100 Days Project, Dips, Condiments and Dressings, Gluten Free, Party Food, Recipes, Snacks

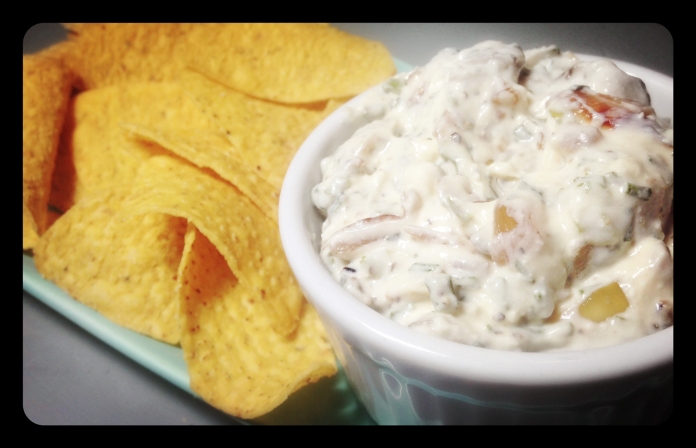
Day 55 – Caramelized Onion & Goat Cheese Dip

Day55

I think onion dip was one of the first thing I ever learned how to make as a kid.

This 1950’s classic onion soup mix and sour cream concoction is essential at American parties, BBQ’s, and picnics and I used to make it for after school snacks when I had friends around.  I was thrilled to find that here in New Zealand they make a similar version, and it is just as common, if not more so, to have onion dip at parties and gatherings. The one main difference is that in New Zealand they use reduced dream instead of sour cream, but the overall flavor is very similar.

When I found this recipe for Caramelized Onion and Goat Cheese Dip, on the Kitchen Simplicity blog, it seemed like a good alternative that used fresh ingredients instead of the typical packaged and processed ones.  The results are very similar tasting, although this recipe has the added subtle goat cheese flavor and a stronger caramelized onion taste, but there is nothing wrong with that as far as I am concerned.  If you are going to eat onion dip , you might as well eat ONION dip.

Caramelized Onion & Goat Cheese Dip

from: Kitchen Simplicity

MAKES: approx. 2 cups

INGREDIENTS

  • 1 tablespoon olive oil
  • 2 cups diced onion (about 2 medium onions)
  • 1 garlic clove, minced
  • salt and pepper, to taste
  • 1 cup sour cream
  • 4 oz. soft goat cheese
  • 1/4 cup finely chopped fresh chives

Heat oil in a pan or skillet over a medium-low heat.  Add the chopped onions and garlic, and season with salt and pepper. Cook the onions down, stirring often, until it caramelizes and turns a deep golden brown. Set the caramelized onion aside to cool slightly.

Meanwhile stir together sour cream and goat cheese, mashing the goat cheese with a fork
to break it up.  I use the Tararua Lite sour cream as it is one of the only vegetarian sour creams you can find in New Zealand (only thr Lite version is vegetarian). Stir in the caramelized onions and garlic addong the fresh chives and more salt and pepper to taste.

Cover and refrigerate at least one hour before serving with corn chips, potato chips, pretzels, fresh bread, or any other party snack. Honesty, you could very easily just lick this off a spoon.

ENJOY!!


Standard
100 Days Project, Dairy Free, Gluten Free, Party Food, Recipes, Side Dish, Snacks, Vegan

Day 42 – Panelle

Day42Mmmm . . . Deep fried chickpea goodness . . .

A friend of mine posted this recipe, from the New York Times, on her Facebook page, and I knew I was going to have to try making it at some point. Panelle is a type of Sicilian street food that is very similar to polenta, which is made of corn meal. Instead, Panelle is made from chickpea flour (Gram flour), which means it has the added benefit for vegetarians of being high in protein. They make a tasty and interesting and healthier alternative to potato fries, and can be used in the same way for a quick, but filling, snack

These “chips” went extremely well with the left over Warm Chickpea & Artichoke Pâté from my Day 41 post of the 100 Days Project challege.

Panelle

from: The New York Times

INGREDIENTS

  • Vegetable or olive oil for greasing and frying
  • 1 cup chickpea flour
  • Salt and freshly ground black pepper
  • 2 tablespoons olive oil
  • 1 lemon, cut into wedges

Grease an 8-by-8 baking dish or a quarter sheet pan with some oil.

Bring 2 cups water to a boil in a small saucepan. Put the chickpea flour in a large bowl, and when the water comes to a boil, gradually add it to the chickpea flour, whisking constantly to prevent lumps. Scrape the mixture into the saucepan you used to boil the water, and sprinkle with salt and pepper.  Bring the chickpea flour mixture up to a boil, stir in 2 tablespoons of olive oil, and then reduce to a gentle simmer. Only continue cooking for about a minute.

Scoop the chickpea mixture onto the baking dish or sheet pan and spread it into an even layer. Let it cool, and cover loosely with parchment or plastic. Refrigerate for at least 30 minutes, or up to 24 hours.

Put at least 15mm or 1/4 inch oil in a large skillet over medium heat.  Cut the chickpea mixture into “French Fries”, about 3 inches long and blot any excess moisture with a paper towel. Working in batches, gently drop them into the hot oil. Cook, rotating them occasionally until they’re golden all over, 3 to 4 minutes. Drain fries on paper towels and immediately sprinkle with salt and lots of pepper. Serve hot, with lemon wedges.

Pour yourself a glass of wine and  . . .

ENJOY!!

Standard
100 Days Project, Dairy Free, Dips, Condiments and Dressings, Gluten Free (with Substitutions), Party Food, Recipes, Vegan

Day 41 – Warm Chickpea & Artichoke Pâté Toasted Baguette Sandwich

Day41

I thought this was just going to be a fancy hummus . . .

I found this recipe for Warm Artichoke and Chickpea Pâté  on the Huffington Post website and thought it would make a good filling for a wintertime sandwich. Much to my surprise and delight, the artichoke pureed with the chickpeas, along with the other spices and herbs, gave the pâté a texture and flavor very different from what I was suspecting. It turned out much creamier, and had a consistency similar to tuna fish salad (if I am remembering tuna fish correctly). In fact, I think this pâté would probably make a great vegetarian tuna melt alternative.

Artichokes are actually the bud of a large flower head before it comes into bloom; once the flower blooms, this bud becomes stingy, coarse, and barely edible. Both the ancient Greeks and Romans ate artichokes, and it is a popular ingredient in Mediterranean cooking. The heart of the artichoke is the softest, the best part to eat, and most often used, but often the outer leaves can be cooked and eaten as well.

For me the surprising ingredient for this recipe was the use of Chinese Five Spice Powder. This mixture of star anise, cloves, chinese cinnamon, sichuan pepper, and fennel seeds is not something I cook with often, and I was unsure how well the flavors would combine with the artichoke. In fact, both fennel and anise are flavors that I do not really like very much, but I figured when it comes to unknown spices,  it is always worth trying a recipe the first time how it is written and you can always change it up a bit later. I am glad I did, because the recipe works very well seasoned with these spices, and it would not normally been something I would have tried.

You can use  this recipe for the chickpea and artichoke pâté on its own, as a topping for crackers, or in a sandwich as I did.  It would be gluten free and vegan without the bread or the cheese I used, and these items can easily be swapped with gluten free or vegan substitutions .

Warm Chickpea & Artichoke Pâté Toasted Baguette Sandwich

adapted from: The Huffinton Post: TASTE

INGREDIENTS

  • 390 gram or 14-ounce cooked chickpeas
  • 200 gram or 7-ounce jar of artichokes packed in sunflower oil or olive oil
  • 1 teaspoon Chinese five spice powder
  • 2 cloves garlic, chopped
  • 3 tablespoons fresh coriander,chopped
  • 3 tablespoons olive oil
  • juice of 1 lemon
  • 1 French baguette , for serving
  • roasted red peppers, sliced for topping
  • parmesan cheese, shaved, for topping
  • lettuce, for topping

Preheat oven to 180 C or 350 F.

Drain the chickpeas and artichokes.

Roast the five spice in a hot, dry pan until fragrant.

Blend all the remaining ingredients to a fine purée. I found this easiest to do with my stick blender directly in an oven proof dish.

Transfer the mixture to an ovenproof dish, if you are not using a stick blender, and then bake for 10 minutes, or until heated through.

Cut a length of baguette to your desired size, and slice it open. Toast baguette in the oven while warming the pâté.

To build the sandwich: Place the lettuce and a thick layer of the warm pâté onto the toasted baguette,  and top with the sliced roasted red peppers and shaved parmesan cheese.

ENJOY!!

Standard
100 Days Project, Gluten Free (with Substitutions), Party Food, Snacks

Day 38 – Crispy Potato & Parmesan Puffs

Day38

Continuing this weekend’s theme of finger-food, tapas, small plate type recipes . . . I present the Crispy Potato & Parmesan Puff.

This recipe, originally from the How Sweet It Is blog, caught my attention because they idea of potato and parmesan cheese combined together into a crispy bite sized treat was just too good to ignore. It was the perfect thing to make on a rainy sunday afternoon, and combined with the Feta & Pesto Stuffed Peppadew Peppers , the Dolmades, a glass of wine, and some bread, these little puffs make a great lunch or dinner to graze your way through while chatting with a friend or two.

The recipe makes about 70 puffs, but it is easy to halve. Honestly though, I do not think 70 of these puffs would be all that hard to get through.

This recipe would be easy to make gluten free by substituting the panko bread crumbs with a gluten free bread crumb alternative.

Crispy Potato & Parmesan Puffs

MAKES: 70 puffs

INGREDIENTS

  • 1 kg or 2 lbs of russet potatoes, peeled and cut into chunks
  • 2 tablespoons milk
  • 3 tablespoons unsalted butter
  • 1 teaspoon salt
  • 1/2 teaspoon pepper
  • 1 cup freshly grated parmesan cheese
  • 2 tablespoons minced green onions/spring onions
  • 2 eggs, lightly beaten
  • 1-2 cups seasoned panko bread crumbs

Add potatoes to a large pot of boiling water and cook until fork tender, about 20 minutes. Drain the potatoes and then mash them with salt, pepper, butter and milk. Then stir in parmesan and onions, then place the mixture in the fridge to cool for 15-20 minutes.

Preheat the oven to 200 C or 400 F. I would recommend using the fan bake setting, if you have one on your oven.

Remove potatoe mixture from the fridge and roll into golf ball sized balls. Dip each potato ball into the beaten egg, then cover in bread crumbs. Place them on a baking sheet about 20mm or 1-2 inches apart, and hit each with a quick spritz of olive oil or cooking spray.

Bake for 12-15 minutes, or until outside is crispy.

Serve them while still warm with a lemon garlic aioli, pesto or other dipping sauce.

ENJOY!!

Standard
100 Days Project, Dairy Free, Gluten Free, Party Food, Recipes, Side Dish, Snacks, Vegan

Day 37 – Dolmades

Day37

Since I started off last night with my Day 36 Feta & Pesto Stuffed Peppadew Peppers post, I decided to keep up the theme for the weekend with recipes for small plate tapas type dishes. Dolmades seemed like the perfect fit!!

Dolmades or Dolma are a stuffed vegetable dish common in the Balkans and surrounding regions of the Middle East. The word Dolma comes from the Turkish for “stuffed thing”. Generally, grape or cabbage leaves are wrapped around a rice based filling, that can be meat or vegetarian, and includes onion, herbs like dill, mint or parsley and spices. While meat Dolma are served warm, vegetarian ones are often served cold or at room temperature. There are numerous variations of ingredients and fillings across the many countries that make a Dolma-like dish.

I first made and had Dolmades as a pre-teen at summer camp. Two kids from every cabin had to help out the kitchen staff with food prep every day. Probably not hard to believe that this was one of my favorite tasks on the chore rotation. I remember one day when we came in, there was a big industrial sized bowl of rice filling and all these grape leaves. I had never thought about eating an actual leaf before (not including lettuce) and thought this was a bit strange. I followed instructions on how to fill and roll the grape leaves into Dolmades, and was pleasantly surprised when it came to dinner time that this strange dish was actually quite yummy!! Although I have eaten Dolmades many times since then, this was probably the last time I tried making them myself until today.

Dolmades

adpated from: Kitchen Classics – Gourmet Vegetarian

MAKES: approx. 40 Dolma

INGREDIENTS

  • 6 spring onion (green onions)
  • 1/2 cup olive oil
  • 3/4 cup long grain rice
  • 15 grams or 1/2 ounce fresh mint
  • 2 tablespoons chopped dill
  • 2/3 cup lemon juice
  • salt and pepper, to taste
  • 1/4 cup currants
  • 1/4 cup sun-dried tomatoes, finely chopped
  • 1/4 cup artichoke hearts, finely chopped
  • 1/4 cup pine nuts, toasted.
  • 235 grams or 8 1/2 ounce packaged pickled grape leaves
  • 2 tablespoons olive oil, extra

Heat the oil in a medium sized sauce pan. Chop the spring onions and add them to the pan, cooking them over a medium heat for only one minute.  Stir in the rice, mint, dill, half the lemon juice, and salt and pepper to taste. Add 1 cup of water and bring to a boil, then reduce heat, cover, and simmer for 20 minutes.

Dry roast the pine nuts until they are toasted and golden brown.

Remove the lid, and fork through the currants, sun-dried tomatoes, artichokes, and toasted pine nuts. Cover with a paper towel, then the lid, and leave to one side to cool.

Gently rinse and separate the grape leave, then pat dry with a paper towel and trim any thick stems off with scissors.

Line the base of a 20cm or 8 inch pot with any torn of misshapen leaves. Choose the larger leaves for filling and sue the smaller ones to patch any gaps.

Place a leaf shiny side down, vein side up,  on a cutting board. Spoon a tablespoon of filling into the center of the leaf.  Bring in the sides, and roll up tightly from the stem end of the leaf. Place seam side down in the base of the leaf lined pot arranging them close together in a single layer.

Pour int he rest of the lemon juice, the extra oil , and enough water to just cover the top of the dolmades. Cover them with an inverted plate and some sort of weight to firmly compress the dolmades and keep them in place while cooking (I had trouble finding something for this, but a tin of canned vegetables might work). Cover with the lid, and bring the liquid up to a boil reducing it to a simmer for 45 minutes. Let them cool and serve at room temperature.

These would make a great side dish to go with my Lebanese Red Lentil Soup.

ENJOY!!

Standard
100 Days Project, Gluten Free, Party Food, Recipes, Snacks

Day 36 – Feta & Pesto Stuffed Peppadew Peppers

Day36

Make your own tapas . . .

I first had feta stuffed Peppadews at a friend’s wedding and I have been hooked on these little sweet and slightly spicy treats ever since, but this is the first time I have ever made them myself. Normally, they can be found in the deli section of the supermarket, where you pay a ridiculous price for the convenience of having someone else stuff a little square of feta into the Peppadew for you because you can not be bothered to take the time and do it yourself.  No more . . . I will henceforth be making my own feta stuffed Peppadews with the Herbivore twist of adding a small dallop of pesto at the bottom of the pepper before stuffing it with feta.

Just like Kleenex or Hoover, Peppadew is actually a brand name for a certain type of sweet piquanté peppers originally grown in South Africa. The pepper is processed for removal of the seeds and reduction of the spiciness of the pepper to more tolerable levels. It is then pickled and bottled. The flavor of a Peppadew is sweet with a slight briney spice.

Feta & Pesto Stuffed Peppadew Peppers

INGREDIENTS

  • 1 bottle Peppadew peppers
  • 1 package feta cheese
  • 1 tub of pesto or make your own fresh

Drain the brine from the jar of peppers.

Cut the feta cheese into small squares.

Using a teaspoon, place a small amount of pesto at the bottom of the Peppadew and then stuff it with the small block of feta. Do not worry of some of the pesto gushes out around the edges. Continue the same process with each pepper until you have finished the bottle, or alternatively run out of either pesto or cheese.

ENJOY!!

Standard
100 Days Project, Dairy Free, Gluten Free, Party Food, Recipes

Day 17 – Dukkah Carrot & Zucchini Bites with Tahini Dressing

Day17

A friend sent me this recipe that she had found on Lady Homemade.

It seems like the perfect Sunday snack or party treat, especially since it fits nicely into the Paleo diet regime that many people seem to be following these days.  First popularized in the mid-1970s by gastroenterologist Walter L. Voegtlin, the Paleo diet is based on the presumed ancient diet of wild plants and animals that our ancestors ate during the Paleolithic era. The contemporary version of this diet consists mainly of fish, grass-fed pasture raised meats, eggs, vegetables, fruit, fungi, roots, and nuts, and excludes grains, legumes, dairy products, refined salt, refined sugar, and processed oils. The idea is based on the premise that modern humans are genetically adapted to the diet of their Paleolithic ancestors and that human genetics have scarcely changed making a similar diet ideal for modern human health and well-being.

Unfortunately, I found this recipe to be lacking in flavor, even the tahini dressing did not help that much. So . . . the version below is my adaptation adding in a few more herbs, spices, and (most importantly) a few more pinches of salt.

Dukkah Carrot & Zucchini Bites with Tahini Dressing

adapted from: Lady Homemade

INGREDIENTS

  • 2 small zucchini (courgette), grated – should be about 2 1/2 cups
  • 2 small carrots, grated – should be about 2 1/2 cups
  • 2 eggs
  • 1 1/2 cups blanched almond meal
  • 2 cloves garlic, crushed
  • pinch of dried chilli flakes or more if you dare
  • pinch of smoked paprika
  • 1 tablespoon fresh chives
  • 2 teaspoons dill
  • 2 teaspoons salt
  • 1 teaspoon pepper
  • 3-4 tablespoon dukkah spice mix, store bought or make your own

for the dipping sauce

  • 2 tablespoons tahini
  • 1 lemon, juice and zest
  • 3-4 tablespoons hot water
  • 1/2 teaspoon salt
  • 1 teaspoon smoked paprika

Heat oven to 180 degrees C.

Grate zucchinis, mix in a good couple of pinches of salt and leave to sit in a colander for at least 30 minutes.

Grate carrots and add to a mixing bowl with the almond meal, garlic, spices (except the dukkah).

One handful at a time, squeeze the grated zucchini to get out as much of the water as possible then add to the carrots.

Add the eggs and mix until thoroughly combined

Shape into little balls and place on a lined oven tray. Once you have made all the balls, sprinkle generously with dukkah.

Bake for 25 to 30 minutes until golden brown. They might give off a little liquid when cooking, this is normal.

To make the dipping sauce, mix tahini and lemon juice in a bowl until combined. Then add tablespoons of warm water
until the desired consistency. Add spices and mix until all ingredients are combined.

ENJOY!!

Standard
100 Days Project, Gluten Free, Party Food, Recipes, Vegan

Day 13 – Smokey Sweet Maple Chickpea Snacks

Day13

Have you ever bought those over priced crunchy flavored chickpea snacks from the natural foods store?

I know I have, because they usually just taste too good and are a quick healthy high protein snack to have around. Realistically though, I figured they should not be too hard to make and decided to see what Google had to say about the idea. I ended up downloading about half a dozen recipes from various sources, which when it came down to it were all pretty much the same except for the choice of spice mixture to use for flavoring the chickpeas. Some versions were sweet, some salty, some curried, and some with herbs, but I tend to like when savory and sweet are used together, which is why this recipe by Jerry James Stone for a Maple Seat Salt variation caught my attention. Another recipe used smoked paprika in the seasoning, and that got my brain thinking that maple, sea salt, and smoked paprika would make a really yummy flavor combination, and it did!!

Overall, they did not turn out quite as I had imagined. The seasoning was great, but the chickpeas themselves mostly either burned, or were too soft in the middle. There were very few on the tray that actually came out as crunchy as the ones you can buy from the store. Even not as crunchy as expected, they still made a great late morning snack, and would go quiet nicely with an after work beer (or 2). I will definitely have to try again experimenting with different flavor combinations, cooking times, and temperatures.

I wonder if roasting the chickpeas and then dehydrating them might be an easier way to go. Does anyone have a food dehydrator I can borrow?

Smokey Sweet Maple Chickpea Snacks

INGREDIENTS

  • 15 Ounces or 425g of cooked Chickpeas
  • 1 Tablespoon real Maple syrup (imitation Maple Syrup does not have the same depth of flavor)
  • ½ Teaspoon Brown Sugar
  • ½ Teaspoon Sea Salt
  • 1/4 Teaspoon  La Chinata Smoked Paprika

Preheat the oven to 180 degrees C.

Strain the chickpeas and rinse them clean.

Place a paper towel on a flat surface and spread the chickpeas on to it so that they are a single layer. Place another towel on top of them, rolling them around, until they are completely dry.

Add the seasonings to the chickpeas, and then place them on a baking sheet lined with parchment paper.

Roast them for about 40 minutes until they are a deep golden brown and very crunchy, making sure to not burn them.

ENJOY!!

Standard
100 Days Project, Dips, Condiments and Dressings, Gluten Free, Party Food, Recipes, Vegan (with substitutions)

Day 10 – White Bean & Pea Shoot Crostini

Day10

Mmmmm . . . Crostini . . .

There is nothing quite like a piece of toasted chrunchy bread topped with an assortment of tasty ingredients. These little nibbles are perfect for a party, an appetiser/entree,  along side of a salad or bowl of soup, or even on their own with a beautiful glass Sauvignon Blanc or other tipple of your choice.

That being said, flavor wise, this probably has not been one of my favorite dishes I have made so far during the 100 Days Project. It tastes nice and full of spring flavors (like lemon and mint), but the inclusion of the raw pea shoots, which I enjoy in salads and sandwiches on their own, did not quite seem to work with the other ingredients.

Th original recipe called for Fava beans, which I could not find in New Zealand this time of year, so maybe the Cannellini Beans I used instead were lacking something to bring the flavors together.

But everyone is different, so if you like the sound of the recipe, give it a try . . . you never know, it could be your new favorite.

You can easily make it gluten free by using a different base for the toppings, and  make it dairy free by leaving off the cheese.

White Bean & Pea Shoot Crostini

adapted from: The Cozy Herbivore

PREP TIME: about 10 minutes
COOKING TIME: about 20 minutes
MAKES: about 24 crostini
INGREDIENTS:

for the bean spread:

  • 1 1/2 pounds or 1 1/4 cups cannellini beans
  • 2 tablespoons extra virgin olive oil
  • 2 ounces pea shoots, roughly chopped
  • 1 bunch or 1/2 cup loosely packed fresh mint, roughly chopped
  • 1 small bunch or 1/4 cup loosely packed fresh flat-leafed parsley, roughly chopped
  • the juice of 2 lemons (about 2 tablespoons)
  • sea salt and freshly cracked pepper, to taste
  • parmesan or manchego cheese, for garnish

for crostini:

  • 1  baguette, cut diagonally into 1/4″ slices
  • 1 clove garlic, roughly smashed
  • 1/4 cup extra virgin olive oil
  • a sprinkle of sea salt and a few cracks of the pepper mill

DIRECTIONS

Prepare the crostini:

Preheat oven to 350 degrees F or 180 degrees C. Lay baguette slices on a couple of baking sheets and rub smashed garlic clove on top of the bread. Lightly brush slices with olive oil and from, and sprinkle with sea salt and freshly cracked pepper.

Place in oven and bake until bread is uniformly a dark golden brown, checking often so the slices don’t burn.  This will take anywhere from 10-20 minutes. Remove slices as they brown and set aside. Crostini can be made up to two days ahead and stored at room temperature in an airtight container.

Prepare the bean spread:

Bring a large pot of salted water to a rolling boil. Add cannellini beans and boil till soft.  Drain and rinse
under cold water. Alternatively you can use a slow cooker to cook the beans, or you can use canned beans if you do not have dried beans around.

Place cooked beans, olive oil, pea shoots, 4. mint, parsley and lemon juice in the bowl of a food processor and pulse until a thick paste is created. (If mixture is super-chunky, drizzle a little more olive oil through the top of the food processor while it’s running until a
smooth consistency is reached.) Season to taste with sea salt & pepper.

The fava paste can be made up to a day ahead and stored in an airtight container in the fridge.

To assemble:

Spread 1 teaspoon of bean paste onto each crostini. Using a vegetable peeler, shave off long, thin slices of manchego or parmesan cheese to garnish.

ENJOY!!

Standard