100 Days Project, Drinks & Cocktails, Gluten Free, Recipes, Vegan (with substitutions)

Day 49 – Earl Gray Hot Chocolate

Day 49

Mmmm . . . there is nothing like curling up with a cup of tea or hot chocolate before bedtime.

That is unless you combine the two!! When I found this recipe for Earl Grey Hot Chocolate on Fisher and Paykel’s  Our Kitchen blog, it was one of those “why haven’t I thought of this before” moments.

I have been in love with tea since I spent time in Australia in 1999-2000, and had some friends who were obsessed with the stuff. I have to admit that one of the highlights of a short trip I took to London in late 2000 was a trip to the main Twinings tea shop. Floor to ceiling shelves full of teas with the lovely aroma of all those tinctures filling the store and pouring out into the busy London street.  I have no idea how people were passing by without coming in for a cup of tea, or at least a brief sniff of the tea perfumed air.

As far as I am concerned adding chocolate to tea, can only be a winning combination. The Earl Grey gave the hot chocolate just that slight earthy, herby flavor and made a delicious night cap.

This recipe can easily be made vegan by using soy, almond, or other non-dairy milk of your choice.

If you are feeling a bit naughty, a shot of vanilla liquor, Frangelico, Baileys, or even a good quality whiskey would probably go quite nicely.

Earl Gray Hot Chocolate

SERVES: 2 small cups or one large cup (my preference)

INGREDIENTS

  • 1 ½ cups milk
  • 1 ½ tsp earl grey tea
  • 4 squares of dark chocolate, or to taste

Combine the milk and tea in a saucepan and gently heat without boiling. Continue heating for approximately 10 minutes. The milk will take on a light tea colour.

Place 2 squares of chocolate into a heatproof glass; you could always put an extra one in. Pour the milk over the chocolate using a tea strainer to remove the tea leaves. Stir the the chocolate into the milk, and serve while still warm.

ENJOY!!

Standard
100 Days Project, Dairy Free, Gluten Free, Recipes, Soups, Vegan (with substitutions)

Day 47 – Risi E Bisi


Day47

Risi e Bisi in Italian literally translates to rice and peas.

This is a classic Venetian (Venice, Italy) dish that was prepared only on the feast days decreed by the Doge (Venice’s ruler). These days this law no longer applies and you are allowed to prepare Risi e Bisi at any time, although it is best when fresh peas are available. Even though this recipe uses Aborio rice, which typically is used for Risotto, Risi e Bisi is more like a soup.

I found this soup recipe in a collection from The Moosewood Restaurant, in Ithaca, New York. The Moosewood, was one of the first fully vegetarian restaurants opened in the United States in the early 1970s, and it has been named one of the thirteen most influential restaurants of the 20th century by Bon Appetit magazine. The Moosewood Collective was  also one of the first to publish a vegetarian cookbook for home use. “The Moosewood Cookbook” is a recipe book written by Mollie Katzen in 1977. It was hand-lettered, imaginatively illustrated by Katzen,  featured a number of the recipes favored by the restaurant at the time, and quickly became a “must have” in many American homes. Recently, “The Moosewood Cookbook” was listed by the New York Times as one of the top ten bestselling cookbooks of all time, and is likely the most popular vegetarian cookbook in the world. Both “The Enchanted Broccoli Forest” and “The Vegetable Dishes I Can’t Live Without” are cookbooks written by Katzen that can be considered Sequels to “The Moosewood Cookbook”. When I lived in Rochester, NY for University, I often made the 1 1/2 road trip to Ithaca just to eat at The Moosewood. I do not think any project about vegetarian food would be complete without including at least one of their recipes.

This recipe is incredibly simple and delicious; I could not stop myself from eating two large bowls for lunch. It is gluten free and can easily be made dairy free and vegan by substituting the butter, and leaving out the Parmesan.

Risi E Bisi

SERVES: 4-6

INGREDIENTS

  • 1 tablespoon butter (or Vegan alternative)
  • 1 tablespoon extra virgin olive oil
  • 1 large onion, chopped
  • 8 cups “Mock Chicken Stock” (I used a 1/2 and 1/3 combo of mushroom stock and vegetable stock”
  • 1 teaspoon salt
  • 1 cup raw arborio rice
  • 2 cups baby peas fresh or frozen
  • 2 tablespoons fresh parsley, chopped
  • 1 cup parmesan cheese, grated
  • salt and pepper to taste

Warm the butter and olive oil in a medium pot until the butter has completely melted.

Add the onions and sauté on medium-high heat for about 10 minutes. The add the stock and salt and turn up the heat to high bringing the stock to a boil. Stir in the rice, and lower the temperature to a simmer, cover, and cook for 20 to 20 minutes, until the rice is tender.

Add the peas and cook for another 2 to 3minutes before stirring in 1/2 cup of the parmesan cheese and the parsley. Add additional salt and pepper to taste.

Serve immediately, topped with remaining parmesan.

ENJOY!!


Standard
100 Days Project, Dairy Free, Desert, Gluten Free, Recipes, Uncategorized, Vegan (with substitutions)

Day 45 – Baked Apples Stuffed with Candied Ginger and Almonds

Day45

Baked apples make me think of Grandma and Grandpa Mills . . .

Growing up, we had dinner with my grandparents every Sunday. There was a cafeteria style restaurant they liked to go to, and everyone’s favorite from the desert bar was the baked apple. Those baked apples were not nearly as fancy as this Baked Apple Stuffed with Candied Ginger and Almonds recipe from Jerry James Stone and Treehugger’s Green Wine Guide, but it still makes those memories float to the surface.

I had a friend over last night for a Sunday night game of intense competitive Scrabble, which was a game I always played with with my Grandmother as well. Maybe that is why this recipe seemed like the perfect fit. Unfortunately, I got a bit distracted when reducing the syrup and it turned into more of a caramel that almost candied the baked apples, but it was still quite delicious, and I supplemented it with warm maple syrup to make sure the apple was not too dry.

I served the the baked apples with maple walnut ice cream and a small glass of port. The three made quite a good winter desert combination and an excellent Scrabble treat!!

You can easily substitute the honey for another unrefined sweetener for Vegan alternative . . .

Baked Apples Stuffed with Candied Ginger and Almonds

MAKES: 4- 6 Apples, depending on the size of your apples

INGREDIENTS

  • 4- 6 large apples (Rome or Braeburn)
  • 1/3 cup candied ginger, chopped
  • 3/4 cup almonds, toasted and chopped
  • 1/4 cup brown sugar, packed
  • 1/2 teaspoon vanilla extract
  • 2 tablespoons honey
  • 1 1/2 teaspoons lemon zest
  • 1 teaspoon cinnamon
  • 1/2 teaspoon ground clove
  • Water, for the baking dish

Preheat oven to 350 degrees.

Combine brown sugar, vanilla and honey and mix well. Then mix in the ginger, almonds, cinnamon, clove and lemon zest, and set to one side.

Core each apple; be careful to remove all of the stem and seeds. If need be, trim the apple bottoms so that they sit steadily on a flat surface. Place the apples upright in a baking dish, and spoon the filling into hollow of each apple .

Fill the baking dish with enough water to form a 20 mm or 1/2-inch pool around the apples.

Bake for 1 hour and 15 minutes or until the apples are tender.

Transfer the apples to a serving plate with a spatula.

Pour the reaming liquid from the baking dish into a small saucepan, and cook over a medium-high heat until it becomes syrupy, about 15 minutes. This is where you need to make sure not to reduce it too long that it becomes a caramel. Drizzle the syrup over the top of each apple, and sprinkle some additional almonds and candied ginger on top.

ENJOY!!

Standard
Gluten Free, Raw, Recipes, Salads, Vegan (with substitutions)

Antipasto Salad

Antipasti Salad

I love antipasti plates!!

Antipasto means “before the meal” and is the first course of a formal Italian dinner. Now, I know traditional antipasti plates have cured meats on them as well, but personally I say “who needs it” when you have all sorts of yummy pickled and marinated vegetables with different kinds of cheeses thrown in for good measure. The contents of a traditional Italian antipasto vary greatly according to regional cuisine, and this salad is something you can easily vary according to your own tastes..

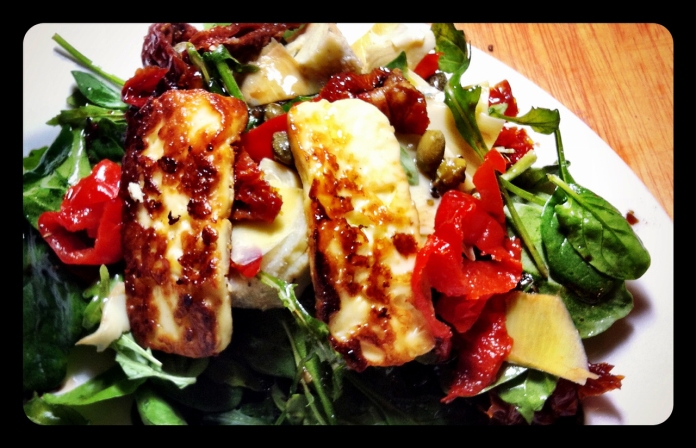
This Antipasto Salad is something I threw together to go with an Italian dinner I was making years ago, and have continued making it ever since. I do not think I have ever made it exactly the same way twice; there is plenty of room for your own experimentation, but the basic idea is always the same.  In this version I used a combination of spinach, rocket (arugula), and fresh basil leaves as the greens, with artichokes, sun dried tomatoes, capers, peppadew peppers, and pan fried haloumi on top, but marinated mushrooms, cocktail onions, olives, roasted red peppers, pepperoncinis, marinated garlic,  fresh mozzerella, parmesan, feta or numerous other marinated or pickled vegetables and fresh cheeses are all other options.

None of the measurements below are exact, it all depends how much of  the different ingredients you want to add to your salad. This salad can be made vegan, by leaving off the cheese and it still has plenty of flavor.

Antipasto Salad

SERVES: 4

INGREDIENTS

  • 1 bag of baby spinach
  • 1/2 a bag of rocket (arugula)
  • a large handful of fresh basil leaves
  • 2 -3 marinated artichoke hearts, chopped
  • 1/2 cup sundried tomatoes, chopped
  • 1/2 cup peppadew peppers, chopped
  • 1/4 cup capers
  • 1 packet haloumi
  • olive oil

for the dressing

  • 1/2 cup good quality olive oil
  • 1/4 cup balsamic vinegar
  • 1 tablespoon dried mixed italian herbs
  • pinch of dried chili flakes
  • salt and pepper to taste

Mix your greens together in a large bowl.

Roughly chop your marinated and pickled vegetables, and add them into the bowl along with the capers.

Add your cheese and dressing on top of the salad.

If using haloumi: On a medium high temperature, heat enough olive oil to cover the bottom of the pan. Cut the haloumi into 5mm or 1/8 inch slices and add them to the pan, once the oil has been heated. Let the cheese brown on each side for about 2-3 minutes. If your haloumi looks like it is starting to melt, you probably have your heat too high.Let the cheese cool slightly but add to the salad and serve still warm.

For the dressing: Mix all the ingredients in a small bowl with a whisk or fork until they looked combined.

ENJOY!!

Standard
100 Days Project, Gluten Free, Recipes, Salads, Vegan (with substitutions)

Day 34 – Roasted Shallot, Beetroot, & Lentil Salad

Day34

With all the heavy carbs I have been making lately, I felt like something simple green and leafy for dinner tonight.

Winter is always a good time for roasted vegetables, and combined with the fresh baby spinach and a tangy mustard based dressing this recipe for Roasted Shallot, Beetroot, and Lentil Salad, from the Hub-UK website, was exactly the kind of meal I was craving.

I have found many people do not know what a shallot is. This vegetable belongs to the same family as onions and garlic, and is thought to have originated in Central or Southeast Asia. Like garlic, shallots form in clusters with a head composed of multiple cloves. Shallots are used in many different cuisines from around the world. They taste somewhat similar to an onion, but have a milder flavour.

You can easily make this recipe Dairy Free  and Vegan by leaving off the cheese.

Roasted Shallot, Beetroot, & Lentil Salad

adapted from: Hub-UK

SERVES: 4

INGREDIENTS

  • 12 shallots, peeled (If large, cut in half)
  • 2 tablespoon rapeseed or olive oil
  • Sea salt and freshly ground black pepper
  • 250 grams or 9 ounces of beetroot, cooked
  • 1 tablespoons honey
  • 225 grams or 8 ounces cooked puy lentils
  • 150 grams or 6 ounces baby spinach leaves, washed and well drained
  • 200 grams or 7 ounces soft goat’s cheese

For the dressing:

  • 1 clove garlic, peeled and finely chopped
  • 1 tablespoon of chopped chives
  • 5 tablespoon rape seed or olive oil
  • 2 teaspoons Dijon mustard
  • 2 teaspoons cider vinegar
  • Sea salt and freshly ground black pepper

Preheat oven to 190°C or 375°F

Put puy lentils into a medium pot of boiling water and cook until done. Drain the lentils and rinse under water and place in a bowl.

If using fresh beetroot, chop into large pieces and put into a pot of boiling water. Cook for about 10 minutes or until the beetroot is mostly cooked.

Put the shallots into a roasting tin, drizzle with the 2 tablespoons of oil, toss well and season with sea salt and black pepper.  Place roasting tin in the oven for 15 minutes, then add the beetroot and drizzle with honey and toss well with the shallots. If using solid honey, put it in the microwave first for about 20 seconds to make the honey runny and easier to coat the vegetables.  Roast for a further 10 minutes, or until the shallots are soft.

To make the dressing, mix all of the dressing ingredients together and season with sea salt and black pepper.

When they are ready remove the shallots and beetroot from the oven and mix with the lentils and half the dressing while still warm and leave to cool.

To serve: Place  a large handful of spinach leaves onto a plate, top with the shallots, beetroot and lentils. Crumble the goat’s cheese on top, and drizzle with some of the remaining dressing.  You can serve this on its own, or with a hunk of crusty bread and a glass of medium bodied red wine.

ENJOY!!

Standard
Baking, Breads, Dairy Free, Vegan (with substitutions)

New York Style Bagels

Bagels

Today is Bagel Day at my flat!!

Honestly, it’s very difficult to find a proper bagel in New Zealand . . . I am sorry Kiwis, but a bread roll with a hole in the center just does not count!! A few years ago, I was rescued from this bagel wasteland by my friend Stephen, who had a bagel recipe from his sister, who lives in New York, and she originally got the recipe from a Rabbi’s wife. Now that has to be a good bagel recipe!!

Ever since then, Bagel Day was born . . . which just means that a few times a year I spend a Sunday morning making bagels and inviting people around for an afternoon of bagel indulgence. I have been told it is a life changing experience for most of my Kiwi friends.

Bagels were invented by the Jewish population of Kraków, Poland in the early 1600’s.  It is believed that bagels were the Jewish version of the obwarzanek, a lean bread of wheat flour designed for Lent.  Since then, the bagel became a staple of the Polish diet, as well as the diets of people in neighboring countries.  The name may have originated from an old spelling of the Polish word for bow, because traditional handmade bagels are not circles but slightly stirrup-shaped instead.  In the Brick Lane district and surrounding areas of London, England, bagels have been sold since the middle of the 19th century, and bagels were brought to the United States by immigrant Polish-Jews.  Father and son, Harry and Murray Lender, helped to popularize the bagel throughout North America in the 1960s by pioneering automated production and the distribution of frozen pre-sliced bagels.

The thing most people miss when making bagels, is that bagels should be briefly  boiled before they are baked. This gives the dough a thin skin, that when baked, becomes a crunchy outer shell for the soft bagel center. It does take a good chunk of time to go through all the steps of making your own bagels, but it makes a great social activity to do with kids or friends, and you wind up with a warm yummy treat.

The main problem with Bagel Day is I always end up eating way too many fresh out of the oven bagels and spend the rest of the Sunday in a bagel coma on the couch. Just remember . . . you have been warned!!

This recipe can easily be made Vegan by using an egg replacer.

New York Style Bagels

MAKES: between 20 – 40 bagels, depending on how big you make your bagel shapes (the recipe can be easily halved)

INGREDIENTS

  • 12 cups flour
  • 2 eggs
  • 2 tablespoons oil
  • 4 cups luke-warm water
  • 1 packet or 6 teaspoons dried yeast
  • 4 teaspoons salt
  • 1/4 cup sugar

Combine sugar, salt, oil, half of the flour, all liquid, yeast and eggs in a large bowl and mix with wooden spoon until smooth. Cover with tea towel and leave in a warm place for 30-45 mins until risen and bubbly. If you do not have a hot water cupboard or similar suitable warm place, then briefly turn on your oven to its maximum temperature and then turn off again. This will create a perfectly warm environment for your dough to rise in.

Beat in remaining flour and knead until smooth and elastic. Put dough into floured bowl, sprinkle a little flour on top, cover with towel and return to the warm place for 1 to 1.5 hours. If using your oven, you may want to turn it on briefly again, but remember to turn it off again. The dough should double in bulk.

Punch dough down and form your bagel shapes. The easiest way to do this is to take a round ball of dough, slightly larger then a golf ball, and pinch it in the center with your thumb and second finger. Insert the first finger of both hands into the hole created by the pinch, and twirl fingers in a circular motion smoothly expending the hole. Make the hole a little larger than you will need, as it will start to close up when the dough rises.  Try to make the surface of your bagel shapes as smooth as possible.

Place bagel shapes on a floured bench space, cover, and leave for 15 minutes to rest and rise slightly.

Now, heat your oven to 220 C or 425 F.

Drop bagels into a pot of slowly boiling salted water one at a time. Leave for about 30 seconds on each side (the longer you boil the bagels the thicker the skin will be). Remove bagel shapes from the pot and place onto oiled baking trays.

Sprinkle on your choice of toppings: garlic, onion, sea salt, rosemary, sesame seeds, poppy seeds, cinnamon and sugar, pepper, caraway seeds are just some suggestions. This is where you can be creative and experiment with topping combinations and flavors.

Bake for about 20 minutes or until brown.

Cool them on a rack or threaded on a wooden spoon handle to prevent sogginess.

Eat them as soon as they are cool enough to hold in your hand. My preference is slathered with a “shmear” of Philadelphia brand cream cheese, but you can get just as creative with your condiments and bagel sandwich making as you can with the toppings themselves.

Make sure to eat them while fresh, within 12 hours, the crust will have gone soft, and the texture from cakey to rubbery.

ENJOY!!

Standard
100 Days Project, Baking, Breads, Dairy Free, Gluten Free, Vegan (with substitutions)

Day 31 – The Gluten Free Bagel Experiment

day31

Today was Bagel Day at my flat . . .

Since moving to New Zealand 7 years ago, I started making my own bagels and sharing them with friends because it is almost impossible to find a decent bagel in this country, but my gluten-free friends have always had to miss out on Bagel Day.  So . . . This time I decided to try and make gluten free bagels, as well as gluten-full bagels for Bagel Day.

Doing research online, I came up with quite a few gluten free bread recipes that I thought might make a decent bagel. The recipe I decided to go with was a gluten free pizza dough recipe from Karina: The Gluten Free Goddess. My thought process being that pizza crust should have the closest consistency to bagels.

Now proper American, New York style bagels are boiled, and then baked, which is what gives you that lovely crunchy shell around the soft inner bagel. Unfortunately most gluten free bread doughs are more like muffin or cake batter than they are typical bread dough. I knew the dough would not have enough elasticity to hold the bagel shape on its own, and unfortunately I definitely would not be able to boil them.  I came up with the solution of using a doughnut pan to create the round bagel shape with the gluten free dough. I also used the fan bake function of my oven, which will cook the outside quicker than the inside giving you a crispier outer shell to your gluten free bagels.

The most important part of any bagel making is the toppings. This is also the fun part where you can get a bit creative. From right to left in the picture above I used garlic and onion and sesame, cinnamon and sugar, sesame and sea salt, smoked paprika and sea salt (my favorite), onion and caraway seeds, and garlic and sea salt. If you think something might taste good on a bagel  . . . give it a try!!

Overall, these were not quite the same texture as normal bagels, but they were quite yummy and I think the idea is worth further experimentation.  My gluten free friends certainly seemed quite happy tucking into their bagel-like treats.

This recipe can easily be made vegan by using an egg replacer.

If you are not concerned about gluten . . . click here for my New York Style Bagel recipe.

Gluten Free Bagels

adapted from: The Gluten Free Goddess

MAKES: 12 bagels

INGREDIENTS

  • 2 cups tapioca flour/starch
  • 1 cup sorghum flour
  • 1/2 cup brown rice flour
  • 1/2 cup GF millet flour
  • 3 teaspoons baking powder
  • 2 teaspoons xantham gum
  • 1 teaspoon fine sea salt
  • 3 tablespoons organic light brown sugar
  • 1 1/4 cup warm water (between 110 – 115ºF)
  • 1 teaspoon organic light brown sugar
  • 1 packet active dry yeast
  • 1/4 cup good olive oil
  • 1/4 cup beaten organic free-range egg whites
  • 1/4 teaspoon light tasting rice vinegar

Preheat the oven to 400 F or 200 C, using the fan bake setting if you have one.

Brush the pockets of the doughnut pan with olive oil and set aside.

In a large mixing bowl, whisk together the flours and dry ingredients.

Proof the yeast in 1 cup warm water with a pinch of sugar. Once the yeast has gotten puffy, add the proofed yeast to the dry ingredients.

Add the oil, eggs and vinegar, and beat the dough until smooth and sticky. The dough should be more like cake or muffin batter than typical bread dough.

Spoon the dough into the pockets of the doughnut pan. Wet your fingers with warm water, and smooth the surface of the bagels.  Then set the pan in a warm spot to rest and rise a bit- about 15 minutes.

Brush the tops of the bagels with olive oil, and add you choice of yummy toppings.

Bake for 10 – 15 minutes till golden.

Eating while still warm, preferably slathered with cream cheese, is always best.

ENJOY!!

Standard
100 Days Project, Dairy Free, Gluten Free (with Substitutions), Mains, Recipes, Uncategorized, Vegan (with substitutions)

Day 28 – Spiced Eggplant with Herbed Bulgur Salad

day28

Since the last two days have been quick and simple recipes, I figured I would do something a bit fancier for today’s post.

Are you ever in a Doctor’s office or coffee shop flipping through the magazines and come across that amazing looking recipe you want to take home to try? So you very sneakily and quietly, trying not to attract the receptionist’s or cafe staff’s attention, rip the recipe out of the magazine and quickly stuff it into whatever bag or purse you have with you. I know I have done this countless times over the years since I have started being interested in cooking as a teenager. It always leaves me feeling a bit guilty . . . but thank goodness for technology and camera phones; I no longer have this guilt. Now I simply pull my iPhone out a take a picture of whatever amazing looking recipe has caught my attention. This recipe for Spiced Eggplant with Herbed Bulgur Salad, found in January 2012 issue of Bon Appetit magazine, is was one of these recipes that I snapped with my iPhone.

Eggplants are a vegetable that is native to the Indian Subcontinent, has been cultivated in southern and eastern Asia, and the first known written record is found in an ancient Chinese agricultural treatise. It is believed that the eggplant was introduced throughout the Mediterranean by the Arabs in the early Middle Ages. The raw flesh of the eggplant can have a somewhat bitter taste, but becomes tender when cooked and develops a rich, complex flavor. Many recipes advise salting, rinsing and draining  eggplants to soften it and to reduce the amount of fat absorbed during cooking, but mainly to remove the bitterness that it can have. The flesh is capable of absorbing large amounts of cooking fats and sauces, making for very rich dishes, but salting reduces the amount of oil absorbed. Due to its texture and bulk, eggplant makes a great  meat substitute in vegan and vegetarian cuisine.

Bulgur is a whole grain, usually sold parboiled and dried, that has a light nutty flavor and is a common ingredient in Armenian, Assyrian, Lebanese, Turkish, Middle Eastern, and Mediterranean dishes.  Bulgur can be used in pilafs, soups, bakery goods, salads, or as stuffing. Its high nutritional value makes it a good substitute for rice or couscous.

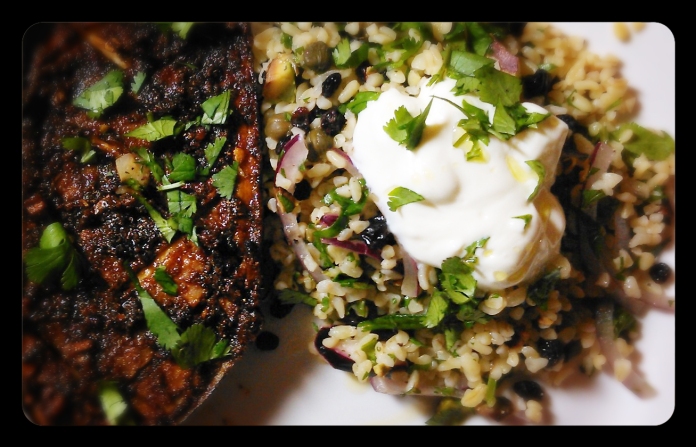
I was looking forward to making this dish because of the interesting spice mixture that is brushed on the eggplants before they are roasted, and the combination of sweet, savory, and crunchy ingredients that are mixed through the bulgur salad, and this recipe definitely delivered on the promise of great flavor and spice.

This dish can easily be made dairy free and vegan by leaving off the yogurt, and the bulgur can be substituted with quinoa to make it gluten free.

Spiced Eggplant with Herbed Bulgur Salad

from: Bon Apetit, January 2012

INGREDIENTS

  • 1/2 cup olive oil, divided, plus more for drizzling
  • 2 tablespoons preserved lemon peel, finely chopped
  • 2 garlic cloves, smashed
  • 2 teaspoons ground cumin
  • 1 teaspoon ground coriander
  • 1 teaspoon paprika
  • 3/4 teaspoon ground cinnamon
  • 1/2 teaspoon crushed red pepper flakes
  • 1/2 teaspoon sea salt
  • 2 medium eggplants (9-10 ounces each), halved lengthwise
  • 1 cup quick cooking bulgur
  • 1/2 cup pitted green olives or capers
  • 1/2 small red onion, thinly sliced
  • 1/3 cup currants
  • 1/2 cup flat-leaf parsley, chopped
  • 1/3 cup fresh coriander, chopped, plus more for garnish
  • 1/4 cup pistachios, toasted and lightly crushed
  • 2 tablespoons fresh lemon juice
  • freshly ground black pepper
  • 1 cup Greek style yogurt

Preheat ovem to 350 degrees F or 180 degrees C

In a small bowl, combine 1/4 cup oil, the next seven ingredients, and 1/2 teaspoon salt.

Score the flesh of each eggplant half with 15mmor 1/2 inch deep diagonal crisscrossing lines, spacing 40mm or 1 inch apart (do not cut through the skin). Drizzle 1 tablespoon oil over each cut side, allowing it to soak in. Season lightly with salt. Brush or spoon spice mix on each half diving it equally. Place eggplants, cut side up on a rimmed baking sheet and roast until soft ( about 50 – 60 min).

While eggplant is cooking, place bulgur in a large bowl and cover with 1 1/2 cups boiling water. Let soak for 45 minutes to soften and absorb water. Stir in olives or capers, onion, currants, parsley, 1/2 cup coriander, pistachios, and lemon juice. Season to taste with salt and pepper, and then let sit for at least 30 minutes for flavors to meld.

Serve at room temperature, with a dallop of greek yogurt on top of the bulgur salad and coriander to garnish.

ENJOY!!

Standard
100 Days Project, Recipes, Side Dish, Vegan (with substitutions)

Day 27 – Crumbed Asparagus

day27

Another busy day needs another quick, simple, and yummy recipe . . .

This recipe for Crumbed Asparagus, by The Cozy Herbivore, seemed to be the perfect side dish for the left over Creamy Pearl Barley & Porcini Mushroom Risotto from my Day 25 post. It has lovely flavors of lemon, honey, garlic, and chive added into the freshness of the roast asparagus, and the crunchiness of the panko bread crumb is one of the best parts of the dish.

Asparagus has been eaten as a vegetable and used as a medicine, since ancient times.  It was known in Syria and in Spain, and Greeks and Romans ate it fresh when in season and dried it for eating during the winter.  A recipe for cooking asparagus is in the oldest surviving book of recipes, and the ancient Greek physicians used asparagus as a beneficial herb during the second century AD. By 1469, asparagus was cultivated in French monasteries, and asparagus became available to the New World around 1850.  Because once the buds start to open, the shoots will turn “woody”, only young asparagus shoots tend to be eaten.  Asparagus is low in calories, very low in sodium, and is a good source of many other vitamins and minerals.

I know winter in New Zealand is not asparagus season, so I am being a bit naughty, but this dish was worth the ridiculous amount I paid for the asparagus at the food store.

The recipe can easily be made gluten free by substitutng the bread crumbs for gluten free bread crumbs, and can be made Vegan by substituting the honey for agave nectar or brown rice syrup, and leaving out the parmesan.

Crumbed Asparagus

adapted from: The Cozy Herbivore

MAKES: 2-3 servings

INGREDIENTS

for the asparagus:

  • 1 pound fresh asparagus
  • 1 medium lemon
  • 1 teaspoon honey
  • 1 tablespoon extra-virgin olive oil
  • 1/2 teaspoon dried garlic granules
  • sea salt & freshly cracked pepper, to taste

for the crumb topping:

  • 1 cup bread crumbs
  • 1/4 cup finely shredded parmesan cheese
  • 1 tablespoon finely minced fresh flat-leafed parsley
  • 1 teaspoon finely minced fresh chives
  • 2 tablespoons extra-virgin olive oil
  • sea salt & freshly cracked pepper, to taste

Preheat oven to 400 degrees Fahrenheit.

Trim asparagus spears by snapping off woody ends. The asparagus will break naturally between the fresh stalk and the tough end. Discard the ends.

Juice and zest lemon. Finely mince lemon zest and set aside to use in crumb topping.

In a small bowl whisk together lemon juice, honey, garlic granules and olive oil.  Add a pinch of sea salt & a few cracks of pepper. Taste and adjust seasonings accordingly.

Toss trimmed asparagus spears in lemon juice mixture. Arrange coated spears in a single layer in a casserole dish, and pour remaining lemon juice mixture over.

Bake until just tender, about 10 minutes. They should feel slightly soft and be easily pierced with a fork without being mushy.

While the asparagus is roasting, prepare crumb topping. In a large bowl, combine bread crumbs, cheese, minced herbs, olive oil and 1 teaspoon of the finely minced lemon zest. Using freshly washed hands, toss the mixture together until combined. Add a generous pinch of sea salt & a few cracks of pepper. Taste
and adjust seasonings accordingly.

When asparagus is done roasting, pour bread crumb mixture over and place under the broiler of your oven for one minute, or until browned and toasty. This can very quickly turn from brown to burned so keep a careful watch and do not walk away.

When the crumb has browned, take the baking dish out of the oven and serve,

ENJOY!!

Standard
100 Days Project, Dairy Free, Raw, Recipes, Snacks, Vegan (with substitutions)

Day 26 – No Bake Granola Bars

Photo1(32)

On to Day 26, Herbivores . . .

Today was a busy day, did not have time to grab breakfast, and got home late. These kind of days are where quick snacks come in handy, and quick recipes. I had seen this recipe for easy No Bake Granola Bars on Food52, and figured I would keep it around for one of these short on time days during the 100 Days Project.

All these ingredients are items I normally keep in my pantry, and I think most people will probably have around. I used rolled oats, sunflower seeds, pumpkin seeds, raisins, and dried cranberries, but there are infinite various on this combination. You can easily tailor the recipe to suit your personal tastes. Some other suggestions might be chocolate chips, dried pineapple, cashews, almonds, coconut, or dried cherries, and these granola bars could easily be made gluten free by using puffed millet and other gluten free cereals instead of oats. This recipe can also be made Vegan by substituting the honey with agave nectar or brown rice syrup. Personally I love honey though, I think honey is one of the main reasons I am not Vegan. Well . . . honey and cheese.

No Bake Granola Bars

From: Food52

MAKES:10-12

INGREDIENTS

  • 2 1/2 cups rolled or quick oats
  • 1/2 cup raw pumpkin seeds
  • 1/2 cup raw sunflower seeds
  • 1/2 cup raisins
  • 1/2 cup dried cranberries
  • 2/3 cups peanut or almond butter
  • 2/3 cup honey (adjust based on how well things stick together)
  • 1/8 teaspoon sea salt (adjust based on which nut butter you use)

Mix oats,  seeds, and fruit in a large bowl

I a small bowl, whisk together nut butter, sweetener, and sea salt. I used a half and half combination of Pics Peanut butter and Almond butter, mostly because I did not have enough peanut butter on its own, but also because I thought it would give an interesting taste.  If you are in New Zealand, where it is easier to find solid honey than liquid honey, put the solid honey in the microwave for 30 seconds to loosen it up before trying to whisk it into the peanut butter.
Pour into oat mixture, and mix well, till everything is sticky and combined. If it’s too dry, add a bit more honey.
Press mixture into a shallow baking dish that you’ve lined with foil, saran wrap, or baking paper. Cover with more foil/saran, press well into the baking dish (Iused the bottom on another baking dish for this in order to make sure the pressure was flat and even), and refrigerate for 4 hours.
Cut into bar shapes, wrap, and keep refridgerated till ready to use. They will last two weeks in the fridge.
ENJOY!!
Standard