100 Days Project, Dairy Free, Dips, Condiments and Dressings, Gluten Free, Recipes, Vegan

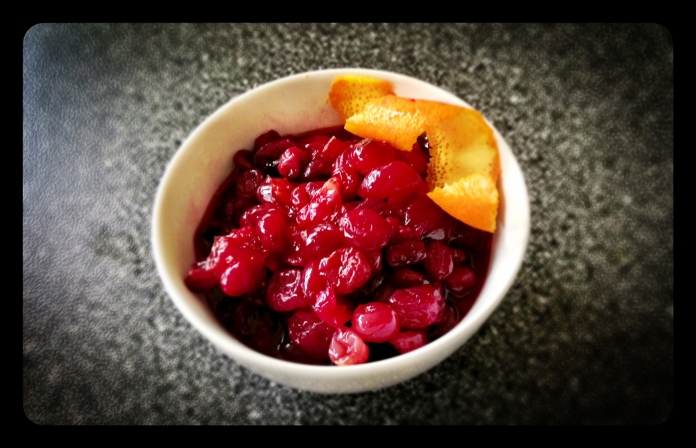
Day 56 – Boozy Baked Cranberry Sauce

Day56

Cranberry sauce is always one of my favorite parts of the Thanksgiving meal.

I think as a young future vegetarian, who did not like turkey very much, Cranberry sauce was one of the things I looked forward to the most. Typically it was just the jellied wobbly canned stuff that comes out with the ridges imprinted in the sides, but cranberry sauce was one of the special foods that may family only ate at Thanksgiving, which made it seem that much more fantastic. Now I am older, and prefer to make food from scratch and use as little processed and preserved ingredients as possible, so when I found this recipe from Jerry James Stone, the idea of making my own Cranberry sauce caught my attention. Especially if you are adding a little booze.

Although, I have a feeling “Boozy” might be a bit of a misnomer here, as I suspect most the alcohol will bake off, but it will still leave behind that lovely residue of sugar and will have helped macerate the cranberries. Maceration is a process in food preparation that uses liquids (often alcohol ) to soften or break up tough ingredients like raw, dried, preserved, or fresh fruit and vegetables and help them release their own juices adding to the flavor and making the ingredient easier to chew and digest.

I am making this cranberry sauce as a test for this year’s Thanksgiving. I am heading home to The States to be at my family Thanksgiving for the first time time since I moved to New Zealand 7 years ago.   Looking forward to seeing my family and helping to cook up vegetarian treats to add to the Thanksgiving table.

Boozy Baked Cranberry Sauce

adapted from: Jerry James Stone

INGREDIENTS

  • 340 grams or 12 ounces fresh or frozen cranberries
  • ½ cup liquid honey
  • 2 Large Oranges
  • 1 Shot Triple Sec, Gran Marnier, Cointreau or other orange flavored liqueur (a vanilla liqueur could possible work quite nicely as well).

Half the oranges. Then in a large mixing bowl add the honey and juice the orange halves. If you are using solid honey, pop it in the microwave for 30 seconds to a minute to help liquify the honey.

Add the liqueur and whisk together the juice and honey mixture so that the honey is mostly dissolved into the juice.

Add in the cranberries and gently mix so they are lightly coated. Then place the cranberries in a baking dish or on a shallow cookie sheet and bake for 40 min on 180 C or 350 F. They are ready when the cranberries have wilted, cracked, and broken open.

You can chill them and serve them later but they are best hot and gooey. Also if you prefer a saucier texture you can roughly pulse the baked cranberries in a blender with some of the left over juice.

ENJOY!!

Standard
100 Days Project, Dairy Free, Desert, Gluten Free, Recipes, Uncategorized, Vegan (with substitutions)

Day 45 – Baked Apples Stuffed with Candied Ginger and Almonds

Day45

Baked apples make me think of Grandma and Grandpa Mills . . .

Growing up, we had dinner with my grandparents every Sunday. There was a cafeteria style restaurant they liked to go to, and everyone’s favorite from the desert bar was the baked apple. Those baked apples were not nearly as fancy as this Baked Apple Stuffed with Candied Ginger and Almonds recipe from Jerry James Stone and Treehugger’s Green Wine Guide, but it still makes those memories float to the surface.

I had a friend over last night for a Sunday night game of intense competitive Scrabble, which was a game I always played with with my Grandmother as well. Maybe that is why this recipe seemed like the perfect fit. Unfortunately, I got a bit distracted when reducing the syrup and it turned into more of a caramel that almost candied the baked apples, but it was still quite delicious, and I supplemented it with warm maple syrup to make sure the apple was not too dry.

I served the the baked apples with maple walnut ice cream and a small glass of port. The three made quite a good winter desert combination and an excellent Scrabble treat!!

You can easily substitute the honey for another unrefined sweetener for Vegan alternative . . .

Baked Apples Stuffed with Candied Ginger and Almonds

MAKES: 4- 6 Apples, depending on the size of your apples

INGREDIENTS

  • 4- 6 large apples (Rome or Braeburn)
  • 1/3 cup candied ginger, chopped
  • 3/4 cup almonds, toasted and chopped
  • 1/4 cup brown sugar, packed
  • 1/2 teaspoon vanilla extract
  • 2 tablespoons honey
  • 1 1/2 teaspoons lemon zest
  • 1 teaspoon cinnamon
  • 1/2 teaspoon ground clove
  • Water, for the baking dish

Preheat oven to 350 degrees.

Combine brown sugar, vanilla and honey and mix well. Then mix in the ginger, almonds, cinnamon, clove and lemon zest, and set to one side.

Core each apple; be careful to remove all of the stem and seeds. If need be, trim the apple bottoms so that they sit steadily on a flat surface. Place the apples upright in a baking dish, and spoon the filling into hollow of each apple .

Fill the baking dish with enough water to form a 20 mm or 1/2-inch pool around the apples.

Bake for 1 hour and 15 minutes or until the apples are tender.

Transfer the apples to a serving plate with a spatula.

Pour the reaming liquid from the baking dish into a small saucepan, and cook over a medium-high heat until it becomes syrupy, about 15 minutes. This is where you need to make sure not to reduce it too long that it becomes a caramel. Drizzle the syrup over the top of each apple, and sprinkle some additional almonds and candied ginger on top.

ENJOY!!

Standard
100 Days Project, Dairy Free, Dips, Condiments and Dressings, Gluten Free, Mains, Recipes, Side Dish, Vegan

Day 44 – Slow Cooked Barbecue Baked Beans

Day44

Her is another great slow cooker recipe for you my Herbivores . . .

The best thing about slow cookers is how you can pop everything into the insert the night before or in the morning, the slow cooker does all the work, and you get to eat the yummy results.  This recipe for slow cooked barbecue baked beans, from Skinny Ms, is not exception.

I love the smokey maple flavor of a good BBQ sauce, and unfortunately, until recently, that can be hard to find here in New Zealand. I used to make the trip out to Martha’s Backyard, the American Store in Mt. Wellington, just for BBQ sauce. Luckily now some of the fancier food stores like Nosh and Farro are bringing BBQ sauce in from the US. Even one of my favorite brands, Kansas City Cowtown BBQ Sauce. I got so excited when I saw this at a friend’s house that she bought me a bottle the next time she came over for dinner. A friend that brings good BBQ sauce is a good friend indeed!! The Bonz Kajun Kitchen in Elliott Stables makes great locally made BBQ sauce that they bottle and sell, but you have to ask nicely for a vegetarian version, because he will normally put pig fat drippings in his sauce otherwise.

The thing that makes BBQ sauce so good is the combination of smokey, savoury, spicy, and sweet all perfectly balanced for optimal enjoyment.  When slow cooked with these beans, it makes a great side dish or can easily be turned into a main, like I did, by spooning the beans over a baked potato and adding a bit of spring onion/green onion and cheese.  A Kiwi favorite is baked beans on toast, and this recipe can be be used to make a great version of that dish as well. Add a fried egg on top, and you got a yummy savoury breakfast!!

If you do not have access to a good BBQ sauce, you can easily make your own with the recipe included below.

Slow Cooked Barbecue Baked Beans

MAKES: 8, 1 cup servings

INGREDIENTS

  • 1 sweet onion, diced
  •  1.7 kilograms or 60 ounces cooked Cannellini beans, drained and rinsed
  • 1 1/4 cup barbecue sauce (recipe below)
  • 1/2 cup unrefined sweetener, (choices of unrefined sweeteners: Madhava Coconut Sugar, honey, molasses, pure maple syrup, sucanat, sorghum)
  • 2 tablespoons yellow mustard
  • 1/2 teaspoon cayenne pepper
  • 1/2 teaspoon freshly ground black pepper
  • Sea salt to taste

for BBQ Sauce:

  • 1 tablespoon vegetable oil
  • 1 sweet onion, finely diced
  • 1 clove garlic, minced
  • 1 – 230 gram or 8 ounce can tomato puree
  • 1/2 cup mild molasses or sorghum
  • 1/4 cup balsamic vinegar
  • 2 teaspoons Dijon mustard
  • 1/2 teaspoon cayenne pepper
  • 2 teaspoons chili powder
  • 1/4 teaspoon black pepper
  • Sea Salt to taste

Add all ingredients for the BBQ beans  into the slow-cooker.  For the unrefined sweetener, I used a combination of golden syrup and molasses, but any of the other options will do).  Cover, turn to low and cook 6-8 hours.

It is as simple at that!!

To make your own Barbecue Sauce:

In a medium sauce pan add canola oil, turn to medium-low heat and saute onion and garlic until tender, about 5 minutes. Add the remaining barbecue sauce ingredients, stir and simmer until sauce has thickened, about 30 minutes. Viola!!

ENJOY!!

Standard
100 Days Project, Dairy Free, Gluten Free, Party Food, Recipes, Side Dish, Snacks, Vegan

Day 42 – Panelle

Day42Mmmm . . . Deep fried chickpea goodness . . .

A friend of mine posted this recipe, from the New York Times, on her Facebook page, and I knew I was going to have to try making it at some point. Panelle is a type of Sicilian street food that is very similar to polenta, which is made of corn meal. Instead, Panelle is made from chickpea flour (Gram flour), which means it has the added benefit for vegetarians of being high in protein. They make a tasty and interesting and healthier alternative to potato fries, and can be used in the same way for a quick, but filling, snack

These “chips” went extremely well with the left over Warm Chickpea & Artichoke Pâté from my Day 41 post of the 100 Days Project challege.

Panelle

from: The New York Times

INGREDIENTS

  • Vegetable or olive oil for greasing and frying
  • 1 cup chickpea flour
  • Salt and freshly ground black pepper
  • 2 tablespoons olive oil
  • 1 lemon, cut into wedges

Grease an 8-by-8 baking dish or a quarter sheet pan with some oil.

Bring 2 cups water to a boil in a small saucepan. Put the chickpea flour in a large bowl, and when the water comes to a boil, gradually add it to the chickpea flour, whisking constantly to prevent lumps. Scrape the mixture into the saucepan you used to boil the water, and sprinkle with salt and pepper.  Bring the chickpea flour mixture up to a boil, stir in 2 tablespoons of olive oil, and then reduce to a gentle simmer. Only continue cooking for about a minute.

Scoop the chickpea mixture onto the baking dish or sheet pan and spread it into an even layer. Let it cool, and cover loosely with parchment or plastic. Refrigerate for at least 30 minutes, or up to 24 hours.

Put at least 15mm or 1/4 inch oil in a large skillet over medium heat.  Cut the chickpea mixture into “French Fries”, about 3 inches long and blot any excess moisture with a paper towel. Working in batches, gently drop them into the hot oil. Cook, rotating them occasionally until they’re golden all over, 3 to 4 minutes. Drain fries on paper towels and immediately sprinkle with salt and lots of pepper. Serve hot, with lemon wedges.

Pour yourself a glass of wine and  . . .

ENJOY!!

Standard
100 Days Project, Dairy Free, Dips, Condiments and Dressings, Gluten Free (with Substitutions), Party Food, Recipes, Vegan

Day 41 – Warm Chickpea & Artichoke Pâté Toasted Baguette Sandwich

Day41

I thought this was just going to be a fancy hummus . . .

I found this recipe for Warm Artichoke and Chickpea Pâté  on the Huffington Post website and thought it would make a good filling for a wintertime sandwich. Much to my surprise and delight, the artichoke pureed with the chickpeas, along with the other spices and herbs, gave the pâté a texture and flavor very different from what I was suspecting. It turned out much creamier, and had a consistency similar to tuna fish salad (if I am remembering tuna fish correctly). In fact, I think this pâté would probably make a great vegetarian tuna melt alternative.

Artichokes are actually the bud of a large flower head before it comes into bloom; once the flower blooms, this bud becomes stingy, coarse, and barely edible. Both the ancient Greeks and Romans ate artichokes, and it is a popular ingredient in Mediterranean cooking. The heart of the artichoke is the softest, the best part to eat, and most often used, but often the outer leaves can be cooked and eaten as well.

For me the surprising ingredient for this recipe was the use of Chinese Five Spice Powder. This mixture of star anise, cloves, chinese cinnamon, sichuan pepper, and fennel seeds is not something I cook with often, and I was unsure how well the flavors would combine with the artichoke. In fact, both fennel and anise are flavors that I do not really like very much, but I figured when it comes to unknown spices,  it is always worth trying a recipe the first time how it is written and you can always change it up a bit later. I am glad I did, because the recipe works very well seasoned with these spices, and it would not normally been something I would have tried.

You can use  this recipe for the chickpea and artichoke pâté on its own, as a topping for crackers, or in a sandwich as I did.  It would be gluten free and vegan without the bread or the cheese I used, and these items can easily be swapped with gluten free or vegan substitutions .

Warm Chickpea & Artichoke Pâté Toasted Baguette Sandwich

adapted from: The Huffinton Post: TASTE

INGREDIENTS

  • 390 gram or 14-ounce cooked chickpeas
  • 200 gram or 7-ounce jar of artichokes packed in sunflower oil or olive oil
  • 1 teaspoon Chinese five spice powder
  • 2 cloves garlic, chopped
  • 3 tablespoons fresh coriander,chopped
  • 3 tablespoons olive oil
  • juice of 1 lemon
  • 1 French baguette , for serving
  • roasted red peppers, sliced for topping
  • parmesan cheese, shaved, for topping
  • lettuce, for topping

Preheat oven to 180 C or 350 F.

Drain the chickpeas and artichokes.

Roast the five spice in a hot, dry pan until fragrant.

Blend all the remaining ingredients to a fine purée. I found this easiest to do with my stick blender directly in an oven proof dish.

Transfer the mixture to an ovenproof dish, if you are not using a stick blender, and then bake for 10 minutes, or until heated through.

Cut a length of baguette to your desired size, and slice it open. Toast baguette in the oven while warming the pâté.

To build the sandwich: Place the lettuce and a thick layer of the warm pâté onto the toasted baguette,  and top with the sliced roasted red peppers and shaved parmesan cheese.

ENJOY!!

Standard
100 Days Project, Baking, Mains, pastry, Recipes

Day 40 – Puff Pastry Pockets

Day40

The right music always adds to the cooking experience . . .

I received in the mail today the new  Fleur Jack CD, who is a Kiwi singer/song writer and friend currently living in The States.  I stuck the CD in my computer, put it on repeat, and danced my way (wine glass in hand) through this recipe for Puff Pastry Pockets, originally from the Baking Makes Things Better blog.

This was the perfect simple recipe for the end of a work day, that used up many of the ingredients I had around the house. The recipe called for filling the puff pastry with feta, pesto, and sundried tomato, but I added spinach and spring onion/green onion into the mix. There are countless other variation you could do on this as well, to help clean out your refrigerator. I can imagine roast pumpkin, potato, kumara, red peppers, capers, carrot, mushrooms, onion, lentils or other beans, chickpeas, and other kinds of cheese all being great alternatives to the filling I chose.

Puff pastry is not something I have ever tried making myself, although it is on the bucket list. Making puff pastry from scratch is a time consuming delicate process that can very easily go wrong, and it is an ingredient readily available in the freezer section of most super markets. As a vegetarian you have to be careful though, as most pre-made versions use lard or other animal fats. In New Zealand, New Way brand puff pastry is the only one that is vegetarian friendly, and even has the New Zealand Vegetarian Society stamp of approval.

Puff Pastry Pockets

adapted from: Baking Makes Things Better

MAKES: 4 pockets

INGREDIENTS

  • 2 square sheets of pre-made puff pastry
  • 200g or 7 ounces feta cheese, crumbled
  • 2 tablespoons pesto
  • 4 large sundried tomatoes, chopped
  • 1 packed cup of baby spinach
  • 1 green onion/spring onion
  • 1 egg, lightly beaten
  • Black pepper for seasoning

Preheat the oven to 200 C of 400 F, use the fan bake setting if you have one.

Brush a baking sheet with olive oil.

Cut each of the pastry squares in half.

In a medium bowl mix together the feta, pesto, sun-dried tomato, spinach, green onion, plus a sprinkling of black pepper.

Divide the feta mixture between the four pieces of pastry, and hen fold over the pastry to encase the filling. Press down on the edges with a fork to seal the
filing in. They should look like giant ravioli.

Brush the tops with the egg then bake for 20 minutes until golden.

Serve, while warm, with a simple side salad, or these will also make a great lunch for the next day.

ENJOY!!

Standard
100 Days Project, Gluten Free, Recipes, Salads, Vegan (with substitutions)

Day 34 – Roasted Shallot, Beetroot, & Lentil Salad

Day34

With all the heavy carbs I have been making lately, I felt like something simple green and leafy for dinner tonight.

Winter is always a good time for roasted vegetables, and combined with the fresh baby spinach and a tangy mustard based dressing this recipe for Roasted Shallot, Beetroot, and Lentil Salad, from the Hub-UK website, was exactly the kind of meal I was craving.

I have found many people do not know what a shallot is. This vegetable belongs to the same family as onions and garlic, and is thought to have originated in Central or Southeast Asia. Like garlic, shallots form in clusters with a head composed of multiple cloves. Shallots are used in many different cuisines from around the world. They taste somewhat similar to an onion, but have a milder flavour.

You can easily make this recipe Dairy Free  and Vegan by leaving off the cheese.

Roasted Shallot, Beetroot, & Lentil Salad

adapted from: Hub-UK

SERVES: 4

INGREDIENTS

  • 12 shallots, peeled (If large, cut in half)
  • 2 tablespoon rapeseed or olive oil
  • Sea salt and freshly ground black pepper
  • 250 grams or 9 ounces of beetroot, cooked
  • 1 tablespoons honey
  • 225 grams or 8 ounces cooked puy lentils
  • 150 grams or 6 ounces baby spinach leaves, washed and well drained
  • 200 grams or 7 ounces soft goat’s cheese

For the dressing:

  • 1 clove garlic, peeled and finely chopped
  • 1 tablespoon of chopped chives
  • 5 tablespoon rape seed or olive oil
  • 2 teaspoons Dijon mustard
  • 2 teaspoons cider vinegar
  • Sea salt and freshly ground black pepper

Preheat oven to 190°C or 375°F

Put puy lentils into a medium pot of boiling water and cook until done. Drain the lentils and rinse under water and place in a bowl.

If using fresh beetroot, chop into large pieces and put into a pot of boiling water. Cook for about 10 minutes or until the beetroot is mostly cooked.

Put the shallots into a roasting tin, drizzle with the 2 tablespoons of oil, toss well and season with sea salt and black pepper.  Place roasting tin in the oven for 15 minutes, then add the beetroot and drizzle with honey and toss well with the shallots. If using solid honey, put it in the microwave first for about 20 seconds to make the honey runny and easier to coat the vegetables.  Roast for a further 10 minutes, or until the shallots are soft.

To make the dressing, mix all of the dressing ingredients together and season with sea salt and black pepper.

When they are ready remove the shallots and beetroot from the oven and mix with the lentils and half the dressing while still warm and leave to cool.

To serve: Place  a large handful of spinach leaves onto a plate, top with the shallots, beetroot and lentils. Crumble the goat’s cheese on top, and drizzle with some of the remaining dressing.  You can serve this on its own, or with a hunk of crusty bread and a glass of medium bodied red wine.

ENJOY!!

Standard
100 Days Project, Mains, Recipes

Day 33 – Homemade Potato Gnocchi with Tomato Mascarpone Sauce & Fried Capers

Mmmmm . . . Gnocchi . . .

Gnocchi are one of those foods that are amazing to eat when made right, and for whatever reason are so often done wrong.  It is so disappointing to order gnocchi at a restaurant expecting little fluffy, melt in your mouth, pillows of potato goodness, and what is delivered on your plate are gluggy, sticky potato rocks.

Because it seemed too hard and daunting a task to make gnocchi that are nice to eat, I had never tried making my own . . . until now. My friend Stef claims she has a fool-proof easy recipe for potato gnocchi given to her by an Italian friend, Elisa Testoni, who used to run Italian cooking classes in Christchurch and now has moved back to Italy to open her own bed & breakfast (I know where I am staying next time I am in Italy).

So . . . I enlisted Stef’s help to make gnocchi for Day 33 of my 100 Days Project. Gnocchi are thick, soft Italian dumplings; the origin of which dates back to ancient Roman times. Originally made from semolina flour, modern gnocchi are most often made from potato, but ingredients vary depending on the region a particular recipe is from.  Traditionally gnocchi are eaten as a first course commonly served with melted or browned butter with sage, pesto, and other various sauces.

Mascarpone is a thick spreadable Italian cheese made from cream. It is considered a specialty of the Lombardy region of Italy and is used to thicken sauces and risottos, and is also used in deserts like Tiramisu. For this recipe the macarpone is added to tomato sauce to give it a creamy texture and flavor. On its own, I thought the combination of tomato and mascarpone would be delicious, but I like to have a little texture and saltiness with creamy sauces. A friend had recently been talking about frying capers, and how they “pop in your mouth with a crunch releasing that yummy warm salty brine”. From this description, I thought fried capers would make the perfect finishing touch for my plate of gnocchi and sauce.

Instead of being a single recipe, this dish for Day 33 is more of a combination of food elements that I have been wanting to try. The gnocchi, the sauce, and the fried capers originally come from three different recipes or ideas I have heard about. Together, the three different elements create a quite tasty meal.

Homemade Potato Gnocchi with Tomato Mascarpone Sauce & Fried Capers

MAKES: 3 servings

INGREDIENTS

for the gnocchi

  • 600g potato
  • 200 g plain flour or semolina flour
  • 1 egg, lightly beaten
  • 2 tablespoons parmesan, finely grated
  • 2 teaspoons nutmeg (freshly grated is best but not necessary)

for the sauce – recipe adapted from BBC Good Food.

  • 1 tablespoon olive oil
  • 2 garlic cloves, crushed
  • 400 gram or 14 ounce can of chopped tomatoes in sauce
  • 140 grams or 5 ounce mascarpone
  • 200 gram or 8 ounce bag of baby spinach
  • handful fresh basil leaves
  • shaved parmesan, for garnish
  • salt, pepper, and Italian herbs to taste

for the capers

  • 1/2 cup capers, drained and patted dry

For the gnocchi: Boil potatoes with skins on.  When cool enough to handle remove potato skins with your thumbs.  Mash the potato and let completely cool. This is best prepared ahead of time so that the mashed potato can completely cool, but can be put in the refrigerator or freezer to save time.

Add the lightly beaten egg, flour, and parmesan. Do not add these ingredients until the potato has completely cooled or else your gnocchi will come out sticky and gluggy instead of light and fluffy.

On a lightly floured surface, knead the ingredients into a smooth dough, and then pad it out into a shape about 20mm or 1 inch thick.

Cut the dough into strips about 20mm or 1 inch wide. Roll the strip back and forth until rounded, and then cut into 30mm or 1 1/2 pieces. With the back of a floured fork give the gnocchi pieces grooves.

Place gnocchi pieces on a floured baking sheet to rest.  At this point, if you are not planning on eating all the gnocchi right away, the gnocchi pieces can be put into the freezer for use at a later date.

While gnocchi are resting, fill a large pot with water and salt, and bring the water to a boil. Once the water is boiling, put the gnocchi pieces into the pot making sure to stir the water so that they do not stick together. If you are using gnocchi that have been frozen from before, then they can come directly out of the freezer and into the pot of boiling water. Bring the water back up to a gentle boil, and when the gnocchi float to the surface they are done.  Use a slotted spoon to transfer the cooked gnocchi from the pot into a colander or plate.

For the sauce: Heat the olive oil in a frying pan, fry the garlic until golden, then add the tomatoes. Season, with salt and pepper or other Italian herbs, and then let simmer for 10 minutes.

Stir in the mascarpone and cook for 2 minutes more.  Add the spinach for the final min of cooking. You want to make sure the spinach is just wilted and not over cooked into the sauce.

For the capers: Drain the capers of any brine and pat dry with a paper towel.

Heat the oil in a small heavy duty skillet over a medium heat. Add capers to oil in the skillet and fry until capers are crisp and open like flowers. Stirring often, they will need to cook for only 45 to 60 seconds.

Using slotted spoon, transfer capers to paper towels to drain. The capers can be fried two hours ahead before being used in a recipe. Just let them stand at room temperature until you’re ready to add them.

To serve: Add cooked gnocchi into the pan of sauce and mix well. Serve immediately with basil leaves, parmesan shavings, and fried capers scattered over the top of each portion.

ENJOY!!

Standard
100 Days Project, Dairy Free, Gluten Free (with Substitutions), Mains, Recipes, Uncategorized, Vegan (with substitutions)

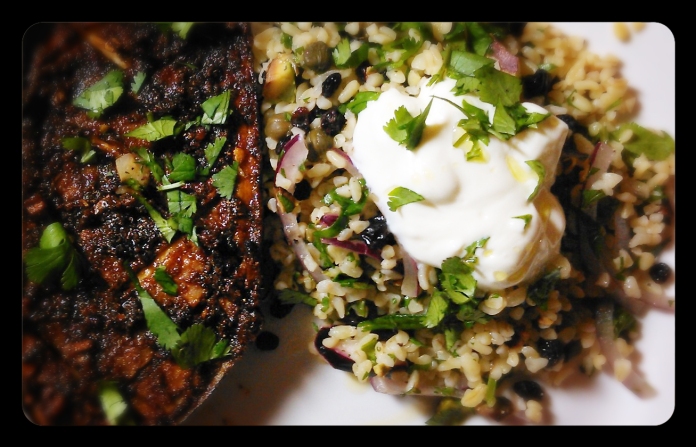
Day 28 – Spiced Eggplant with Herbed Bulgur Salad

day28

Since the last two days have been quick and simple recipes, I figured I would do something a bit fancier for today’s post.

Are you ever in a Doctor’s office or coffee shop flipping through the magazines and come across that amazing looking recipe you want to take home to try? So you very sneakily and quietly, trying not to attract the receptionist’s or cafe staff’s attention, rip the recipe out of the magazine and quickly stuff it into whatever bag or purse you have with you. I know I have done this countless times over the years since I have started being interested in cooking as a teenager. It always leaves me feeling a bit guilty . . . but thank goodness for technology and camera phones; I no longer have this guilt. Now I simply pull my iPhone out a take a picture of whatever amazing looking recipe has caught my attention. This recipe for Spiced Eggplant with Herbed Bulgur Salad, found in January 2012 issue of Bon Appetit magazine, is was one of these recipes that I snapped with my iPhone.

Eggplants are a vegetable that is native to the Indian Subcontinent, has been cultivated in southern and eastern Asia, and the first known written record is found in an ancient Chinese agricultural treatise. It is believed that the eggplant was introduced throughout the Mediterranean by the Arabs in the early Middle Ages. The raw flesh of the eggplant can have a somewhat bitter taste, but becomes tender when cooked and develops a rich, complex flavor. Many recipes advise salting, rinsing and draining  eggplants to soften it and to reduce the amount of fat absorbed during cooking, but mainly to remove the bitterness that it can have. The flesh is capable of absorbing large amounts of cooking fats and sauces, making for very rich dishes, but salting reduces the amount of oil absorbed. Due to its texture and bulk, eggplant makes a great  meat substitute in vegan and vegetarian cuisine.

Bulgur is a whole grain, usually sold parboiled and dried, that has a light nutty flavor and is a common ingredient in Armenian, Assyrian, Lebanese, Turkish, Middle Eastern, and Mediterranean dishes.  Bulgur can be used in pilafs, soups, bakery goods, salads, or as stuffing. Its high nutritional value makes it a good substitute for rice or couscous.

I was looking forward to making this dish because of the interesting spice mixture that is brushed on the eggplants before they are roasted, and the combination of sweet, savory, and crunchy ingredients that are mixed through the bulgur salad, and this recipe definitely delivered on the promise of great flavor and spice.

This dish can easily be made dairy free and vegan by leaving off the yogurt, and the bulgur can be substituted with quinoa to make it gluten free.

Spiced Eggplant with Herbed Bulgur Salad

from: Bon Apetit, January 2012

INGREDIENTS

  • 1/2 cup olive oil, divided, plus more for drizzling
  • 2 tablespoons preserved lemon peel, finely chopped
  • 2 garlic cloves, smashed
  • 2 teaspoons ground cumin
  • 1 teaspoon ground coriander
  • 1 teaspoon paprika
  • 3/4 teaspoon ground cinnamon
  • 1/2 teaspoon crushed red pepper flakes
  • 1/2 teaspoon sea salt
  • 2 medium eggplants (9-10 ounces each), halved lengthwise
  • 1 cup quick cooking bulgur
  • 1/2 cup pitted green olives or capers
  • 1/2 small red onion, thinly sliced
  • 1/3 cup currants
  • 1/2 cup flat-leaf parsley, chopped
  • 1/3 cup fresh coriander, chopped, plus more for garnish
  • 1/4 cup pistachios, toasted and lightly crushed
  • 2 tablespoons fresh lemon juice
  • freshly ground black pepper
  • 1 cup Greek style yogurt

Preheat ovem to 350 degrees F or 180 degrees C

In a small bowl, combine 1/4 cup oil, the next seven ingredients, and 1/2 teaspoon salt.

Score the flesh of each eggplant half with 15mmor 1/2 inch deep diagonal crisscrossing lines, spacing 40mm or 1 inch apart (do not cut through the skin). Drizzle 1 tablespoon oil over each cut side, allowing it to soak in. Season lightly with salt. Brush or spoon spice mix on each half diving it equally. Place eggplants, cut side up on a rimmed baking sheet and roast until soft ( about 50 – 60 min).

While eggplant is cooking, place bulgur in a large bowl and cover with 1 1/2 cups boiling water. Let soak for 45 minutes to soften and absorb water. Stir in olives or capers, onion, currants, parsley, 1/2 cup coriander, pistachios, and lemon juice. Season to taste with salt and pepper, and then let sit for at least 30 minutes for flavors to meld.

Serve at room temperature, with a dallop of greek yogurt on top of the bulgur salad and coriander to garnish.

ENJOY!!

Standard
100 Days Project, Dairy Free, Gluten Free, Mains, Recipes, Vegan

Day 18 – Teriyaki Tempeh Bowl

Day18

Asian style food is usually my fall back for a quick, healthy, flavorful meal when I am running short of time.

I got home really late from work yesterday, and realized I had not eaten much during the busy day so needed to make something quick, healthy, and packed with protein. It seemed like the perfect opportunity to try this recipe for a Teriyaki Tempeh Bowl sent to me by a friend who, although she is not vegetarian herself, cooks amazing food for her vegetarian husband.

Tempeh is a traditional soy product originally from Indonesia, most likely from the island of Java. Like Tofu, tempeh is made from soybeans, but it is a whole soybean product with different nutritional characteristics and a very unique textural quality made by a natural culturing and controlled fermentation process that binds whole soybeans into a cake form. Tempeh’s fermentation process and use of the whole soybean give it a higher content of protein, dietary fiber, and vitamins than Tofu.

Teriyaki is a Japanese cooking style in which foods are broiled or grilled while being basted in a marinade based on soy sauce, mirin (rice vinegar), and sugar. Modern or store bought Teriyaki Sauce also may include honey, garlic, ginger, and chili, but these are not ingredients common to to traditional Japanese cooking.

So this meal is a bit of a mash up of cultures between Indonesian Tempeh and Japanese Teriyaki Sauce, but all together it was just what I needed for a late night quick protein fix.

Teriyaki Tempeh Bowl

MAKES: 2 Servings

INGREDIENTS

  • 250g (one packet) of tempeh, sliced
  • 1 tablespoon sesame oil
  • store bought or homemade Teriyaki Sauce
  • 1 small head of broccoli
  • 1 carrot, cut into sticks
  • 1 small red onion
  • 2 small heads of Bok Choy
  • 1 cup mushrooms, sliced
  • 1 small zucchini (courgette), sliced
  • 1 green onion (spring onion), for garnish
  • 1 cup brown rice
  • 2 cups water

Place the 1 cup brown rice and 2 cups water into a rice cooker or pot on the stove and simmer until done.

Heat the sesame oil in a medium pan and add the Tempeh slices cooking them until brown on both sides. Add enough Teriyaki sauce to cover the tempeh and let simmer in a covered pan for about 5 minutes, turning the Tempeh slices over about half way through.

While Tempeh is simmering, steam the vegetables over a pot of boiling water for only a few minutes, just until the colours brighten and the vegetables start to lose their rawness. Be careful, you do not want to over steam the vegetables.

Build your bowl with a serving of brown rice on the bottom, adding a portion of the steamed vegetables, and topped with a few pieces of the Teriyaki Tempeh and some additional Teriyaki Sauce splashed on top. Garnish with a sprinkle of the chopped green onion.

ENJOY!!

Standard