100 Days Project, Dairy Free, Desert, Gluten Free, Recipes, Uncategorized, Vegan (with substitutions)

Day 45 – Baked Apples Stuffed with Candied Ginger and Almonds

Day45

Baked apples make me think of Grandma and Grandpa Mills . . .

Growing up, we had dinner with my grandparents every Sunday. There was a cafeteria style restaurant they liked to go to, and everyone’s favorite from the desert bar was the baked apple. Those baked apples were not nearly as fancy as this Baked Apple Stuffed with Candied Ginger and Almonds recipe from Jerry James Stone and Treehugger’s Green Wine Guide, but it still makes those memories float to the surface.

I had a friend over last night for a Sunday night game of intense competitive Scrabble, which was a game I always played with with my Grandmother as well. Maybe that is why this recipe seemed like the perfect fit. Unfortunately, I got a bit distracted when reducing the syrup and it turned into more of a caramel that almost candied the baked apples, but it was still quite delicious, and I supplemented it with warm maple syrup to make sure the apple was not too dry.

I served the the baked apples with maple walnut ice cream and a small glass of port. The three made quite a good winter desert combination and an excellent Scrabble treat!!

You can easily substitute the honey for another unrefined sweetener for Vegan alternative . . .

Baked Apples Stuffed with Candied Ginger and Almonds

MAKES: 4- 6 Apples, depending on the size of your apples

INGREDIENTS

  • 4- 6 large apples (Rome or Braeburn)
  • 1/3 cup candied ginger, chopped
  • 3/4 cup almonds, toasted and chopped
  • 1/4 cup brown sugar, packed
  • 1/2 teaspoon vanilla extract
  • 2 tablespoons honey
  • 1 1/2 teaspoons lemon zest
  • 1 teaspoon cinnamon
  • 1/2 teaspoon ground clove
  • Water, for the baking dish

Preheat oven to 350 degrees.

Combine brown sugar, vanilla and honey and mix well. Then mix in the ginger, almonds, cinnamon, clove and lemon zest, and set to one side.

Core each apple; be careful to remove all of the stem and seeds. If need be, trim the apple bottoms so that they sit steadily on a flat surface. Place the apples upright in a baking dish, and spoon the filling into hollow of each apple .

Fill the baking dish with enough water to form a 20 mm or 1/2-inch pool around the apples.

Bake for 1 hour and 15 minutes or until the apples are tender.

Transfer the apples to a serving plate with a spatula.

Pour the reaming liquid from the baking dish into a small saucepan, and cook over a medium-high heat until it becomes syrupy, about 15 minutes. This is where you need to make sure not to reduce it too long that it becomes a caramel. Drizzle the syrup over the top of each apple, and sprinkle some additional almonds and candied ginger on top.

ENJOY!!

Standard
100 Days Project, Baking, Breads, Cakes, Desert, Recipes, Uncategorized

Day 39 – Peanut Butter Banana Bread

Day39

There is a Facebook group called Baking Our Blues Away, that has declared Monday July 15th , 2013 as an international day of baking goodwill.

The idea is simple . . .  “everyone is encouraged to take a moment and give someone they know or don’t know, be it a loved one, a work colleague or perhaps a stranger on the street, a bit of baked or handmade love.”  I have browning bananas in my fruit bowl just asking to be made into banana bread, and so in honor of this, today I am baking this Peanut Butter Banana Bread recipe, which I found on the Sweet Pea’s Kitchen blog but originally comes from Cooking Light magazine.

PicsI can not imagine a better combination than peanut butter and banana. Being an American, I grew up on peanut butter, but I know most Kiwis are brought up on and are more partial to Vegemite or Marmite (for the uninitiated they are very different things and you must have a preference for one or the other).  Sadly, When I moved to New Zealand could not find anything on the grocery store shelves that tasted remotely like I expected peanut butter to taste like. They were all too sweet and sugary with chemical artificial sweeteners, and you could not taste any real peanut in them. Thank goodness for Pics Peanut Butter!!! I only discovered this peanut butter, made in the Nelson region, after being here for over 2 years. It used to only be sold at the Nelson weekend markets, and I was visiting a friend who had moved down the line. Honestly for the last 4 years, Pics has been the only peanut butter I will buy, and until someone can convince me there is another acceptable alternative, I will continue to be forever grateful to Mr. Pic.

So even though it is no longer July 15th, try baking something to share with others. In my experience from this 100 Days Project, where I have been sharing most of what I have been making, it makes you feel good and brings a smile to someone else’s face.

Peanut Butter Banana Bread

adapted from: Sweet Pea’s Kitchen and Cooking Light

INGREDIENTS

For the Bread:

  • 1 1/2 cups mashed ripe banana
  • 1/3 cup plain yogurt
  • 1/3 cup peanut butter, creamy or crunchy depending on your preference
  • 3 tablespoons unsalted butter, melted
  • 2 large eggs
  • 1/2 cup granulated sugar
  • 1/2 cup packed brown sugar
  • 1 1/2 cups all-purpose flour
  • 1/4 cup ground flaxseed or ground almonds
  • 3/4 teaspoon baking soda
  • 1/2 teaspoon salt
  • 1/2 teaspoon ground cinnamon
  • 1/8 teaspoon ground allspice
  • 2 tablespoons chopped dry-roasted peanuts

For the Peanut Butter Glaze:

  • 1/3 cup powdered sugar
  • 1 tablespoon milk
  • 1 tablespoon creamy peanut butter

Preheat oven to 180 C or 350 F.
Grease bottom and sides of a loaf pan and dust with flour.

In a large bowl , beat together the bananas, yogurt, peanut butter, butter and eggs at medium speed until combined. Add sugars and beat until blended.

In a small bowl, whisk together flour, flaxseed/ground almond, baking soda, salt, cinnamon and allspice. Add the dry ingredients to banana mixture; beat just until blended. Stir in nuts, and then scrape batter into prepared loaf pan and smooth surface with a rubber spatula.

Bake until top is golden and toothpick inserted into center comes out clean, about 1 hour 15 minutes. Cool in pan 10 minutes, then transfer to wire rack and cool completely.

To make the peanut butter glaze: In a small bowl whisk together powdered sugar, milk and peanut butter until smooth. Drizzle glaze over bread. Make sure it is completely cool when you do this, or you will wind up with a runny mess, like I did on my first attempt.

ENJOY!!

Standard
100 Days Project, Baking, Muffins, Recipes, Uncategorized

Day 29 – Carrot Cake Muffins with Cream Cheese Center

day29

If carrots are good for your eyes, than carrot cake must be even better . . . right!?!

These little Carrot Cake Muffins with Cream Cheese Center, from The Curvy Carrot,  make a yummy breakfast, lunch time treat, or afternoon snack.   They were super quick to put together this morning, and with carrots, raisins, and walnuts, they have to at least be a little bit healthy for you (just ignore all the sugar).

Carrots have been used in sweet cakes since medieval times when sweeteners were scarce and expensive. Carrots, which contain more sugar than any other vegetable besides the sugar beet, were much easier to find and less expensive. Similarly, during World War II, the popularity of carrot cake was revived in Britain because of rationing. Carrot cakes first became commonly available as a novelty item in restaurants and cafeterias in the United States in the early 1960s.  People liked them so much, that soon carrot cake became a standard desert in restaurants.

Carrot Cake Muffins with Cream Cheese Center

adapted from: The Curvy Carrot

MAKES:12

INGREDIENTS

for the filling:

  • one 8-ounce or 250g package cream cheese
  • 1/4 cup granulated sugar
  • 1/4 teaspoon almond extract or vanilla

for the muffins:

  • 2 1/4 cups all-purpose flour
  • 1/2 cup granulated sugar
  • 1/4 cup light brown sugar, firmly packed
  • 1 1/2 teaspoons baking powder
  • 1 1/2 teaspoons ground cinnamon
  • 1 1/2teaspoon ground ginger
  • 3/4 teaspoon salt
  • 2 large eggs
  • 3/4 cup milk
  • 1/3 cup vegetable oil
  • 1 cup grated carrots, lightly packed (about 2 medium carrots)
  • 2/3 cup walnuts, toasted and chopped
  • 2/3 cup raisins, chopped

Preheat the oven to 400 degrees.

Line a cupcake pan with paper liners or brush with melted butter.

For the filling: In a microwave-safe bowl, microwave the cream cheese on low power until softened, about 40 seconds.  Add the granulated sugar and almond extract to the cream cheese mixture, mixing well, and set aside.

For the muffins: In a medium-sized bowl, whisk together the flour, sugars, baking powder, cinnamon, ginger, and salt.

In a separate small bowl, whisk together the eggs, water, and oil. Using a rubber spatula, slowly add the wet ingredients to the dry ingredients and stir until just
combined. Then, fold in the grated carrots, walnuts, and raisins.

Drop about 2 tablespoons of the muffin batter into each muffin cup, making sure to completely cover the bottom.

Using another tablespoon, drop 1 tablespoon of the cream cheese mixture onto the center of each muffin cup.

To complete the muffins, cover each dollop of cream cheese completely with the remaining muffin batter. It is helpful to wet your fingertips a little bit to spread the batter evenly and thoroughly over the tops of each muffin.

Bake the muffins until a cake tester inserted into the center of a muffin comes out clean, about 20 minutes.

Transfer the muffins to a wire rack to cool.

ENJOY!!


Standard
100 Days Project, Dairy Free, Gluten Free (with Substitutions), Mains, Recipes, Uncategorized, Vegan (with substitutions)

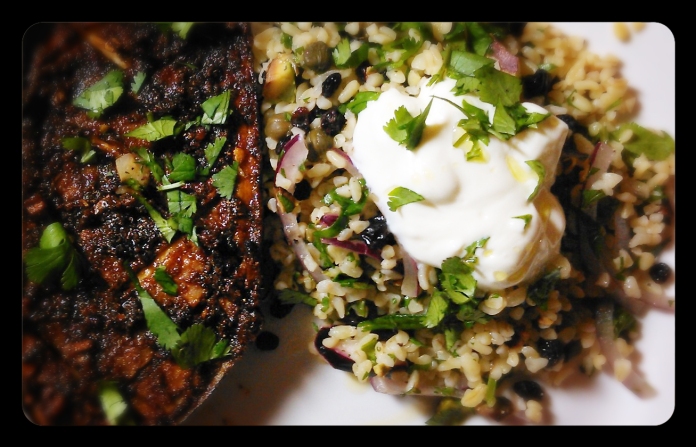
Day 28 – Spiced Eggplant with Herbed Bulgur Salad

day28

Since the last two days have been quick and simple recipes, I figured I would do something a bit fancier for today’s post.

Are you ever in a Doctor’s office or coffee shop flipping through the magazines and come across that amazing looking recipe you want to take home to try? So you very sneakily and quietly, trying not to attract the receptionist’s or cafe staff’s attention, rip the recipe out of the magazine and quickly stuff it into whatever bag or purse you have with you. I know I have done this countless times over the years since I have started being interested in cooking as a teenager. It always leaves me feeling a bit guilty . . . but thank goodness for technology and camera phones; I no longer have this guilt. Now I simply pull my iPhone out a take a picture of whatever amazing looking recipe has caught my attention. This recipe for Spiced Eggplant with Herbed Bulgur Salad, found in January 2012 issue of Bon Appetit magazine, is was one of these recipes that I snapped with my iPhone.

Eggplants are a vegetable that is native to the Indian Subcontinent, has been cultivated in southern and eastern Asia, and the first known written record is found in an ancient Chinese agricultural treatise. It is believed that the eggplant was introduced throughout the Mediterranean by the Arabs in the early Middle Ages. The raw flesh of the eggplant can have a somewhat bitter taste, but becomes tender when cooked and develops a rich, complex flavor. Many recipes advise salting, rinsing and draining  eggplants to soften it and to reduce the amount of fat absorbed during cooking, but mainly to remove the bitterness that it can have. The flesh is capable of absorbing large amounts of cooking fats and sauces, making for very rich dishes, but salting reduces the amount of oil absorbed. Due to its texture and bulk, eggplant makes a great  meat substitute in vegan and vegetarian cuisine.

Bulgur is a whole grain, usually sold parboiled and dried, that has a light nutty flavor and is a common ingredient in Armenian, Assyrian, Lebanese, Turkish, Middle Eastern, and Mediterranean dishes.  Bulgur can be used in pilafs, soups, bakery goods, salads, or as stuffing. Its high nutritional value makes it a good substitute for rice or couscous.

I was looking forward to making this dish because of the interesting spice mixture that is brushed on the eggplants before they are roasted, and the combination of sweet, savory, and crunchy ingredients that are mixed through the bulgur salad, and this recipe definitely delivered on the promise of great flavor and spice.

This dish can easily be made dairy free and vegan by leaving off the yogurt, and the bulgur can be substituted with quinoa to make it gluten free.

Spiced Eggplant with Herbed Bulgur Salad

from: Bon Apetit, January 2012

INGREDIENTS

  • 1/2 cup olive oil, divided, plus more for drizzling
  • 2 tablespoons preserved lemon peel, finely chopped
  • 2 garlic cloves, smashed
  • 2 teaspoons ground cumin
  • 1 teaspoon ground coriander
  • 1 teaspoon paprika
  • 3/4 teaspoon ground cinnamon
  • 1/2 teaspoon crushed red pepper flakes
  • 1/2 teaspoon sea salt
  • 2 medium eggplants (9-10 ounces each), halved lengthwise
  • 1 cup quick cooking bulgur
  • 1/2 cup pitted green olives or capers
  • 1/2 small red onion, thinly sliced
  • 1/3 cup currants
  • 1/2 cup flat-leaf parsley, chopped
  • 1/3 cup fresh coriander, chopped, plus more for garnish
  • 1/4 cup pistachios, toasted and lightly crushed
  • 2 tablespoons fresh lemon juice
  • freshly ground black pepper
  • 1 cup Greek style yogurt

Preheat ovem to 350 degrees F or 180 degrees C

In a small bowl, combine 1/4 cup oil, the next seven ingredients, and 1/2 teaspoon salt.

Score the flesh of each eggplant half with 15mmor 1/2 inch deep diagonal crisscrossing lines, spacing 40mm or 1 inch apart (do not cut through the skin). Drizzle 1 tablespoon oil over each cut side, allowing it to soak in. Season lightly with salt. Brush or spoon spice mix on each half diving it equally. Place eggplants, cut side up on a rimmed baking sheet and roast until soft ( about 50 – 60 min).

While eggplant is cooking, place bulgur in a large bowl and cover with 1 1/2 cups boiling water. Let soak for 45 minutes to soften and absorb water. Stir in olives or capers, onion, currants, parsley, 1/2 cup coriander, pistachios, and lemon juice. Season to taste with salt and pepper, and then let sit for at least 30 minutes for flavors to meld.

Serve at room temperature, with a dallop of greek yogurt on top of the bulgur salad and coriander to garnish.

ENJOY!!

Standard
Uncategorized

100 Herbivores

THANK YOU!!

Thanks to all of you out there posting, reposting, and sharing Herbivore with your family and friends. Through Facebook and WordPress, Herbivore has gained just over 100 followers (103 to be precise) in only 2 weeks!! This is amazing . . . I never imagined there would be such a positive response.

My favorite comment so far is: “Dylan’s Grandma told me she loves your blog”. Well, I love Grandmas too!!

My Grandmother Leona Mills was my first food inspiration. For years she was the Food Maven writing a column for the Jewish Journal newspaper in Florida where I grew up, and going over to grandma’s house for dinner was always a treat!! When I became vegetarian at the young age of 11, she supported my decision by collecting all of her vegetarian recipes into my own personal Leona Mills cookbook.

This is only the start of of what hopefully will be an amazing adventure . . . and I am glad you all are coming along for the ride.

Standard
100 Days Project, Dips, Condiments and Dressings, Mains, Recipes, Uncategorized

Day 14 – Lentil & Chickpea Sliders with Coriander Cream

Day14)

Sliders (little mini hamburgers) seem to be one of the latest culinary trends . . .

At restraunts you can now find quite a few different varieties of Sliders, like beef, chicken, fish, etc . . .  Sadly, I have very rarely seen any vegetarian Slider options. So when I found this recipe for Lentil and Chickpea Burgers with Coriander Cream in my Kitchen Classics: Gourmet Vegetarian cookbook, I was inspired to make my own.

Looking through the ingredient list I found that all the ingredients were items I already had around the house except Tandoori Spice Mix, which is an Indian spice mix typically used on meats that are going to be roasted in a traditional clay oven called a Tandoor. A quick Google search pointed me in the direction of this Tandoori Spice Mix recipe, and it turns out that all of the different spices that make up this mixture were already sitting on my shelf, and most likely will be on yours too.

The Coriander Cream Sauce calls for the use of sour cream. As a vegetarian in New Zealand, I have found it hard to find yogurt or sour cream that does not use gelatine as a thickener. Gelatine is a product made from the skin, boiled crushed horn, hoof and bones, connective tissues, organs and some intestines of animals such as domesticated cattle, chicken, pigs, and horses. It is added to many dairy products here in New Zealand (you do not find gelatine used in dairy products as often in the United States) in order to give them a better texture; it also can be used in many other food products like gummy candy, jelly/Jello, honey comb, and other deserts.  There are certain brands like Cyclops that are gelatine free, but they also tend to be quite expensive and hard to find. Just for you, Herbivores, here is my vegetarian food tip of the day . . . Even though the full fat version of Tararua sour cream has gelatine, the Tararua Lite sour cream does not, and it is reasonably priced and easily found at the major food stores.

I used red onion, roasted red peppers, and avocado to top off these little burgers, but you can use any toppings that happen to be in your refrigerator or that you prefer.  Melted Swiss cheese with sauteed mushrooms and onions might be another excellent combination with this Lentil and Chickpea Burger recipe; one that I am planning on trying out on my left overs.

Lentil & Chickpea Sliders with Coriander Cream

from the Kitchen Classics: Gourmet Vegetarian cookbook

MAKES: approximately 14 Slider sized burgers, or 12 normal sized burgers

PREP TIME: 30 mins

COOKING TIME: 30 mins

INGREDIENTS

for the burgers:

  • 250g (9oz or 1 cup) red lentils
  • 1 tablespon oil
  • 2 onions, sliced
  • 1 tablespoon tandoori spice mix
  • 425g (15 oz) either tinned chickpeas, drained or dry chickpeas soaked over night and then cooked
  • 1 tablespoon grated fresh ginger
  • 1 egg
  • 3 tablespoons flat leaf Italian parsley, chopped
  • 3 tablespoons corriander/cilantro, chopped
  • 180g or 2 1/4 cups stale breadcrumbs
  • flour, to dust

for the Coriander Cream:

  • 1/2 cup sour cream
  • 1/3 cup fresh cream
  • 1 garlic clove, crushed
  • 3 table spoons corriander/cilantro, chopped
  • 1 tablespoon flat leaf Italian parsley, chopped

Bring a large saucepan of water to boil. Add the lentils and let simmer uncovered for about 10 minutes or until they are soft. Drain well once they have been cooked.

Heat the oil in a frying pan and cook the onions until tender. Add the tandoori spice mix to the onions, and fry off the spices until they are fragrant.

Combine the chikpeas, half the lentils, ginger, egg, and onion mixture in a food processor until smooth. Transfer into a bowl and add the remaining lentils, parsley, coriander/cilantro, and bread crumbs, and combine well.

Divide the mixture into portions. If the mixture is too soft, refrigerate for about 15 mins or until it becomes firm. Shape the portions into round patties, toss them in flour, and shake off any excess. Place the patties on a lightly greased BBQ and cook for 3-4 minutes on each side, until the are brown. Alternatively you can use a grill pan, a skillet, or bake the burgers in an oven.

Serve with the Coriander Cream: To make the Coriander Cream, combine all the ingredients in a bowl and mix well.

To build the sliders: Toast the Slider rolls under the broiler of the oven being careful not to burn them. Place a large dallop of the coriander cream on the bottom half of the bun, add the burger patties, and top with another teaspoon or so of the Coriander Cream. Add the avocado, roasted peppers, and red onion or whatever other toppings you think will go nicely.

Both the burger patties and the coriander cream can be prepared 2-3 days ahead of time and stored covered in the refrigerator.

ENJOY!!

Standard
Food, Uncategorized

Storing Avocado . . .

Avocado are one of the best and most versatile fruits produced by mother nature. I will happily sit eating an avocado directly out of its shell, but I hate it when an avocado goes brown on me in the refrigerator. They are usually so expensive to buy and they always seem to go brown exactly when you were planning on using it to finish off a salad or meal.

Jerry James Stone, one of my favorite food bloggers, has recently posted this easy tip for storing a cut avocado in the refrigerator for up to 5 days.

I am definitely going to be giving this one a try . . . THANKS JERRY!!

Standard
100 Days Project, Dairy Free, Gluten Free, Recipes, Salads, Uncategorized, Vegan

Day 6 – Sweet Potato & Pistachio Quinoa Salad

Day6

I have a question for you Herbivores  . . . Do you have the problem of always making just way too much food?

This is certainly a problem in my kitchen; you would think a small army was coming to dinner. I am single, live with one flatmate who I rarely see, every once and awhile I will have a friend or two over for dinner, but typically there is more food made than can possibly be eaten.  Realistically, there are only so many days you can stand to eat the same left overs, and while freezing food is an option, my freezer is small and can only hold so much. Plus, not everything freezes well. One of the lovely things about this recipe is that it makes small portions. It serves two, so you have enough for dinner and lunch for the next day. That being said, it is also easibly scalable just in case that small army turns up unexpectedly, or you want to make a healthy meal for your family or friends.

Quinoa (pronounced keen-wah) is becoming a very popular grain in our modern society, but it has ancient origins dating back to Ican civilization. It was considered the “mother or all grains”, and today we call it a “super grain” as it is wheat-free, gluten-free, easy to digest, high in protein, and among the least allergenic foods available. It has been a staple of the indigenous diet in areas like Peru for centuries cultivated more for domestic use than international export. The only problem with Quinoa’s blossoming popularity in the western world is that it is putting pressure on the available crops causing the price to increase, making this staple food economically out of reach for some communities who have depended on it. This imbalance will hopefully be solved as more crops are currently being planted to keep up with both the domestic and international demand.

I can create amazingly complicated recipes, but the simplest of foods can sometimes be a challenge. Qunioa, like rice, can be difficult to cook properly, coming out gluggy when it should be soft and fluffy, or burning to the bottom of your pan if left too long. Just like rice, I have found you can cheat by making it in a rice cooker for perfect results every time. Shhh . . . this can be our little kitchen secret.

Sweet Potato & Pistachio Quinoa Salad

adapted from: Will Cook For Friends

SERVES: 2

INGREDIENTS

  • 1 sweet potato, peeled and cut into 20mm cubes (in New Zealand you can substitute a golden kumara for sweet potato)
  • 2-3 tabkespoons olive oil
  • 1 clove garlic, minced
  • 1/2 cup quinoa, rinsed (I used a mixture of red and white quinoa)
  • 1 cup vegetable stock or water
  • 1/2 teaspoon coriander seads
  • 1/2 teaspoon cumin powder
  • 1/4 cup fresh cilantro, chopped
  • 1/2 cup pistachios, roasted/salted/shelled, roughly chopped (plus more for garnish)
  • 500g of spinach, roughly chopped or baby spinach
  • Salt, pepper, and cayenne to taste

Preheat oven to 375f.

Toss cubed sweet potato or kumara with 1-2 tablespoons olive oil, and a large pinch of salt. Spread in an single layer on a foil covered baking sheet, and roast for 15-20 minutes, or until fork tender and brown. Shake or stir the pan once during cooking to stop tops from burning.
In a small pan over medium-high heat dry roast the coriander seeds until they start making a popping sound and release their fragrant aroma. Keep an eye on them, because they can very quickly got from brown to burnt. Grind the coriander seeds into coarse powder in an electric coffee mill, mortar and pestle, or with the bottom of a heavy glass.

In the same small pan, over medium heat, saute garlic in 1 tablespoon olive oil until golden and fragrant.

Rinse the quinoa under cold water, drain, then add to the pan. Add the vegetable broth, coriander, and cumin, and bring to a boil. Cover, reduce the heat to low, and let cook 12-15 minutes without lifting the lid. Remove from heat, and let stand for another 5 minutes. Alternatively, you can add all of these ingredients to a insert of a rice cooker and let it simmer away till done. Remove the lid or your pan or rice cooker, and fluff quinoa with a fork.

Gently stir in chopped cilantro, pistachios, and the sweet potato. Season to taste with salt, pepper, and cayenne.

Place a good size handful of the chopped spinach on a plate and top with the quinoa mixture.

ENJOY!!

Standard
100 Days Project, Uncategorized

100 Days project

Part of my reason for starting this blog now is that I will be doing the 2013 100 Days Project. Like many food lovers, I am constantly scouring the internet and bookstores for new recipes and cookbooks, yet I have only ever tried a small portion of the recipes in my collection. Starting on June 7th, I will be making a new recipe a day for 100 days, and I am using Herbivore to help document this experience and share the recipes with the rest of you. Since they are all new recipes I have never tried before, I am sure there will be some glorious successes and some epic failures. I hope to learn from both of these and invite all of you to join me in this adventure.

Link
Uncategorized

Welcome to Herbivore

herbivoreWelcome to Herbivore . . .

The first thing you should know is that I am a foodie . . . an unashamed and unabashed foodie. I love the taste, textures, smells, and visual appeal of well made and well presented food.  I love knowing about food: where it comes from, its history, and how it is made. I have also been a Vegetarian for over 20 years, and some people seem to foolishly believe that these two things do not go together. It may be slightly more difficult to get flavor into a meal that does not depend on meat, but the pay-offs when that is done well, in my opinion, out weigh the simplicity of the “just add meat” school of cooking.

I spend hours scouring the web for new recipes, stealing ideas from my favorite food bloggers, such as Jerry James Stone, Heidi Swanson, and Karina “The Gluten Free Goddess”, or raptly watching the MasterChef franchise trying to figure how I can make that amazing dish they are cooking vegetarian without losing any of its visual or flavor appeal.

One, but certainly not the only, reason for my vegetarianism, is the environmental impact raising food animals has on our ecology. This as well as many other of our common practices are not sustainable for the future. There is so much research, development, and creativity that is happening right now to try to refine our human processes into something that will leave less of a footprint on this world. These ideas need to be nurtured and shared in order to gain momentum and acceptance in our society.

Both of these things are important to me, and I feel are important to share with others . . . so this is why I have started Herbivore.  I hope the inspiration and  information you find here feeds your body, sparks interesting thoughts, and one way or another warms your soul.

I look forward to hearing your responses and creating conversations . . .

– Jess “The Herbivore”

Standard