100 Days Project, Baking, Breads

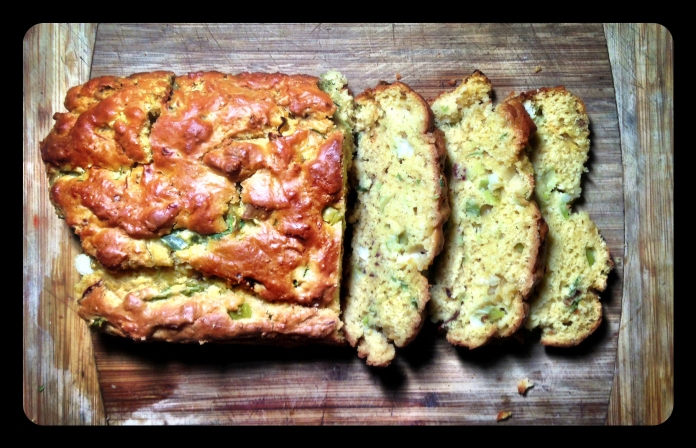
Day 51 – Chipotle and Scallion Buttermilk Bread

Day51

I couldn’t resist trying to make this recipe . . .

This recipe from the Fork, Spoon, and Knife blog uses a combination of green/spring onion, spicy chipotle peppers, and rich buttermilk bread was just too tempting.

It is hard to find a lot of chilli pepper types in NZ, and Chipotle peppers are no exception. La Mama and Tio Pablo are two brands that are imported, and you can usually find one or the other in the higher end shops like Nosh or Farro Fresh. Chipotles are a key ingredient in Mexican food.  They have heat and a distinctive smoky flavor and give the food a mild and earthy spiciness.  These chilis acan be used to make salsas and are often ground and combined with other spices to make a marinade called adobo. The flesh of the chilli  is thick, so they are usually used in a slow-cooked dish rather than raw.

The bread recipe is flavorful enough to be eaten on its on, with a slather of butter or cream cheese, or used for a sandwich.

Chipotle and Scallion Buttermilk Bread

by: Fork, Spoon, and Knife

INGREDIENTS

  • 1 1/3  cup flour
  • 2/3 cup chickpea flour
  • 2 tablespoon sugar
  • 1 1/2 teaspoon baking powder
  • 1/2 teaspoon baking soda
  • 2 teaspoons salt
  • 1 cup buttermilk
  • 2 chipotle peppers (preserved in adobo sauce but without sauce), diced fine
  • 4 scallions diced fine
  • 2 yolk
  • 4 tablespoons olive oil

Heat the oven to 350°F. Grease a loaf pan with olive oil.

Sift together all the dry ingredients together and whisk together the wet ones. Add the wet ingredients to the dry and fold until just incorporated. Fold in the chipotle and scallions and pour the batter into the prepared pan.

Bake for 30 – 40 minutes until just golden brown and it passes the toothpick test. Let the loaf cool in the pan for 15 minutes before removing and slicing.

ENJOY!!

Standard
100 Days Project, Baking, Breads, Cakes, Desert, Recipes, Uncategorized

Day 39 – Peanut Butter Banana Bread

Day39

There is a Facebook group called Baking Our Blues Away, that has declared Monday July 15th , 2013 as an international day of baking goodwill.

The idea is simple . . .  “everyone is encouraged to take a moment and give someone they know or don’t know, be it a loved one, a work colleague or perhaps a stranger on the street, a bit of baked or handmade love.”  I have browning bananas in my fruit bowl just asking to be made into banana bread, and so in honor of this, today I am baking this Peanut Butter Banana Bread recipe, which I found on the Sweet Pea’s Kitchen blog but originally comes from Cooking Light magazine.

PicsI can not imagine a better combination than peanut butter and banana. Being an American, I grew up on peanut butter, but I know most Kiwis are brought up on and are more partial to Vegemite or Marmite (for the uninitiated they are very different things and you must have a preference for one or the other).  Sadly, When I moved to New Zealand could not find anything on the grocery store shelves that tasted remotely like I expected peanut butter to taste like. They were all too sweet and sugary with chemical artificial sweeteners, and you could not taste any real peanut in them. Thank goodness for Pics Peanut Butter!!! I only discovered this peanut butter, made in the Nelson region, after being here for over 2 years. It used to only be sold at the Nelson weekend markets, and I was visiting a friend who had moved down the line. Honestly for the last 4 years, Pics has been the only peanut butter I will buy, and until someone can convince me there is another acceptable alternative, I will continue to be forever grateful to Mr. Pic.

So even though it is no longer July 15th, try baking something to share with others. In my experience from this 100 Days Project, where I have been sharing most of what I have been making, it makes you feel good and brings a smile to someone else’s face.

Peanut Butter Banana Bread

adapted from: Sweet Pea’s Kitchen and Cooking Light

INGREDIENTS

For the Bread:

  • 1 1/2 cups mashed ripe banana
  • 1/3 cup plain yogurt
  • 1/3 cup peanut butter, creamy or crunchy depending on your preference
  • 3 tablespoons unsalted butter, melted
  • 2 large eggs
  • 1/2 cup granulated sugar
  • 1/2 cup packed brown sugar
  • 1 1/2 cups all-purpose flour
  • 1/4 cup ground flaxseed or ground almonds
  • 3/4 teaspoon baking soda
  • 1/2 teaspoon salt
  • 1/2 teaspoon ground cinnamon
  • 1/8 teaspoon ground allspice
  • 2 tablespoons chopped dry-roasted peanuts

For the Peanut Butter Glaze:

  • 1/3 cup powdered sugar
  • 1 tablespoon milk
  • 1 tablespoon creamy peanut butter

Preheat oven to 180 C or 350 F.
Grease bottom and sides of a loaf pan and dust with flour.

In a large bowl , beat together the bananas, yogurt, peanut butter, butter and eggs at medium speed until combined. Add sugars and beat until blended.

In a small bowl, whisk together flour, flaxseed/ground almond, baking soda, salt, cinnamon and allspice. Add the dry ingredients to banana mixture; beat just until blended. Stir in nuts, and then scrape batter into prepared loaf pan and smooth surface with a rubber spatula.

Bake until top is golden and toothpick inserted into center comes out clean, about 1 hour 15 minutes. Cool in pan 10 minutes, then transfer to wire rack and cool completely.

To make the peanut butter glaze: In a small bowl whisk together powdered sugar, milk and peanut butter until smooth. Drizzle glaze over bread. Make sure it is completely cool when you do this, or you will wind up with a runny mess, like I did on my first attempt.

ENJOY!!

Standard
Baking, Breads, Dairy Free, Vegan (with substitutions)

New York Style Bagels

Bagels

Today is Bagel Day at my flat!!

Honestly, it’s very difficult to find a proper bagel in New Zealand . . . I am sorry Kiwis, but a bread roll with a hole in the center just does not count!! A few years ago, I was rescued from this bagel wasteland by my friend Stephen, who had a bagel recipe from his sister, who lives in New York, and she originally got the recipe from a Rabbi’s wife. Now that has to be a good bagel recipe!!

Ever since then, Bagel Day was born . . . which just means that a few times a year I spend a Sunday morning making bagels and inviting people around for an afternoon of bagel indulgence. I have been told it is a life changing experience for most of my Kiwi friends.

Bagels were invented by the Jewish population of Kraków, Poland in the early 1600’s.  It is believed that bagels were the Jewish version of the obwarzanek, a lean bread of wheat flour designed for Lent.  Since then, the bagel became a staple of the Polish diet, as well as the diets of people in neighboring countries.  The name may have originated from an old spelling of the Polish word for bow, because traditional handmade bagels are not circles but slightly stirrup-shaped instead.  In the Brick Lane district and surrounding areas of London, England, bagels have been sold since the middle of the 19th century, and bagels were brought to the United States by immigrant Polish-Jews.  Father and son, Harry and Murray Lender, helped to popularize the bagel throughout North America in the 1960s by pioneering automated production and the distribution of frozen pre-sliced bagels.

The thing most people miss when making bagels, is that bagels should be briefly  boiled before they are baked. This gives the dough a thin skin, that when baked, becomes a crunchy outer shell for the soft bagel center. It does take a good chunk of time to go through all the steps of making your own bagels, but it makes a great social activity to do with kids or friends, and you wind up with a warm yummy treat.

The main problem with Bagel Day is I always end up eating way too many fresh out of the oven bagels and spend the rest of the Sunday in a bagel coma on the couch. Just remember . . . you have been warned!!

This recipe can easily be made Vegan by using an egg replacer.

New York Style Bagels

MAKES: between 20 – 40 bagels, depending on how big you make your bagel shapes (the recipe can be easily halved)

INGREDIENTS

  • 12 cups flour
  • 2 eggs
  • 2 tablespoons oil
  • 4 cups luke-warm water
  • 1 packet or 6 teaspoons dried yeast
  • 4 teaspoons salt
  • 1/4 cup sugar

Combine sugar, salt, oil, half of the flour, all liquid, yeast and eggs in a large bowl and mix with wooden spoon until smooth. Cover with tea towel and leave in a warm place for 30-45 mins until risen and bubbly. If you do not have a hot water cupboard or similar suitable warm place, then briefly turn on your oven to its maximum temperature and then turn off again. This will create a perfectly warm environment for your dough to rise in.

Beat in remaining flour and knead until smooth and elastic. Put dough into floured bowl, sprinkle a little flour on top, cover with towel and return to the warm place for 1 to 1.5 hours. If using your oven, you may want to turn it on briefly again, but remember to turn it off again. The dough should double in bulk.

Punch dough down and form your bagel shapes. The easiest way to do this is to take a round ball of dough, slightly larger then a golf ball, and pinch it in the center with your thumb and second finger. Insert the first finger of both hands into the hole created by the pinch, and twirl fingers in a circular motion smoothly expending the hole. Make the hole a little larger than you will need, as it will start to close up when the dough rises.  Try to make the surface of your bagel shapes as smooth as possible.

Place bagel shapes on a floured bench space, cover, and leave for 15 minutes to rest and rise slightly.

Now, heat your oven to 220 C or 425 F.

Drop bagels into a pot of slowly boiling salted water one at a time. Leave for about 30 seconds on each side (the longer you boil the bagels the thicker the skin will be). Remove bagel shapes from the pot and place onto oiled baking trays.

Sprinkle on your choice of toppings: garlic, onion, sea salt, rosemary, sesame seeds, poppy seeds, cinnamon and sugar, pepper, caraway seeds are just some suggestions. This is where you can be creative and experiment with topping combinations and flavors.

Bake for about 20 minutes or until brown.

Cool them on a rack or threaded on a wooden spoon handle to prevent sogginess.

Eat them as soon as they are cool enough to hold in your hand. My preference is slathered with a “shmear” of Philadelphia brand cream cheese, but you can get just as creative with your condiments and bagel sandwich making as you can with the toppings themselves.

Make sure to eat them while fresh, within 12 hours, the crust will have gone soft, and the texture from cakey to rubbery.

ENJOY!!

Standard
100 Days Project, Baking, Breads, Dairy Free, Gluten Free, Vegan (with substitutions)

Day 31 – The Gluten Free Bagel Experiment

day31

Today was Bagel Day at my flat . . .

Since moving to New Zealand 7 years ago, I started making my own bagels and sharing them with friends because it is almost impossible to find a decent bagel in this country, but my gluten-free friends have always had to miss out on Bagel Day.  So . . . This time I decided to try and make gluten free bagels, as well as gluten-full bagels for Bagel Day.

Doing research online, I came up with quite a few gluten free bread recipes that I thought might make a decent bagel. The recipe I decided to go with was a gluten free pizza dough recipe from Karina: The Gluten Free Goddess. My thought process being that pizza crust should have the closest consistency to bagels.

Now proper American, New York style bagels are boiled, and then baked, which is what gives you that lovely crunchy shell around the soft inner bagel. Unfortunately most gluten free bread doughs are more like muffin or cake batter than they are typical bread dough. I knew the dough would not have enough elasticity to hold the bagel shape on its own, and unfortunately I definitely would not be able to boil them.  I came up with the solution of using a doughnut pan to create the round bagel shape with the gluten free dough. I also used the fan bake function of my oven, which will cook the outside quicker than the inside giving you a crispier outer shell to your gluten free bagels.

The most important part of any bagel making is the toppings. This is also the fun part where you can get a bit creative. From right to left in the picture above I used garlic and onion and sesame, cinnamon and sugar, sesame and sea salt, smoked paprika and sea salt (my favorite), onion and caraway seeds, and garlic and sea salt. If you think something might taste good on a bagel  . . . give it a try!!

Overall, these were not quite the same texture as normal bagels, but they were quite yummy and I think the idea is worth further experimentation.  My gluten free friends certainly seemed quite happy tucking into their bagel-like treats.

This recipe can easily be made vegan by using an egg replacer.

If you are not concerned about gluten . . . click here for my New York Style Bagel recipe.

Gluten Free Bagels

adapted from: The Gluten Free Goddess

MAKES: 12 bagels

INGREDIENTS

  • 2 cups tapioca flour/starch
  • 1 cup sorghum flour
  • 1/2 cup brown rice flour
  • 1/2 cup GF millet flour
  • 3 teaspoons baking powder
  • 2 teaspoons xantham gum
  • 1 teaspoon fine sea salt
  • 3 tablespoons organic light brown sugar
  • 1 1/4 cup warm water (between 110 – 115ºF)
  • 1 teaspoon organic light brown sugar
  • 1 packet active dry yeast
  • 1/4 cup good olive oil
  • 1/4 cup beaten organic free-range egg whites
  • 1/4 teaspoon light tasting rice vinegar

Preheat the oven to 400 F or 200 C, using the fan bake setting if you have one.

Brush the pockets of the doughnut pan with olive oil and set aside.

In a large mixing bowl, whisk together the flours and dry ingredients.

Proof the yeast in 1 cup warm water with a pinch of sugar. Once the yeast has gotten puffy, add the proofed yeast to the dry ingredients.

Add the oil, eggs and vinegar, and beat the dough until smooth and sticky. The dough should be more like cake or muffin batter than typical bread dough.

Spoon the dough into the pockets of the doughnut pan. Wet your fingers with warm water, and smooth the surface of the bagels.  Then set the pan in a warm spot to rest and rise a bit- about 15 minutes.

Brush the tops of the bagels with olive oil, and add you choice of yummy toppings.

Bake for 10 – 15 minutes till golden.

Eating while still warm, preferably slathered with cream cheese, is always best.

ENJOY!!

Standard
100 Days Project, Baking, Breads, Dairy Free, Gluten Free, Recipes, Vegan (with substitutions)

Day 20 – Gluten Free Dinner Rolls

Day20

Now I like my gluten as much as the next person, but more and more people are finding they are fully Coeliac, have some sort of intolerance to gluten, or that eating less gluten makes them feel better on a day to day basis.

Personally, I fall into that last category. I have Juvenile Rheumatoid Arthritis, an autoimmune disease same as Coeliac disease. Studies have shown the same allergic reaction that causes the stomach to react to gluten causes antigens to form in the blood stream that may case swelling in joints, especially areas already weakened by arthritis. The simple version of this is that i have less swelling and pain in my joints when I eat less gluten. I also tend to feel more clear headed and have more energy.

I am going to a dinner party tomorrow night, where I know there will be other people who do not eat gluten, so I decided to make these Gluten Free Dinner Rolls, which is a recipe from my favorite gluten free resource: Karina, The Gluten Free Goddess. Her recipes for gluten free goodies always come out tasty, and although I have not tried this recipe, I am confident that it will make something yummy for me to bring along to the dinner party.

From Karina, The Gluten Free Goddess I have learned the key to gluten free baking is Xantham Gum. Produced by a bacteria grown through fermentation of glucose, sucrose, or lactoseis, Xantham gum is commonly used as a food additive or thickening agent. In gluten free baking it works as a binding agent replacing that natural property found in gluten.

this recipe provides for Vegan substitutions making these dinner rolls a perfect accompaniment to the Vegan/Gluten Free Split Pea Soup recipe in my Day 19 post.

Gluten Free Dinner Rolls

by: Karina, The Gluten Free Goddess

MAKES: 12 Bread Rolls

INGREDIENTS

  • 1 cup sorghum flour- aka jowar flour
  • 1 1/2 cups tapioca starch or potato starch (not potato flour!)
  • 1/2 cup millet flour or brown rice flour
  • 1/4 cup GF buckwheat flour or GF millet flour
  • 1/4 cup hazelnut flour or almond flour
  • 2 tablespoons coconut flour or brown rice flour
  • 1 teaspoon xanthan gum
  • 1 teaspoon fine sea salt
  • 1 packet rapid rise yeast
  • 2 tablespoons light brown sugar
  • 1 1/2 cups warm liquid (3/4 cup dairy  or non-dairy milk plus 3/4 cup hot water)
  • 1/4 cup light olive oil
  • 2 free-range local organic eggs, beaten or Ener-G Egg Replacer
  • 1/2 teaspoon lemon juice or rice vinegar

Turn your oven on and off briefly to warm it. Grease a 12-cup muffin pan and sprinkle the cups with GF flour; set it aside.

In a large mixing bowl, whisk together the flours and dry ingredients.  Then add in the wet ingredients and beat until a thick batter forms. This bread dough is not puffy and stretchy like wheat-based dough, it is more akin to a sturdy muffin batter. Beat until smooth.

Spoon the bread dough into the twelve greased and floured cups. Even out the tops using wet fingers or the back of a wet tablespoon. Place the pan in the center of the warmed oven to let the dough rise.

Set your timer for 50 minutes. At 50 minutes, turn your oven to 350ºF. (It should come to temperature within a few minutes.)

Bake until the rolls are golden and firm- about 22 minutes. Thump them with a fingertip- they should sound hollow. Note: If your oven is slow to heat, you may have to bake the rolls longer to cook all the way through.

When the rolls are done baking, remove the pan from the oven and place it on a wire rack to cool a bit. Using a thin knife, loosen the edges of the rolls from the pan and ease the rolls out. They are tender when warm.

Serve immediately with butter or vegan substitute.

ENJOY!!

Standard