100 Days Project, Dairy Free, Dips, Condiments and Dressings, Gluten Free, Recipes, Vegan

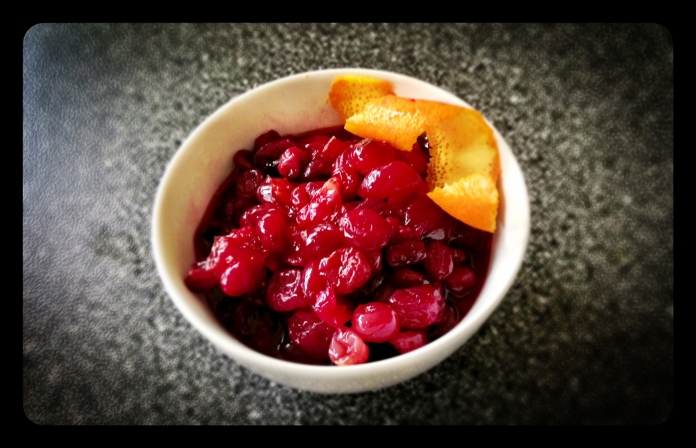
Day 56 – Boozy Baked Cranberry Sauce

Day56

Cranberry sauce is always one of my favorite parts of the Thanksgiving meal.

I think as a young future vegetarian, who did not like turkey very much, Cranberry sauce was one of the things I looked forward to the most. Typically it was just the jellied wobbly canned stuff that comes out with the ridges imprinted in the sides, but cranberry sauce was one of the special foods that may family only ate at Thanksgiving, which made it seem that much more fantastic. Now I am older, and prefer to make food from scratch and use as little processed and preserved ingredients as possible, so when I found this recipe from Jerry James Stone, the idea of making my own Cranberry sauce caught my attention. Especially if you are adding a little booze.

Although, I have a feeling “Boozy” might be a bit of a misnomer here, as I suspect most the alcohol will bake off, but it will still leave behind that lovely residue of sugar and will have helped macerate the cranberries. Maceration is a process in food preparation that uses liquids (often alcohol ) to soften or break up tough ingredients like raw, dried, preserved, or fresh fruit and vegetables and help them release their own juices adding to the flavor and making the ingredient easier to chew and digest.

I am making this cranberry sauce as a test for this year’s Thanksgiving. I am heading home to The States to be at my family Thanksgiving for the first time time since I moved to New Zealand 7 years ago.   Looking forward to seeing my family and helping to cook up vegetarian treats to add to the Thanksgiving table.

Boozy Baked Cranberry Sauce

adapted from: Jerry James Stone

INGREDIENTS

  • 340 grams or 12 ounces fresh or frozen cranberries
  • ½ cup liquid honey
  • 2 Large Oranges
  • 1 Shot Triple Sec, Gran Marnier, Cointreau or other orange flavored liqueur (a vanilla liqueur could possible work quite nicely as well).

Half the oranges. Then in a large mixing bowl add the honey and juice the orange halves. If you are using solid honey, pop it in the microwave for 30 seconds to a minute to help liquify the honey.

Add the liqueur and whisk together the juice and honey mixture so that the honey is mostly dissolved into the juice.

Add in the cranberries and gently mix so they are lightly coated. Then place the cranberries in a baking dish or on a shallow cookie sheet and bake for 40 min on 180 C or 350 F. They are ready when the cranberries have wilted, cracked, and broken open.

You can chill them and serve them later but they are best hot and gooey. Also if you prefer a saucier texture you can roughly pulse the baked cranberries in a blender with some of the left over juice.

ENJOY!!

Standard
100 Days Project, Dips, Condiments and Dressings, Gluten Free, Party Food, Recipes, Snacks

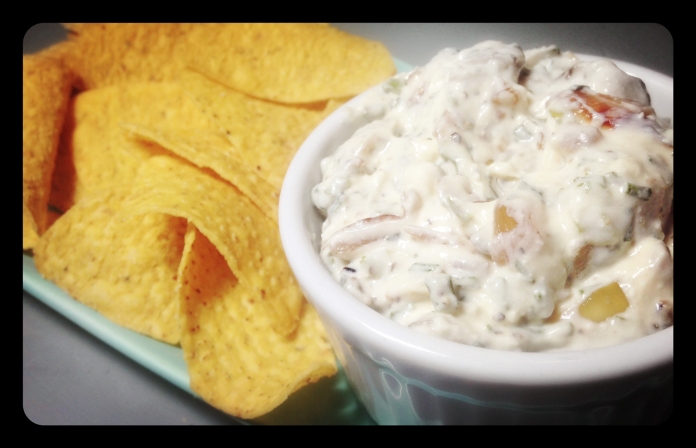
Day 55 – Caramelized Onion & Goat Cheese Dip

Day55

I think onion dip was one of the first thing I ever learned how to make as a kid.

This 1950’s classic onion soup mix and sour cream concoction is essential at American parties, BBQ’s, and picnics and I used to make it for after school snacks when I had friends around.  I was thrilled to find that here in New Zealand they make a similar version, and it is just as common, if not more so, to have onion dip at parties and gatherings. The one main difference is that in New Zealand they use reduced dream instead of sour cream, but the overall flavor is very similar.

When I found this recipe for Caramelized Onion and Goat Cheese Dip, on the Kitchen Simplicity blog, it seemed like a good alternative that used fresh ingredients instead of the typical packaged and processed ones.  The results are very similar tasting, although this recipe has the added subtle goat cheese flavor and a stronger caramelized onion taste, but there is nothing wrong with that as far as I am concerned.  If you are going to eat onion dip , you might as well eat ONION dip.

Caramelized Onion & Goat Cheese Dip

from: Kitchen Simplicity

MAKES: approx. 2 cups

INGREDIENTS

  • 1 tablespoon olive oil
  • 2 cups diced onion (about 2 medium onions)
  • 1 garlic clove, minced
  • salt and pepper, to taste
  • 1 cup sour cream
  • 4 oz. soft goat cheese
  • 1/4 cup finely chopped fresh chives

Heat oil in a pan or skillet over a medium-low heat.  Add the chopped onions and garlic, and season with salt and pepper. Cook the onions down, stirring often, until it caramelizes and turns a deep golden brown. Set the caramelized onion aside to cool slightly.

Meanwhile stir together sour cream and goat cheese, mashing the goat cheese with a fork
to break it up.  I use the Tararua Lite sour cream as it is one of the only vegetarian sour creams you can find in New Zealand (only thr Lite version is vegetarian). Stir in the caramelized onions and garlic addong the fresh chives and more salt and pepper to taste.

Cover and refrigerate at least one hour before serving with corn chips, potato chips, pretzels, fresh bread, or any other party snack. Honesty, you could very easily just lick this off a spoon.

ENJOY!!


Standard
100 Days Project, Dairy Free, Desert, Gluten Free, Recipes, Uncategorized, Vegan (with substitutions)

Day 45 – Baked Apples Stuffed with Candied Ginger and Almonds

Day45

Baked apples make me think of Grandma and Grandpa Mills . . .

Growing up, we had dinner with my grandparents every Sunday. There was a cafeteria style restaurant they liked to go to, and everyone’s favorite from the desert bar was the baked apple. Those baked apples were not nearly as fancy as this Baked Apple Stuffed with Candied Ginger and Almonds recipe from Jerry James Stone and Treehugger’s Green Wine Guide, but it still makes those memories float to the surface.

I had a friend over last night for a Sunday night game of intense competitive Scrabble, which was a game I always played with with my Grandmother as well. Maybe that is why this recipe seemed like the perfect fit. Unfortunately, I got a bit distracted when reducing the syrup and it turned into more of a caramel that almost candied the baked apples, but it was still quite delicious, and I supplemented it with warm maple syrup to make sure the apple was not too dry.

I served the the baked apples with maple walnut ice cream and a small glass of port. The three made quite a good winter desert combination and an excellent Scrabble treat!!

You can easily substitute the honey for another unrefined sweetener for Vegan alternative . . .

Baked Apples Stuffed with Candied Ginger and Almonds

MAKES: 4- 6 Apples, depending on the size of your apples

INGREDIENTS

  • 4- 6 large apples (Rome or Braeburn)
  • 1/3 cup candied ginger, chopped
  • 3/4 cup almonds, toasted and chopped
  • 1/4 cup brown sugar, packed
  • 1/2 teaspoon vanilla extract
  • 2 tablespoons honey
  • 1 1/2 teaspoons lemon zest
  • 1 teaspoon cinnamon
  • 1/2 teaspoon ground clove
  • Water, for the baking dish

Preheat oven to 350 degrees.

Combine brown sugar, vanilla and honey and mix well. Then mix in the ginger, almonds, cinnamon, clove and lemon zest, and set to one side.

Core each apple; be careful to remove all of the stem and seeds. If need be, trim the apple bottoms so that they sit steadily on a flat surface. Place the apples upright in a baking dish, and spoon the filling into hollow of each apple .

Fill the baking dish with enough water to form a 20 mm or 1/2-inch pool around the apples.

Bake for 1 hour and 15 minutes or until the apples are tender.

Transfer the apples to a serving plate with a spatula.

Pour the reaming liquid from the baking dish into a small saucepan, and cook over a medium-high heat until it becomes syrupy, about 15 minutes. This is where you need to make sure not to reduce it too long that it becomes a caramel. Drizzle the syrup over the top of each apple, and sprinkle some additional almonds and candied ginger on top.

ENJOY!!

Standard
100 Days Project, Dairy Free, Dips, Condiments and Dressings, Gluten Free, Mains, Recipes, Side Dish, Vegan

Day 44 – Slow Cooked Barbecue Baked Beans

Day44

Her is another great slow cooker recipe for you my Herbivores . . .

The best thing about slow cookers is how you can pop everything into the insert the night before or in the morning, the slow cooker does all the work, and you get to eat the yummy results.  This recipe for slow cooked barbecue baked beans, from Skinny Ms, is not exception.

I love the smokey maple flavor of a good BBQ sauce, and unfortunately, until recently, that can be hard to find here in New Zealand. I used to make the trip out to Martha’s Backyard, the American Store in Mt. Wellington, just for BBQ sauce. Luckily now some of the fancier food stores like Nosh and Farro are bringing BBQ sauce in from the US. Even one of my favorite brands, Kansas City Cowtown BBQ Sauce. I got so excited when I saw this at a friend’s house that she bought me a bottle the next time she came over for dinner. A friend that brings good BBQ sauce is a good friend indeed!! The Bonz Kajun Kitchen in Elliott Stables makes great locally made BBQ sauce that they bottle and sell, but you have to ask nicely for a vegetarian version, because he will normally put pig fat drippings in his sauce otherwise.

The thing that makes BBQ sauce so good is the combination of smokey, savoury, spicy, and sweet all perfectly balanced for optimal enjoyment.  When slow cooked with these beans, it makes a great side dish or can easily be turned into a main, like I did, by spooning the beans over a baked potato and adding a bit of spring onion/green onion and cheese.  A Kiwi favorite is baked beans on toast, and this recipe can be be used to make a great version of that dish as well. Add a fried egg on top, and you got a yummy savoury breakfast!!

If you do not have access to a good BBQ sauce, you can easily make your own with the recipe included below.

Slow Cooked Barbecue Baked Beans

MAKES: 8, 1 cup servings

INGREDIENTS

  • 1 sweet onion, diced
  •  1.7 kilograms or 60 ounces cooked Cannellini beans, drained and rinsed
  • 1 1/4 cup barbecue sauce (recipe below)
  • 1/2 cup unrefined sweetener, (choices of unrefined sweeteners: Madhava Coconut Sugar, honey, molasses, pure maple syrup, sucanat, sorghum)
  • 2 tablespoons yellow mustard
  • 1/2 teaspoon cayenne pepper
  • 1/2 teaspoon freshly ground black pepper
  • Sea salt to taste

for BBQ Sauce:

  • 1 tablespoon vegetable oil
  • 1 sweet onion, finely diced
  • 1 clove garlic, minced
  • 1 – 230 gram or 8 ounce can tomato puree
  • 1/2 cup mild molasses or sorghum
  • 1/4 cup balsamic vinegar
  • 2 teaspoons Dijon mustard
  • 1/2 teaspoon cayenne pepper
  • 2 teaspoons chili powder
  • 1/4 teaspoon black pepper
  • Sea Salt to taste

Add all ingredients for the BBQ beans  into the slow-cooker.  For the unrefined sweetener, I used a combination of golden syrup and molasses, but any of the other options will do).  Cover, turn to low and cook 6-8 hours.

It is as simple at that!!

To make your own Barbecue Sauce:

In a medium sauce pan add canola oil, turn to medium-low heat and saute onion and garlic until tender, about 5 minutes. Add the remaining barbecue sauce ingredients, stir and simmer until sauce has thickened, about 30 minutes. Viola!!

ENJOY!!

Standard
100 Days Project, Dairy Free, Gluten Free, Recipes, Salads, Vegan

Day 43 – Crispy Spiced Cauliflower Salad with Herbed Dressing

Day43

So this recipe is not a single new recipe, but kinda a combination of two cauliflower recipes I have been holding onto.

I realized I had never made either recipe because each, on its own, seemed a bit too simplistic and bland, but if I combined elements of both recipes together, I thought it could work quite well. The result was certainly worth the experimentation.  One recipe was from Healthy Food and the other one from Treehugger.

Normally, I would use dry chickpeas for a recipe, and soak them over night. Since I was not necessarily planning on making this recipe, I had to use my “emergency ” can of chickpeas that I keep in the pantry, but that is what it is there for.  For most beans I prefer to use the dry version, as it less expensive and usually tastes better (not having been stored in that preservative thick liquid in cans). But sometimes you are making a last minute meal and those emergency cans can be quite handy.

The greens of this salad are Silverbeet, otherwise known as Swiss Chard. This leafy vegetable has been bred to have highly nutritious leaves at the expense of the root, and is subsequently considered to be one of the healthiest vegetables available.

This recipe is another great use for that chickpea flour you may have bought at some point for one recipe, like my Day 42 Panelle post, and are now trying to figure out what to do with the rest.

Crispy Spiced Cauliflower Salad with Herbed Dressing

SERVES:4

INGREDIENTS

  • 1 medium cauliflower, about 1 kg
  • vegetable oil for frying
  • 3 tablespoon gram flour
  • 1/2 teaspoon smoked paprika
  • 1 teaspoon cumin
  • 400 grams cooked chickpeas, drained and rinsed
  • 4 cups chopped silver beet leaves (Swiss Chard), stalks discarded
  • 2 tablespoons olive oil
  • salt and pepper, to taste

for the dressing

  • Generous handful of parsley
  • 6 bushy sprigs of mint
  • Handful of basil
  • 2 cloves garlic, crushed
  • 2 tablespoons Dijon mustard
  • 2 tablespoons capers
  • 6 tablespoons olive oil
  • 2 tablespoons lemon juice
  • Salt and pepper to taste

Break the cauliflower into florets. Boil in salted water for a couple of minutes, and then drain thoroughly.

Blanch or microwave silver beet for 1-2 minutes until tender. Then combine cauliflower, chickpeas, silver beet and olive oil in a large bowl, and mix well. Season with salt and pepper.

Make the dressing before you fry the cauliflower, so that the cauliflower will still be warm when serving. Chop all the herbs quite finely, and then stir in the garlic, mustard and capers. Pour in the olive oil slowly, beating with a fork to make sure the oil combines with the other ingredients.  Stir in the lemon juice and season with salt and black pepper. Be generous with the seasoning, tasting as you go.

Get the vegetable oil hot in a deep pan (if you do not want to fry the cauliflower I imagine this would taste almost as good baked).

Toss the cauliflower with the gram flour, a little salt and pepper, cumin, and smoked paprika. When the cauliflower is coated, fry in the hot oil till crisp, a matter of three or four minutes or so. Drain with a paper towel before adding the cauliflower on top of the silverbeet.

Drizzle with the dressing, and serve warm with additional dressing on the side.

ENJOY!!


Standard
100 Days Project, Baking, Breads, Dairy Free, Gluten Free, Vegan (with substitutions)

Day 31 – The Gluten Free Bagel Experiment

day31

Today was Bagel Day at my flat . . .

Since moving to New Zealand 7 years ago, I started making my own bagels and sharing them with friends because it is almost impossible to find a decent bagel in this country, but my gluten-free friends have always had to miss out on Bagel Day.  So . . . This time I decided to try and make gluten free bagels, as well as gluten-full bagels for Bagel Day.

Doing research online, I came up with quite a few gluten free bread recipes that I thought might make a decent bagel. The recipe I decided to go with was a gluten free pizza dough recipe from Karina: The Gluten Free Goddess. My thought process being that pizza crust should have the closest consistency to bagels.

Now proper American, New York style bagels are boiled, and then baked, which is what gives you that lovely crunchy shell around the soft inner bagel. Unfortunately most gluten free bread doughs are more like muffin or cake batter than they are typical bread dough. I knew the dough would not have enough elasticity to hold the bagel shape on its own, and unfortunately I definitely would not be able to boil them.  I came up with the solution of using a doughnut pan to create the round bagel shape with the gluten free dough. I also used the fan bake function of my oven, which will cook the outside quicker than the inside giving you a crispier outer shell to your gluten free bagels.

The most important part of any bagel making is the toppings. This is also the fun part where you can get a bit creative. From right to left in the picture above I used garlic and onion and sesame, cinnamon and sugar, sesame and sea salt, smoked paprika and sea salt (my favorite), onion and caraway seeds, and garlic and sea salt. If you think something might taste good on a bagel  . . . give it a try!!

Overall, these were not quite the same texture as normal bagels, but they were quite yummy and I think the idea is worth further experimentation.  My gluten free friends certainly seemed quite happy tucking into their bagel-like treats.

This recipe can easily be made vegan by using an egg replacer.

If you are not concerned about gluten . . . click here for my New York Style Bagel recipe.

Gluten Free Bagels

adapted from: The Gluten Free Goddess

MAKES: 12 bagels

INGREDIENTS

  • 2 cups tapioca flour/starch
  • 1 cup sorghum flour
  • 1/2 cup brown rice flour
  • 1/2 cup GF millet flour
  • 3 teaspoons baking powder
  • 2 teaspoons xantham gum
  • 1 teaspoon fine sea salt
  • 3 tablespoons organic light brown sugar
  • 1 1/4 cup warm water (between 110 – 115ºF)
  • 1 teaspoon organic light brown sugar
  • 1 packet active dry yeast
  • 1/4 cup good olive oil
  • 1/4 cup beaten organic free-range egg whites
  • 1/4 teaspoon light tasting rice vinegar

Preheat the oven to 400 F or 200 C, using the fan bake setting if you have one.

Brush the pockets of the doughnut pan with olive oil and set aside.

In a large mixing bowl, whisk together the flours and dry ingredients.

Proof the yeast in 1 cup warm water with a pinch of sugar. Once the yeast has gotten puffy, add the proofed yeast to the dry ingredients.

Add the oil, eggs and vinegar, and beat the dough until smooth and sticky. The dough should be more like cake or muffin batter than typical bread dough.

Spoon the dough into the pockets of the doughnut pan. Wet your fingers with warm water, and smooth the surface of the bagels.  Then set the pan in a warm spot to rest and rise a bit- about 15 minutes.

Brush the tops of the bagels with olive oil, and add you choice of yummy toppings.

Bake for 10 – 15 minutes till golden.

Eating while still warm, preferably slathered with cream cheese, is always best.

ENJOY!!

Standard
100 Days Project, Gluten Free, Mains, Recipes

Day 21 – Portobello Mushroom Skillet

Day21

Well . . . was supposed to be at a friends house for dinner, but that fell through.  I ended up inviting the few friends who were still keen on dinner around to mine, but then had to figure out what to make.

To adhere to everyone’s dietary restrictions, the meal had to be vegetarian and gluten free. I already had the Gluten Free Dinner Rolls, from my Day 20 post, that I made last night, and in my stash of untried recipes, I found this recipe for a Portobello Mushroom Skillet, from How Sweet It Is. This recipe is quick, simple ,gluten free, and vegetarian; so, essentially just what I was looking for. Plus, the added bonus of being warm and cheesy on a chilly night.

I served the mushrooms with the Gluten Free Dinner Rolls,  a last minute concoction of roasted potatoes and green beans that had been tossed in olive oil, salt, pepper, thyme and lemon zest, and of course a lovely bottle of red wine.

Portobello Mushroom Skillet

by: How Sweet It Is

SERVES: 2-4

  • 8 portobello mushrooms, stems removed
  • 2 tablespoons olive oil
  • 1 shallot, thinly sliced
  • 1 small red pepper, chopped
  • 3 cloves of garlic, minced
  • 1 (8 oz) bag of fresh spinach
  • 1/4 teaspoon salt
  • 1/4 teaspoon pepper
  • 1/4 teaspoon smoked paprika
  • 2 tablespoons parmesan cheese
  • 1 tablespoon balsamic vinegar
  • 8-10 slices of fontina or havarti cheese
  • fresh parsley for garnish

Heat a skillet over medium heat and add 1 tablespoon of olive oil. Add shallots and peppers with salt and pepper, cooking until soft – about 5 minutes. Add in garlic and spinach, cooking until spinach wilts, then stir in smoked paprika and parmesan.

Remove spinach mixture from skillet and set aside in a bowl. Add remaining olive oil in skillet, then place mushrooms in the pan stem side down. Cook for 5-6 minutes, then flip. Cook for 5 minutes more, then fill each mushroom with an equal amount of the spinach mixture. Turn the heat under the skillet off, and heat the broiler in your oven.

Dizzle balsamic into pan and gently stir mushrooms to coat, then add a slice of fontina or havarti on top of each. Place under the broiler for 2-3 minutes, or until cheese gets bubbly and melts. Serve immediately,

Garnish with parsley, if desired, and with crusty bread (or in my case gluten free dinner rolls)

ENJOY!!

Standard
100 Days Project, Baking, Breads, Dairy Free, Gluten Free, Recipes, Vegan (with substitutions)

Day 20 – Gluten Free Dinner Rolls

Day20

Now I like my gluten as much as the next person, but more and more people are finding they are fully Coeliac, have some sort of intolerance to gluten, or that eating less gluten makes them feel better on a day to day basis.

Personally, I fall into that last category. I have Juvenile Rheumatoid Arthritis, an autoimmune disease same as Coeliac disease. Studies have shown the same allergic reaction that causes the stomach to react to gluten causes antigens to form in the blood stream that may case swelling in joints, especially areas already weakened by arthritis. The simple version of this is that i have less swelling and pain in my joints when I eat less gluten. I also tend to feel more clear headed and have more energy.

I am going to a dinner party tomorrow night, where I know there will be other people who do not eat gluten, so I decided to make these Gluten Free Dinner Rolls, which is a recipe from my favorite gluten free resource: Karina, The Gluten Free Goddess. Her recipes for gluten free goodies always come out tasty, and although I have not tried this recipe, I am confident that it will make something yummy for me to bring along to the dinner party.

From Karina, The Gluten Free Goddess I have learned the key to gluten free baking is Xantham Gum. Produced by a bacteria grown through fermentation of glucose, sucrose, or lactoseis, Xantham gum is commonly used as a food additive or thickening agent. In gluten free baking it works as a binding agent replacing that natural property found in gluten.

this recipe provides for Vegan substitutions making these dinner rolls a perfect accompaniment to the Vegan/Gluten Free Split Pea Soup recipe in my Day 19 post.

Gluten Free Dinner Rolls

by: Karina, The Gluten Free Goddess

MAKES: 12 Bread Rolls

INGREDIENTS

  • 1 cup sorghum flour- aka jowar flour
  • 1 1/2 cups tapioca starch or potato starch (not potato flour!)
  • 1/2 cup millet flour or brown rice flour
  • 1/4 cup GF buckwheat flour or GF millet flour
  • 1/4 cup hazelnut flour or almond flour
  • 2 tablespoons coconut flour or brown rice flour
  • 1 teaspoon xanthan gum
  • 1 teaspoon fine sea salt
  • 1 packet rapid rise yeast
  • 2 tablespoons light brown sugar
  • 1 1/2 cups warm liquid (3/4 cup dairy  or non-dairy milk plus 3/4 cup hot water)
  • 1/4 cup light olive oil
  • 2 free-range local organic eggs, beaten or Ener-G Egg Replacer
  • 1/2 teaspoon lemon juice or rice vinegar

Turn your oven on and off briefly to warm it. Grease a 12-cup muffin pan and sprinkle the cups with GF flour; set it aside.

In a large mixing bowl, whisk together the flours and dry ingredients.  Then add in the wet ingredients and beat until a thick batter forms. This bread dough is not puffy and stretchy like wheat-based dough, it is more akin to a sturdy muffin batter. Beat until smooth.

Spoon the bread dough into the twelve greased and floured cups. Even out the tops using wet fingers or the back of a wet tablespoon. Place the pan in the center of the warmed oven to let the dough rise.

Set your timer for 50 minutes. At 50 minutes, turn your oven to 350ºF. (It should come to temperature within a few minutes.)

Bake until the rolls are golden and firm- about 22 minutes. Thump them with a fingertip- they should sound hollow. Note: If your oven is slow to heat, you may have to bake the rolls longer to cook all the way through.

When the rolls are done baking, remove the pan from the oven and place it on a wire rack to cool a bit. Using a thin knife, loosen the edges of the rolls from the pan and ease the rolls out. They are tender when warm.

Serve immediately with butter or vegan substitute.

ENJOY!!

Standard
100 Days Project, Dairy Free, Gluten Free, Mains, Recipes, Vegan

Day 18 – Teriyaki Tempeh Bowl

Day18

Asian style food is usually my fall back for a quick, healthy, flavorful meal when I am running short of time.

I got home really late from work yesterday, and realized I had not eaten much during the busy day so needed to make something quick, healthy, and packed with protein. It seemed like the perfect opportunity to try this recipe for a Teriyaki Tempeh Bowl sent to me by a friend who, although she is not vegetarian herself, cooks amazing food for her vegetarian husband.

Tempeh is a traditional soy product originally from Indonesia, most likely from the island of Java. Like Tofu, tempeh is made from soybeans, but it is a whole soybean product with different nutritional characteristics and a very unique textural quality made by a natural culturing and controlled fermentation process that binds whole soybeans into a cake form. Tempeh’s fermentation process and use of the whole soybean give it a higher content of protein, dietary fiber, and vitamins than Tofu.

Teriyaki is a Japanese cooking style in which foods are broiled or grilled while being basted in a marinade based on soy sauce, mirin (rice vinegar), and sugar. Modern or store bought Teriyaki Sauce also may include honey, garlic, ginger, and chili, but these are not ingredients common to to traditional Japanese cooking.

So this meal is a bit of a mash up of cultures between Indonesian Tempeh and Japanese Teriyaki Sauce, but all together it was just what I needed for a late night quick protein fix.

Teriyaki Tempeh Bowl

MAKES: 2 Servings

INGREDIENTS

  • 250g (one packet) of tempeh, sliced
  • 1 tablespoon sesame oil
  • store bought or homemade Teriyaki Sauce
  • 1 small head of broccoli
  • 1 carrot, cut into sticks
  • 1 small red onion
  • 2 small heads of Bok Choy
  • 1 cup mushrooms, sliced
  • 1 small zucchini (courgette), sliced
  • 1 green onion (spring onion), for garnish
  • 1 cup brown rice
  • 2 cups water

Place the 1 cup brown rice and 2 cups water into a rice cooker or pot on the stove and simmer until done.

Heat the sesame oil in a medium pan and add the Tempeh slices cooking them until brown on both sides. Add enough Teriyaki sauce to cover the tempeh and let simmer in a covered pan for about 5 minutes, turning the Tempeh slices over about half way through.

While Tempeh is simmering, steam the vegetables over a pot of boiling water for only a few minutes, just until the colours brighten and the vegetables start to lose their rawness. Be careful, you do not want to over steam the vegetables.

Build your bowl with a serving of brown rice on the bottom, adding a portion of the steamed vegetables, and topped with a few pieces of the Teriyaki Tempeh and some additional Teriyaki Sauce splashed on top. Garnish with a sprinkle of the chopped green onion.

ENJOY!!

Standard
100 Days Project, Dairy Free, Dips, Condiments and Dressings, Gluten Free, Recipes, Vegan

Day 7 – Mediterranean Spiced Carrot Relish

Day7

What do you all think about the new pop-up dining craze?

For those of you who may not know, pop-up dining is when a small restaurant appears in random and/or previously vacant space for a limited time, sometimes only one night.  Personally, I think it’s a great idea!! Serving a specialized menu or sometimes themed, pop-up restaurants offer patrons something different from what is normally locally available and helps turn going out to dinner into a social community event. Unfortunately, one of the draw backs of pop-up dining is that it is typically a set menu with limited vegetarian and vegan options.

I found this recipe on online from Pop-Up Dining Auckland. I have only recently found out about this group, but I am very excited to see that they not only are very creative with their events (the last one being Viking themed), but that often these events are Vegan. The next Vegan pop-up dining event, Vegan Latino, is on July 3rd, and tickets are on-sale now. Being American, I love Latino/Mexican food, and I am thinking I need to check out this yummy Vegan goodness myself. Here’s  hoping tickets will still be available when my next paycheck comes in. Anyone want to go with me?

Further endearing this group to me, they seem to openly post some their recipes on-line inviting and encouraging people to try to make the food they have tasted for themselves.  This recipe was one of the items they served during their recent Mediterranean Vegan pop-up dining event, held at Kokako. They called it Carrot Jam, but when I made the recipe, the consistency and texture is much more similar to what I would call a relish; hence the name change.

The flavors found in Mediterranean food are usually fresh and vibrant playing on the contrast between sweet and savory. This recipe for Mediterranean Spiced Carrot Relish certainly fits that description. Much of this recipe is based on your own personal tastes, and you have to work it it a bit to get the sweet savory balance right, but the results are well worth the effort. I am looking forward to eating this carrot relish with some feta and avocado on a cracker, or maybe as a topping for a falafel burger.

Mediterranean Spiced Carrot Relish

by: Pop-Up Dining Auckland

INGREDIENTS

  • 1 tablespoon mustard seeds
  • 1 tablespoon cumin seeds
  • 1 tablespoon olive oil
  • 5 carrots, grated
  • 1 onion, grated
  • orange juice, preferably fresh squeezed
  • orange zest
  • apple cider vinegar
  • brown sugar
  • salt

Take a tablespoon of mustard seeds and one of cumin seeds and fry in hot oil until it smells nice and the mustard seeds pop.

Add about 5 grated carrots and a grated onion and let it sweat over a med heat. Then add orange juice and zest, apple cider vinegar and brown sugar. Here you will need to judge and taste. A rough guide is about 1 part juice to 2 parts vinegar and then a cup of sugar. You need some liquid to show in the bottom of the pan and you may need to add more as it cooks.

Cover pan with a lid and cook for ages; it is jam after all. If it starts to dry out, add more juice and vinegar and suagr to counter the acidity. Add salt as well. Keep cooking and tasting. If its too vinegary for you, add more sugar, to sweet add more vinegar. You get the idea. It should end up rich and sticky. Leave it to cool, refrigerate and eat tomorrow.

ENJOY!!

Standard