100 Days Project, Dips, Condiments and Dressings, Gluten Free, Party Food, Recipes, Snacks

Day 55 – Caramelized Onion & Goat Cheese Dip

Day55

I think onion dip was one of the first thing I ever learned how to make as a kid.

This 1950’s classic onion soup mix and sour cream concoction is essential at American parties, BBQ’s, and picnics and I used to make it for after school snacks when I had friends around.  I was thrilled to find that here in New Zealand they make a similar version, and it is just as common, if not more so, to have onion dip at parties and gatherings. The one main difference is that in New Zealand they use reduced dream instead of sour cream, but the overall flavor is very similar.

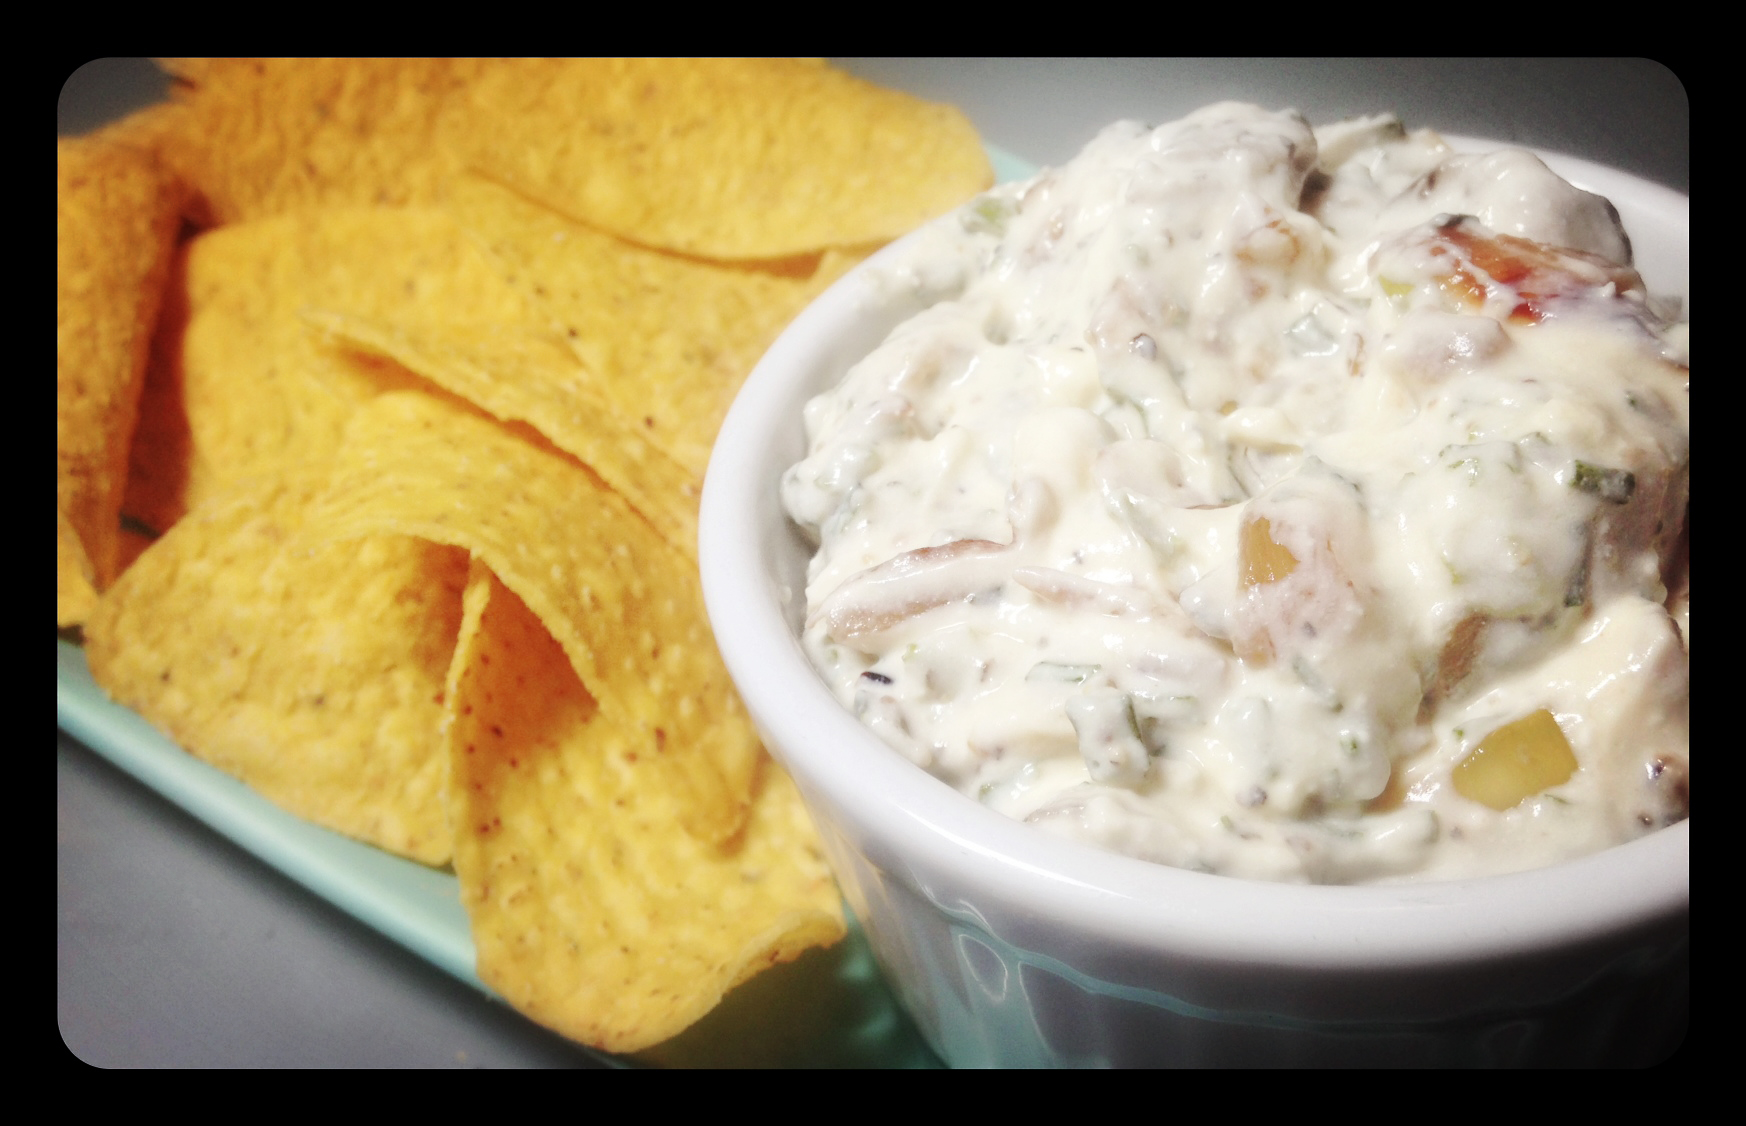
When I found this recipe for Caramelized Onion and Goat Cheese Dip, on the Kitchen Simplicity blog, it seemed like a good alternative that used fresh ingredients instead of the typical packaged and processed ones.  The results are very similar tasting, although this recipe has the added subtle goat cheese flavor and a stronger caramelized onion taste, but there is nothing wrong with that as far as I am concerned.  If you are going to eat onion dip , you might as well eat ONION dip.

Caramelized Onion & Goat Cheese Dip

from: Kitchen Simplicity

MAKES: approx. 2 cups

INGREDIENTS

  • 1 tablespoon olive oil
  • 2 cups diced onion (about 2 medium onions)
  • 1 garlic clove, minced
  • salt and pepper, to taste
  • 1 cup sour cream
  • 4 oz. soft goat cheese
  • 1/4 cup finely chopped fresh chives

Heat oil in a pan or skillet over a medium-low heat.  Add the chopped onions and garlic, and season with salt and pepper. Cook the onions down, stirring often, until it caramelizes and turns a deep golden brown. Set the caramelized onion aside to cool slightly.

Meanwhile stir together sour cream and goat cheese, mashing the goat cheese with a fork
to break it up.  I use the Tararua Lite sour cream as it is one of the only vegetarian sour creams you can find in New Zealand (only thr Lite version is vegetarian). Stir in the caramelized onions and garlic addong the fresh chives and more salt and pepper to taste.

Cover and refrigerate at least one hour before serving with corn chips, potato chips, pretzels, fresh bread, or any other party snack. Honesty, you could very easily just lick this off a spoon.

ENJOY!!


Advertisement
Standard
100 Days Project, Dairy Free, Gluten Free, Party Food, Recipes, Side Dish, Snacks, Vegan

Day 42 – Panelle

Day42Mmmm . . . Deep fried chickpea goodness . . .

A friend of mine posted this recipe, from the New York Times, on her Facebook page, and I knew I was going to have to try making it at some point. Panelle is a type of Sicilian street food that is very similar to polenta, which is made of corn meal. Instead, Panelle is made from chickpea flour (Gram flour), which means it has the added benefit for vegetarians of being high in protein. They make a tasty and interesting and healthier alternative to potato fries, and can be used in the same way for a quick, but filling, snack

These “chips” went extremely well with the left over Warm Chickpea & Artichoke Pâté from my Day 41 post of the 100 Days Project challege.

Panelle

from: The New York Times

INGREDIENTS

  • Vegetable or olive oil for greasing and frying
  • 1 cup chickpea flour
  • Salt and freshly ground black pepper
  • 2 tablespoons olive oil
  • 1 lemon, cut into wedges

Grease an 8-by-8 baking dish or a quarter sheet pan with some oil.

Bring 2 cups water to a boil in a small saucepan. Put the chickpea flour in a large bowl, and when the water comes to a boil, gradually add it to the chickpea flour, whisking constantly to prevent lumps. Scrape the mixture into the saucepan you used to boil the water, and sprinkle with salt and pepper.  Bring the chickpea flour mixture up to a boil, stir in 2 tablespoons of olive oil, and then reduce to a gentle simmer. Only continue cooking for about a minute.

Scoop the chickpea mixture onto the baking dish or sheet pan and spread it into an even layer. Let it cool, and cover loosely with parchment or plastic. Refrigerate for at least 30 minutes, or up to 24 hours.

Put at least 15mm or 1/4 inch oil in a large skillet over medium heat.  Cut the chickpea mixture into “French Fries”, about 3 inches long and blot any excess moisture with a paper towel. Working in batches, gently drop them into the hot oil. Cook, rotating them occasionally until they’re golden all over, 3 to 4 minutes. Drain fries on paper towels and immediately sprinkle with salt and lots of pepper. Serve hot, with lemon wedges.

Pour yourself a glass of wine and  . . .

ENJOY!!

Standard
100 Days Project, Gluten Free (with Substitutions), Party Food, Snacks

Day 38 – Crispy Potato & Parmesan Puffs

Day38

Continuing this weekend’s theme of finger-food, tapas, small plate type recipes . . . I present the Crispy Potato & Parmesan Puff.

This recipe, originally from the How Sweet It Is blog, caught my attention because they idea of potato and parmesan cheese combined together into a crispy bite sized treat was just too good to ignore. It was the perfect thing to make on a rainy sunday afternoon, and combined with the Feta & Pesto Stuffed Peppadew Peppers , the Dolmades, a glass of wine, and some bread, these little puffs make a great lunch or dinner to graze your way through while chatting with a friend or two.

The recipe makes about 70 puffs, but it is easy to halve. Honestly though, I do not think 70 of these puffs would be all that hard to get through.

This recipe would be easy to make gluten free by substituting the panko bread crumbs with a gluten free bread crumb alternative.

Crispy Potato & Parmesan Puffs

MAKES: 70 puffs

INGREDIENTS

  • 1 kg or 2 lbs of russet potatoes, peeled and cut into chunks
  • 2 tablespoons milk
  • 3 tablespoons unsalted butter
  • 1 teaspoon salt
  • 1/2 teaspoon pepper
  • 1 cup freshly grated parmesan cheese
  • 2 tablespoons minced green onions/spring onions
  • 2 eggs, lightly beaten
  • 1-2 cups seasoned panko bread crumbs

Add potatoes to a large pot of boiling water and cook until fork tender, about 20 minutes. Drain the potatoes and then mash them with salt, pepper, butter and milk. Then stir in parmesan and onions, then place the mixture in the fridge to cool for 15-20 minutes.

Preheat the oven to 200 C or 400 F. I would recommend using the fan bake setting, if you have one on your oven.

Remove potatoe mixture from the fridge and roll into golf ball sized balls. Dip each potato ball into the beaten egg, then cover in bread crumbs. Place them on a baking sheet about 20mm or 1-2 inches apart, and hit each with a quick spritz of olive oil or cooking spray.

Bake for 12-15 minutes, or until outside is crispy.

Serve them while still warm with a lemon garlic aioli, pesto or other dipping sauce.

ENJOY!!

Standard
100 Days Project, Dairy Free, Gluten Free, Party Food, Recipes, Side Dish, Snacks, Vegan

Day 37 – Dolmades

Day37

Since I started off last night with my Day 36 Feta & Pesto Stuffed Peppadew Peppers post, I decided to keep up the theme for the weekend with recipes for small plate tapas type dishes. Dolmades seemed like the perfect fit!!

Dolmades or Dolma are a stuffed vegetable dish common in the Balkans and surrounding regions of the Middle East. The word Dolma comes from the Turkish for “stuffed thing”. Generally, grape or cabbage leaves are wrapped around a rice based filling, that can be meat or vegetarian, and includes onion, herbs like dill, mint or parsley and spices. While meat Dolma are served warm, vegetarian ones are often served cold or at room temperature. There are numerous variations of ingredients and fillings across the many countries that make a Dolma-like dish.

I first made and had Dolmades as a pre-teen at summer camp. Two kids from every cabin had to help out the kitchen staff with food prep every day. Probably not hard to believe that this was one of my favorite tasks on the chore rotation. I remember one day when we came in, there was a big industrial sized bowl of rice filling and all these grape leaves. I had never thought about eating an actual leaf before (not including lettuce) and thought this was a bit strange. I followed instructions on how to fill and roll the grape leaves into Dolmades, and was pleasantly surprised when it came to dinner time that this strange dish was actually quite yummy!! Although I have eaten Dolmades many times since then, this was probably the last time I tried making them myself until today.

Dolmades

adpated from: Kitchen Classics – Gourmet Vegetarian

MAKES: approx. 40 Dolma

INGREDIENTS

  • 6 spring onion (green onions)
  • 1/2 cup olive oil
  • 3/4 cup long grain rice
  • 15 grams or 1/2 ounce fresh mint
  • 2 tablespoons chopped dill
  • 2/3 cup lemon juice
  • salt and pepper, to taste
  • 1/4 cup currants
  • 1/4 cup sun-dried tomatoes, finely chopped
  • 1/4 cup artichoke hearts, finely chopped
  • 1/4 cup pine nuts, toasted.
  • 235 grams or 8 1/2 ounce packaged pickled grape leaves
  • 2 tablespoons olive oil, extra

Heat the oil in a medium sized sauce pan. Chop the spring onions and add them to the pan, cooking them over a medium heat for only one minute.  Stir in the rice, mint, dill, half the lemon juice, and salt and pepper to taste. Add 1 cup of water and bring to a boil, then reduce heat, cover, and simmer for 20 minutes.

Dry roast the pine nuts until they are toasted and golden brown.

Remove the lid, and fork through the currants, sun-dried tomatoes, artichokes, and toasted pine nuts. Cover with a paper towel, then the lid, and leave to one side to cool.

Gently rinse and separate the grape leave, then pat dry with a paper towel and trim any thick stems off with scissors.

Line the base of a 20cm or 8 inch pot with any torn of misshapen leaves. Choose the larger leaves for filling and sue the smaller ones to patch any gaps.

Place a leaf shiny side down, vein side up,  on a cutting board. Spoon a tablespoon of filling into the center of the leaf.  Bring in the sides, and roll up tightly from the stem end of the leaf. Place seam side down in the base of the leaf lined pot arranging them close together in a single layer.

Pour int he rest of the lemon juice, the extra oil , and enough water to just cover the top of the dolmades. Cover them with an inverted plate and some sort of weight to firmly compress the dolmades and keep them in place while cooking (I had trouble finding something for this, but a tin of canned vegetables might work). Cover with the lid, and bring the liquid up to a boil reducing it to a simmer for 45 minutes. Let them cool and serve at room temperature.

These would make a great side dish to go with my Lebanese Red Lentil Soup.

ENJOY!!

Standard
100 Days Project, Gluten Free, Party Food, Recipes, Snacks

Day 36 – Feta & Pesto Stuffed Peppadew Peppers

Day36

Make your own tapas . . .

I first had feta stuffed Peppadews at a friend’s wedding and I have been hooked on these little sweet and slightly spicy treats ever since, but this is the first time I have ever made them myself. Normally, they can be found in the deli section of the supermarket, where you pay a ridiculous price for the convenience of having someone else stuff a little square of feta into the Peppadew for you because you can not be bothered to take the time and do it yourself.  No more . . . I will henceforth be making my own feta stuffed Peppadews with the Herbivore twist of adding a small dallop of pesto at the bottom of the pepper before stuffing it with feta.

Just like Kleenex or Hoover, Peppadew is actually a brand name for a certain type of sweet piquanté peppers originally grown in South Africa. The pepper is processed for removal of the seeds and reduction of the spiciness of the pepper to more tolerable levels. It is then pickled and bottled. The flavor of a Peppadew is sweet with a slight briney spice.

Feta & Pesto Stuffed Peppadew Peppers

INGREDIENTS

  • 1 bottle Peppadew peppers
  • 1 package feta cheese
  • 1 tub of pesto or make your own fresh

Drain the brine from the jar of peppers.

Cut the feta cheese into small squares.

Using a teaspoon, place a small amount of pesto at the bottom of the Peppadew and then stuff it with the small block of feta. Do not worry of some of the pesto gushes out around the edges. Continue the same process with each pepper until you have finished the bottle, or alternatively run out of either pesto or cheese.

ENJOY!!

Standard
100 Days Project, Dairy Free, Raw, Recipes, Snacks, Vegan (with substitutions)

Day 26 – No Bake Granola Bars

Photo1(32)

On to Day 26, Herbivores . . .

Today was a busy day, did not have time to grab breakfast, and got home late. These kind of days are where quick snacks come in handy, and quick recipes. I had seen this recipe for easy No Bake Granola Bars on Food52, and figured I would keep it around for one of these short on time days during the 100 Days Project.

All these ingredients are items I normally keep in my pantry, and I think most people will probably have around. I used rolled oats, sunflower seeds, pumpkin seeds, raisins, and dried cranberries, but there are infinite various on this combination. You can easily tailor the recipe to suit your personal tastes. Some other suggestions might be chocolate chips, dried pineapple, cashews, almonds, coconut, or dried cherries, and these granola bars could easily be made gluten free by using puffed millet and other gluten free cereals instead of oats. This recipe can also be made Vegan by substituting the honey with agave nectar or brown rice syrup. Personally I love honey though, I think honey is one of the main reasons I am not Vegan. Well . . . honey and cheese.

No Bake Granola Bars

From: Food52

MAKES:10-12

INGREDIENTS

  • 2 1/2 cups rolled or quick oats
  • 1/2 cup raw pumpkin seeds
  • 1/2 cup raw sunflower seeds
  • 1/2 cup raisins
  • 1/2 cup dried cranberries
  • 2/3 cups peanut or almond butter
  • 2/3 cup honey (adjust based on how well things stick together)
  • 1/8 teaspoon sea salt (adjust based on which nut butter you use)

Mix oats,  seeds, and fruit in a large bowl

I a small bowl, whisk together nut butter, sweetener, and sea salt. I used a half and half combination of Pics Peanut butter and Almond butter, mostly because I did not have enough peanut butter on its own, but also because I thought it would give an interesting taste.  If you are in New Zealand, where it is easier to find solid honey than liquid honey, put the solid honey in the microwave for 30 seconds to loosen it up before trying to whisk it into the peanut butter.
Pour into oat mixture, and mix well, till everything is sticky and combined. If it’s too dry, add a bit more honey.
Press mixture into a shallow baking dish that you’ve lined with foil, saran wrap, or baking paper. Cover with more foil/saran, press well into the baking dish (Iused the bottom on another baking dish for this in order to make sure the pressure was flat and even), and refrigerate for 4 hours.
Cut into bar shapes, wrap, and keep refridgerated till ready to use. They will last two weeks in the fridge.
ENJOY!!
Standard