100 Days Project, Dairy Free, Gluten Free, Recipes, Soups, Vegan (with substitutions)

Day 47 – Risi E Bisi


Day47

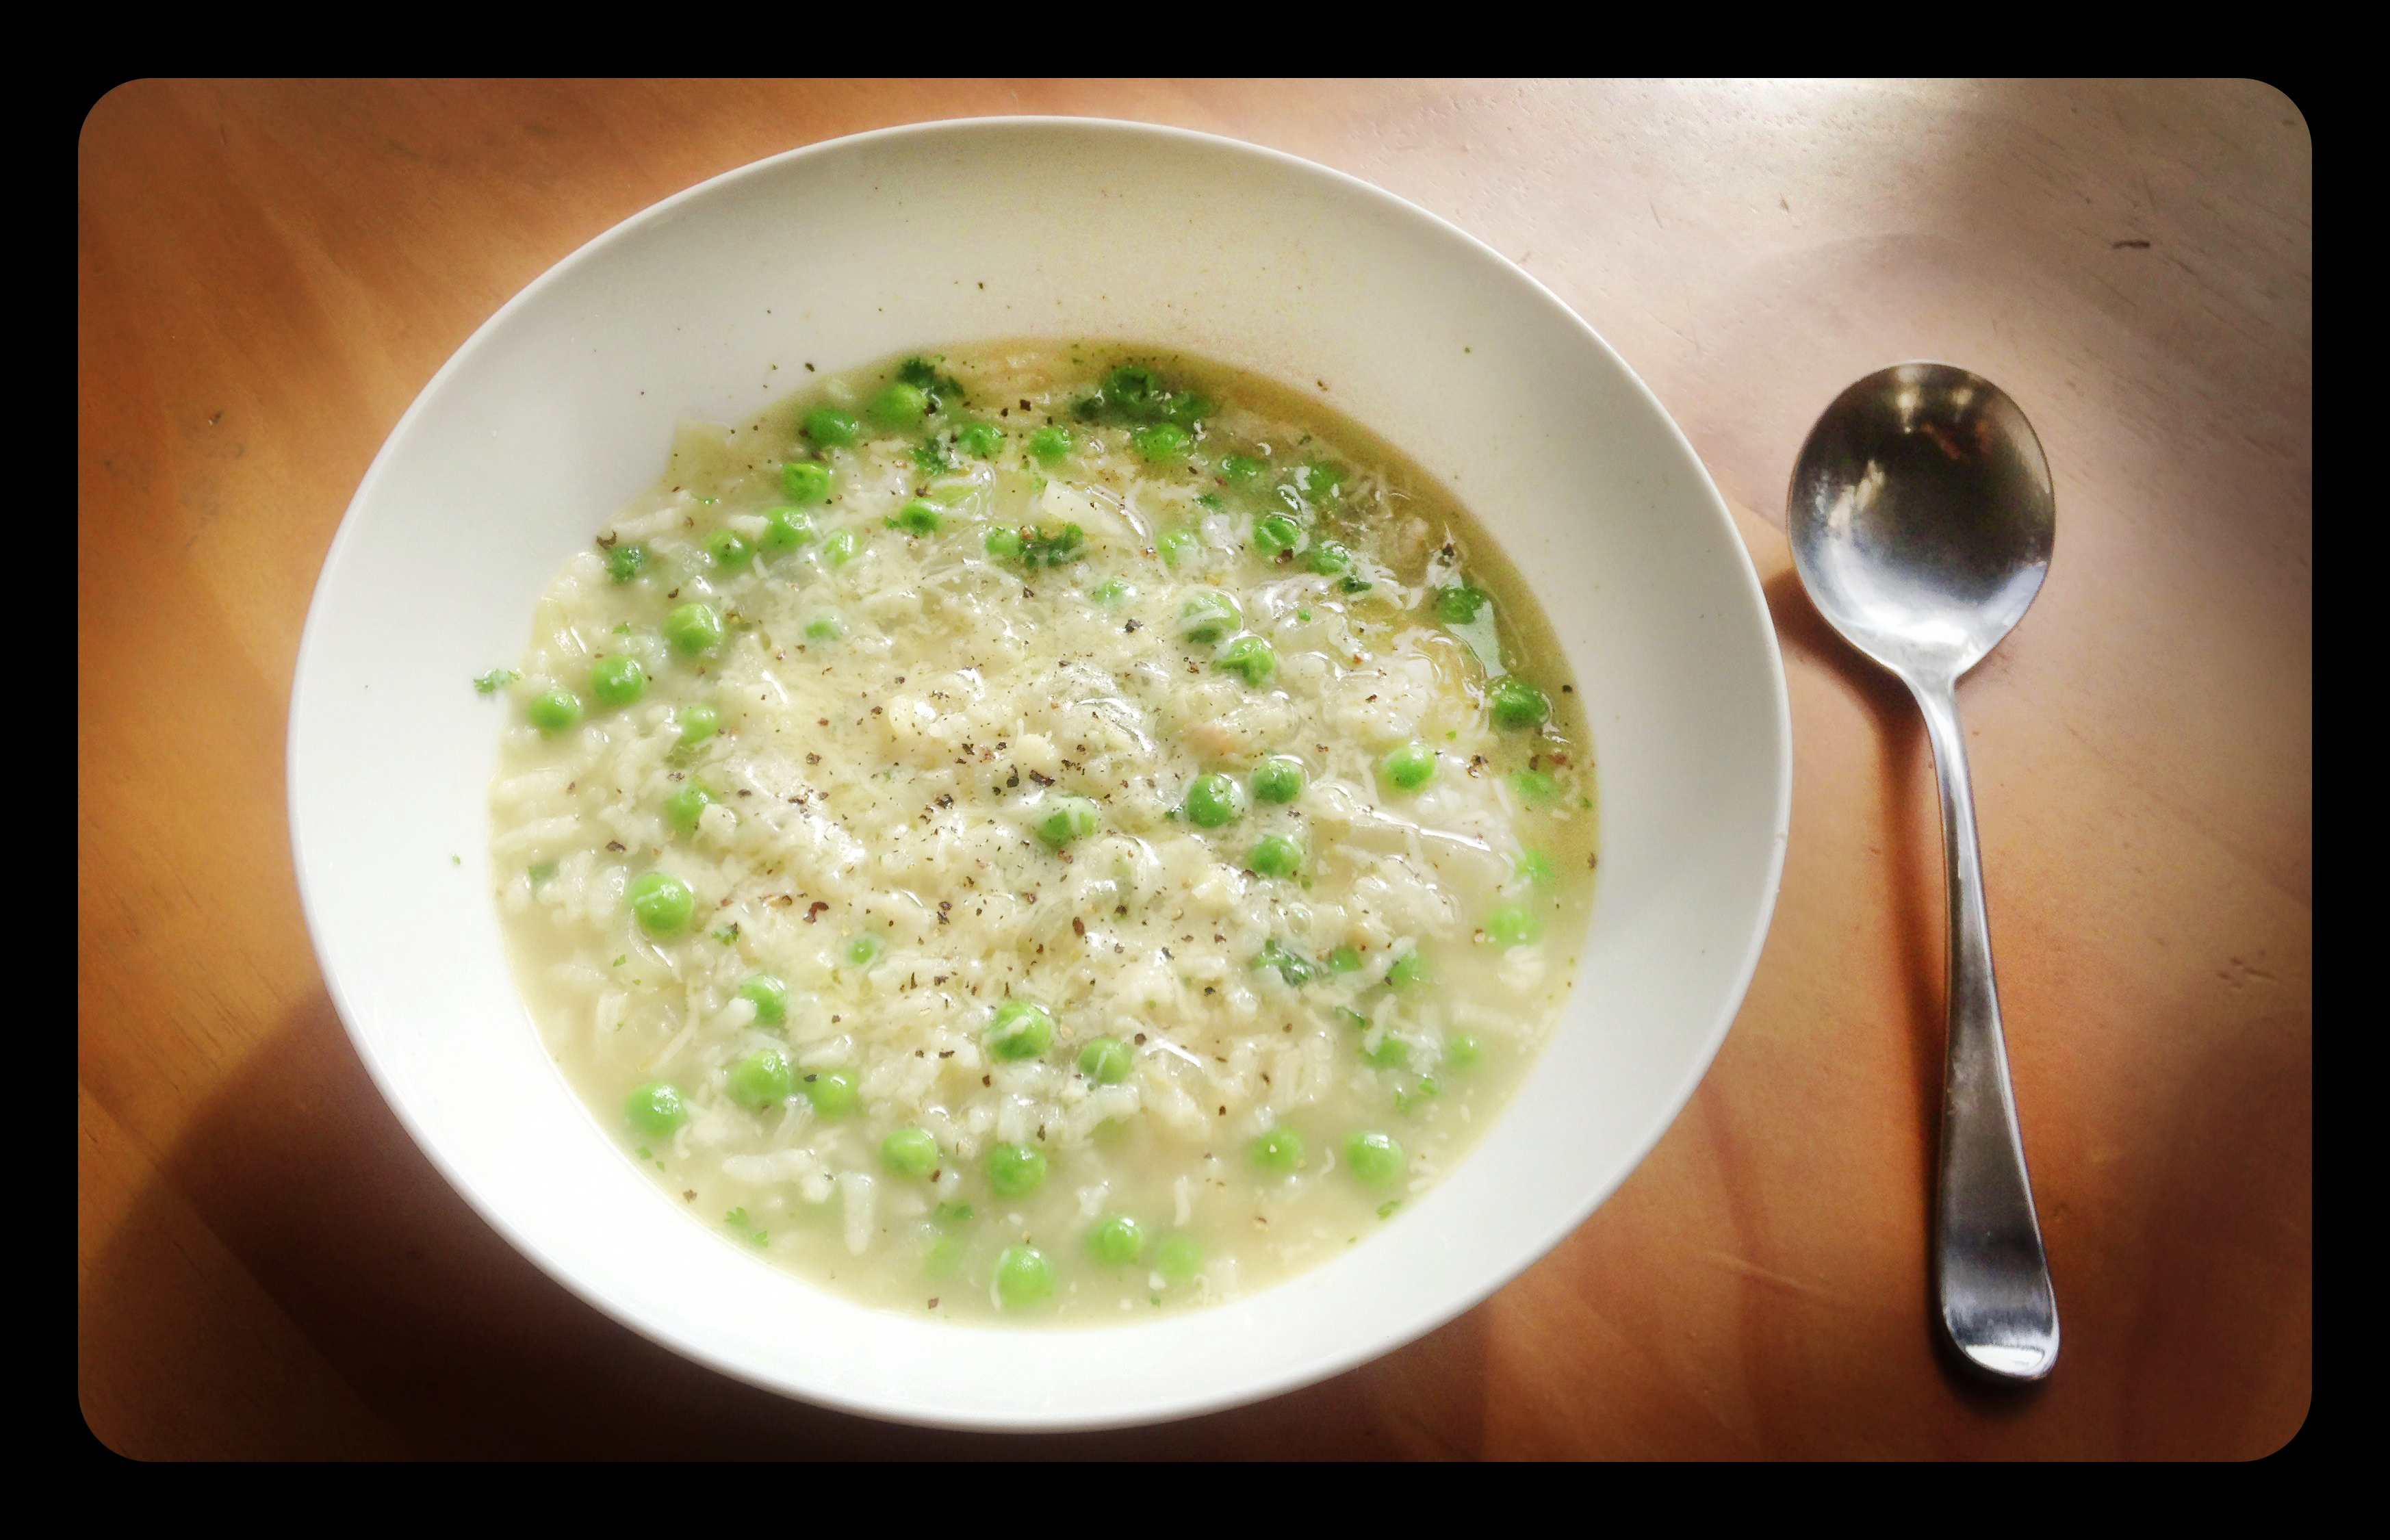
Risi e Bisi in Italian literally translates to rice and peas.

This is a classic Venetian (Venice, Italy) dish that was prepared only on the feast days decreed by the Doge (Venice’s ruler). These days this law no longer applies and you are allowed to prepare Risi e Bisi at any time, although it is best when fresh peas are available. Even though this recipe uses Aborio rice, which typically is used for Risotto, Risi e Bisi is more like a soup.

I found this soup recipe in a collection from The Moosewood Restaurant, in Ithaca, New York. The Moosewood, was one of the first fully vegetarian restaurants opened in the United States in the early 1970s, and it has been named one of the thirteen most influential restaurants of the 20th century by Bon Appetit magazine. The Moosewood Collective was  also one of the first to publish a vegetarian cookbook for home use. “The Moosewood Cookbook” is a recipe book written by Mollie Katzen in 1977. It was hand-lettered, imaginatively illustrated by Katzen,  featured a number of the recipes favored by the restaurant at the time, and quickly became a “must have” in many American homes. Recently, “The Moosewood Cookbook” was listed by the New York Times as one of the top ten bestselling cookbooks of all time, and is likely the most popular vegetarian cookbook in the world. Both “The Enchanted Broccoli Forest” and “The Vegetable Dishes I Can’t Live Without” are cookbooks written by Katzen that can be considered Sequels to “The Moosewood Cookbook”. When I lived in Rochester, NY for University, I often made the 1 1/2 road trip to Ithaca just to eat at The Moosewood. I do not think any project about vegetarian food would be complete without including at least one of their recipes.

This recipe is incredibly simple and delicious; I could not stop myself from eating two large bowls for lunch. It is gluten free and can easily be made dairy free and vegan by substituting the butter, and leaving out the Parmesan.

Risi E Bisi

SERVES: 4-6

INGREDIENTS

  • 1 tablespoon butter (or Vegan alternative)
  • 1 tablespoon extra virgin olive oil
  • 1 large onion, chopped
  • 8 cups “Mock Chicken Stock” (I used a 1/2 and 1/3 combo of mushroom stock and vegetable stock”
  • 1 teaspoon salt
  • 1 cup raw arborio rice
  • 2 cups baby peas fresh or frozen
  • 2 tablespoons fresh parsley, chopped
  • 1 cup parmesan cheese, grated
  • salt and pepper to taste

Warm the butter and olive oil in a medium pot until the butter has completely melted.

Add the onions and sauté on medium-high heat for about 10 minutes. The add the stock and salt and turn up the heat to high bringing the stock to a boil. Stir in the rice, and lower the temperature to a simmer, cover, and cook for 20 to 20 minutes, until the rice is tender.

Add the peas and cook for another 2 to 3minutes before stirring in 1/2 cup of the parmesan cheese and the parsley. Add additional salt and pepper to taste.

Serve immediately, topped with remaining parmesan.

ENJOY!!


Standard
100 Days Project, Dairy Free, Gluten Free, Mains, Vegan

Day 46 – Pomegranate Glazed Eggplant with Tempeh

Day46

I was going through my recipe books with a friend, and she was utterly surprised to find out that I just happened to have pomegranate molasses for this recipe already in my pantry. My cheeky response was  . . . “doesn’t everybody?”

Seriously though, I had bought the pomegranate molasses ages ago for a particular recipe I ended up not liking very much, and have been looking for an opportunity to use it ever since.  Hence my excitement at finding the Pomegranate Glazed Eggplant with Tempeh recipe in Heidi Swanson’s “Super Natural Every Day” cookbook.

Pomegranate is one of those flavors that it so unusual, just the right mix of sweet and tart. It is a fruit that has been cultivated in the Middle East since ancient times, and has been mentioned in many ancient texts including the Old Testament. Pomegranates are used in cooking, baking, juices, smoothies and alcoholic beverages, such as martinis and wine, and can give you up to 12% of your daily required intake of vitamin C. You can usually find pomegranate molasses at a middle eastern shop, or sometimes at your local natural food type store.

Tempeh, is a kind of patty made of highly nutritious fermented soybeans. To learn more about the this food you can read my Day 18 – Teriyaki Tempeh Bowl post.

This recipe is Vegan, gluten and dairy free, if you leave off the feta. I served it over a bed of couscous made with currants, green/spring onions, and dry roasted pistachio nuts, but realistically it would go well with almost any grain or pulse: rice, wild rice, Israeli couscous, bulger, quinoa, etc . . .

Pomegranate Glazed Eggplant with Tempeh

SERVES: 4

INGREDIENTS

  • 1 long thin Asian eggplant (about 225 g or 8 ounce), cut into 25mm or 1 inch chunks
  • 255 grams or 8 ounces tempeh, cut into 10 mm or 1/2 inch cubes
  • 1 cup peeled and diced winter squash, pumpkin, sweet potato, or kumara
  • grated zest of 1 small lemon
  • 1 teaspoon fine grain, sea salt
  • 3 medium cloves of garlic, smashed
  • 1/2 teaspoon red pepper flakes
  • 1/3 cup pomegranate molasses
  • 1/3 olive oil
  • 1/3 cup fresh coriander/cilantro, chopped
  • 1/4 cup crumbled feta or ricotta

Preheat the oven to 180 C or 350 F, with the rack int he middle of the oven.

In a large bowl combine the cubed, eggplant, tempeh, and squash.

Prepare the glaze by sprinkling the salt over the smashed garlic, and then turning the garlic into a paste, either in a mortar and pestle or by  continuously chopping and smashing the garlic with the flat of your knife. Combine the garlic paste in a small bowl with the chili flakes and pomegranate molasses. Whisk in the olive oil.

Then drizzle 3/4 of the glaze over the ingredients in the large bowl. Toss well and transfer them to a rimmed baking sheet trying to arrange the ingredient sin a single layer.

Bake for 45-60 minutes until the eggplant and squash are soft and starting to caramelize. About 35 minutes into baking give the ingredients a good toss on the pan.

Once out of the oven drizzle with the remaining glaze, and sprinkle with the feta and fresh coriander/cilantro.

Serve warm with couscous or your grain of choice.

ENJOY!!


Standard
100 Days Project, Dairy Free, Desert, Gluten Free, Recipes, Uncategorized, Vegan (with substitutions)

Day 45 – Baked Apples Stuffed with Candied Ginger and Almonds

Day45

Baked apples make me think of Grandma and Grandpa Mills . . .

Growing up, we had dinner with my grandparents every Sunday. There was a cafeteria style restaurant they liked to go to, and everyone’s favorite from the desert bar was the baked apple. Those baked apples were not nearly as fancy as this Baked Apple Stuffed with Candied Ginger and Almonds recipe from Jerry James Stone and Treehugger’s Green Wine Guide, but it still makes those memories float to the surface.

I had a friend over last night for a Sunday night game of intense competitive Scrabble, which was a game I always played with with my Grandmother as well. Maybe that is why this recipe seemed like the perfect fit. Unfortunately, I got a bit distracted when reducing the syrup and it turned into more of a caramel that almost candied the baked apples, but it was still quite delicious, and I supplemented it with warm maple syrup to make sure the apple was not too dry.

I served the the baked apples with maple walnut ice cream and a small glass of port. The three made quite a good winter desert combination and an excellent Scrabble treat!!

You can easily substitute the honey for another unrefined sweetener for Vegan alternative . . .

Baked Apples Stuffed with Candied Ginger and Almonds

MAKES: 4- 6 Apples, depending on the size of your apples

INGREDIENTS

  • 4- 6 large apples (Rome or Braeburn)
  • 1/3 cup candied ginger, chopped
  • 3/4 cup almonds, toasted and chopped
  • 1/4 cup brown sugar, packed
  • 1/2 teaspoon vanilla extract
  • 2 tablespoons honey
  • 1 1/2 teaspoons lemon zest
  • 1 teaspoon cinnamon
  • 1/2 teaspoon ground clove
  • Water, for the baking dish

Preheat oven to 350 degrees.

Combine brown sugar, vanilla and honey and mix well. Then mix in the ginger, almonds, cinnamon, clove and lemon zest, and set to one side.

Core each apple; be careful to remove all of the stem and seeds. If need be, trim the apple bottoms so that they sit steadily on a flat surface. Place the apples upright in a baking dish, and spoon the filling into hollow of each apple .

Fill the baking dish with enough water to form a 20 mm or 1/2-inch pool around the apples.

Bake for 1 hour and 15 minutes or until the apples are tender.

Transfer the apples to a serving plate with a spatula.

Pour the reaming liquid from the baking dish into a small saucepan, and cook over a medium-high heat until it becomes syrupy, about 15 minutes. This is where you need to make sure not to reduce it too long that it becomes a caramel. Drizzle the syrup over the top of each apple, and sprinkle some additional almonds and candied ginger on top.

ENJOY!!

Standard
100 Days Project, Dairy Free, Dips, Condiments and Dressings, Gluten Free, Mains, Recipes, Side Dish, Vegan

Day 44 – Slow Cooked Barbecue Baked Beans

Day44

Her is another great slow cooker recipe for you my Herbivores . . .

The best thing about slow cookers is how you can pop everything into the insert the night before or in the morning, the slow cooker does all the work, and you get to eat the yummy results.  This recipe for slow cooked barbecue baked beans, from Skinny Ms, is not exception.

I love the smokey maple flavor of a good BBQ sauce, and unfortunately, until recently, that can be hard to find here in New Zealand. I used to make the trip out to Martha’s Backyard, the American Store in Mt. Wellington, just for BBQ sauce. Luckily now some of the fancier food stores like Nosh and Farro are bringing BBQ sauce in from the US. Even one of my favorite brands, Kansas City Cowtown BBQ Sauce. I got so excited when I saw this at a friend’s house that she bought me a bottle the next time she came over for dinner. A friend that brings good BBQ sauce is a good friend indeed!! The Bonz Kajun Kitchen in Elliott Stables makes great locally made BBQ sauce that they bottle and sell, but you have to ask nicely for a vegetarian version, because he will normally put pig fat drippings in his sauce otherwise.

The thing that makes BBQ sauce so good is the combination of smokey, savoury, spicy, and sweet all perfectly balanced for optimal enjoyment.  When slow cooked with these beans, it makes a great side dish or can easily be turned into a main, like I did, by spooning the beans over a baked potato and adding a bit of spring onion/green onion and cheese.  A Kiwi favorite is baked beans on toast, and this recipe can be be used to make a great version of that dish as well. Add a fried egg on top, and you got a yummy savoury breakfast!!

If you do not have access to a good BBQ sauce, you can easily make your own with the recipe included below.

Slow Cooked Barbecue Baked Beans

MAKES: 8, 1 cup servings

INGREDIENTS

  • 1 sweet onion, diced
  •  1.7 kilograms or 60 ounces cooked Cannellini beans, drained and rinsed
  • 1 1/4 cup barbecue sauce (recipe below)
  • 1/2 cup unrefined sweetener, (choices of unrefined sweeteners: Madhava Coconut Sugar, honey, molasses, pure maple syrup, sucanat, sorghum)
  • 2 tablespoons yellow mustard
  • 1/2 teaspoon cayenne pepper
  • 1/2 teaspoon freshly ground black pepper
  • Sea salt to taste

for BBQ Sauce:

  • 1 tablespoon vegetable oil
  • 1 sweet onion, finely diced
  • 1 clove garlic, minced
  • 1 – 230 gram or 8 ounce can tomato puree
  • 1/2 cup mild molasses or sorghum
  • 1/4 cup balsamic vinegar
  • 2 teaspoons Dijon mustard
  • 1/2 teaspoon cayenne pepper
  • 2 teaspoons chili powder
  • 1/4 teaspoon black pepper
  • Sea Salt to taste

Add all ingredients for the BBQ beans  into the slow-cooker.  For the unrefined sweetener, I used a combination of golden syrup and molasses, but any of the other options will do).  Cover, turn to low and cook 6-8 hours.

It is as simple at that!!

To make your own Barbecue Sauce:

In a medium sauce pan add canola oil, turn to medium-low heat and saute onion and garlic until tender, about 5 minutes. Add the remaining barbecue sauce ingredients, stir and simmer until sauce has thickened, about 30 minutes. Viola!!

ENJOY!!

Standard
100 Days Project, Dairy Free, Gluten Free, Recipes, Salads, Vegan

Day 43 – Crispy Spiced Cauliflower Salad with Herbed Dressing

Day43

So this recipe is not a single new recipe, but kinda a combination of two cauliflower recipes I have been holding onto.

I realized I had never made either recipe because each, on its own, seemed a bit too simplistic and bland, but if I combined elements of both recipes together, I thought it could work quite well. The result was certainly worth the experimentation.  One recipe was from Healthy Food and the other one from Treehugger.

Normally, I would use dry chickpeas for a recipe, and soak them over night. Since I was not necessarily planning on making this recipe, I had to use my “emergency ” can of chickpeas that I keep in the pantry, but that is what it is there for.  For most beans I prefer to use the dry version, as it less expensive and usually tastes better (not having been stored in that preservative thick liquid in cans). But sometimes you are making a last minute meal and those emergency cans can be quite handy.

The greens of this salad are Silverbeet, otherwise known as Swiss Chard. This leafy vegetable has been bred to have highly nutritious leaves at the expense of the root, and is subsequently considered to be one of the healthiest vegetables available.

This recipe is another great use for that chickpea flour you may have bought at some point for one recipe, like my Day 42 Panelle post, and are now trying to figure out what to do with the rest.

Crispy Spiced Cauliflower Salad with Herbed Dressing

SERVES:4

INGREDIENTS

  • 1 medium cauliflower, about 1 kg
  • vegetable oil for frying
  • 3 tablespoon gram flour
  • 1/2 teaspoon smoked paprika
  • 1 teaspoon cumin
  • 400 grams cooked chickpeas, drained and rinsed
  • 4 cups chopped silver beet leaves (Swiss Chard), stalks discarded
  • 2 tablespoons olive oil
  • salt and pepper, to taste

for the dressing

  • Generous handful of parsley
  • 6 bushy sprigs of mint
  • Handful of basil
  • 2 cloves garlic, crushed
  • 2 tablespoons Dijon mustard
  • 2 tablespoons capers
  • 6 tablespoons olive oil
  • 2 tablespoons lemon juice
  • Salt and pepper to taste

Break the cauliflower into florets. Boil in salted water for a couple of minutes, and then drain thoroughly.

Blanch or microwave silver beet for 1-2 minutes until tender. Then combine cauliflower, chickpeas, silver beet and olive oil in a large bowl, and mix well. Season with salt and pepper.

Make the dressing before you fry the cauliflower, so that the cauliflower will still be warm when serving. Chop all the herbs quite finely, and then stir in the garlic, mustard and capers. Pour in the olive oil slowly, beating with a fork to make sure the oil combines with the other ingredients.  Stir in the lemon juice and season with salt and black pepper. Be generous with the seasoning, tasting as you go.

Get the vegetable oil hot in a deep pan (if you do not want to fry the cauliflower I imagine this would taste almost as good baked).

Toss the cauliflower with the gram flour, a little salt and pepper, cumin, and smoked paprika. When the cauliflower is coated, fry in the hot oil till crisp, a matter of three or four minutes or so. Drain with a paper towel before adding the cauliflower on top of the silverbeet.

Drizzle with the dressing, and serve warm with additional dressing on the side.

ENJOY!!


Standard
100 Days Project, Dairy Free, Gluten Free, Party Food, Recipes, Side Dish, Snacks, Vegan

Day 42 – Panelle

Day42Mmmm . . . Deep fried chickpea goodness . . .

A friend of mine posted this recipe, from the New York Times, on her Facebook page, and I knew I was going to have to try making it at some point. Panelle is a type of Sicilian street food that is very similar to polenta, which is made of corn meal. Instead, Panelle is made from chickpea flour (Gram flour), which means it has the added benefit for vegetarians of being high in protein. They make a tasty and interesting and healthier alternative to potato fries, and can be used in the same way for a quick, but filling, snack

These “chips” went extremely well with the left over Warm Chickpea & Artichoke Pâté from my Day 41 post of the 100 Days Project challege.

Panelle

from: The New York Times

INGREDIENTS

  • Vegetable or olive oil for greasing and frying
  • 1 cup chickpea flour
  • Salt and freshly ground black pepper
  • 2 tablespoons olive oil
  • 1 lemon, cut into wedges

Grease an 8-by-8 baking dish or a quarter sheet pan with some oil.

Bring 2 cups water to a boil in a small saucepan. Put the chickpea flour in a large bowl, and when the water comes to a boil, gradually add it to the chickpea flour, whisking constantly to prevent lumps. Scrape the mixture into the saucepan you used to boil the water, and sprinkle with salt and pepper.  Bring the chickpea flour mixture up to a boil, stir in 2 tablespoons of olive oil, and then reduce to a gentle simmer. Only continue cooking for about a minute.

Scoop the chickpea mixture onto the baking dish or sheet pan and spread it into an even layer. Let it cool, and cover loosely with parchment or plastic. Refrigerate for at least 30 minutes, or up to 24 hours.

Put at least 15mm or 1/4 inch oil in a large skillet over medium heat.  Cut the chickpea mixture into “French Fries”, about 3 inches long and blot any excess moisture with a paper towel. Working in batches, gently drop them into the hot oil. Cook, rotating them occasionally until they’re golden all over, 3 to 4 minutes. Drain fries on paper towels and immediately sprinkle with salt and lots of pepper. Serve hot, with lemon wedges.

Pour yourself a glass of wine and  . . .

ENJOY!!

Standard
100 Days Project, Dairy Free, Dips, Condiments and Dressings, Gluten Free (with Substitutions), Party Food, Recipes, Vegan

Day 41 – Warm Chickpea & Artichoke Pâté Toasted Baguette Sandwich

Day41

I thought this was just going to be a fancy hummus . . .

I found this recipe for Warm Artichoke and Chickpea Pâté  on the Huffington Post website and thought it would make a good filling for a wintertime sandwich. Much to my surprise and delight, the artichoke pureed with the chickpeas, along with the other spices and herbs, gave the pâté a texture and flavor very different from what I was suspecting. It turned out much creamier, and had a consistency similar to tuna fish salad (if I am remembering tuna fish correctly). In fact, I think this pâté would probably make a great vegetarian tuna melt alternative.

Artichokes are actually the bud of a large flower head before it comes into bloom; once the flower blooms, this bud becomes stingy, coarse, and barely edible. Both the ancient Greeks and Romans ate artichokes, and it is a popular ingredient in Mediterranean cooking. The heart of the artichoke is the softest, the best part to eat, and most often used, but often the outer leaves can be cooked and eaten as well.

For me the surprising ingredient for this recipe was the use of Chinese Five Spice Powder. This mixture of star anise, cloves, chinese cinnamon, sichuan pepper, and fennel seeds is not something I cook with often, and I was unsure how well the flavors would combine with the artichoke. In fact, both fennel and anise are flavors that I do not really like very much, but I figured when it comes to unknown spices,  it is always worth trying a recipe the first time how it is written and you can always change it up a bit later. I am glad I did, because the recipe works very well seasoned with these spices, and it would not normally been something I would have tried.

You can use  this recipe for the chickpea and artichoke pâté on its own, as a topping for crackers, or in a sandwich as I did.  It would be gluten free and vegan without the bread or the cheese I used, and these items can easily be swapped with gluten free or vegan substitutions .

Warm Chickpea & Artichoke Pâté Toasted Baguette Sandwich

adapted from: The Huffinton Post: TASTE

INGREDIENTS

  • 390 gram or 14-ounce cooked chickpeas
  • 200 gram or 7-ounce jar of artichokes packed in sunflower oil or olive oil
  • 1 teaspoon Chinese five spice powder
  • 2 cloves garlic, chopped
  • 3 tablespoons fresh coriander,chopped
  • 3 tablespoons olive oil
  • juice of 1 lemon
  • 1 French baguette , for serving
  • roasted red peppers, sliced for topping
  • parmesan cheese, shaved, for topping
  • lettuce, for topping

Preheat oven to 180 C or 350 F.

Drain the chickpeas and artichokes.

Roast the five spice in a hot, dry pan until fragrant.

Blend all the remaining ingredients to a fine purée. I found this easiest to do with my stick blender directly in an oven proof dish.

Transfer the mixture to an ovenproof dish, if you are not using a stick blender, and then bake for 10 minutes, or until heated through.

Cut a length of baguette to your desired size, and slice it open. Toast baguette in the oven while warming the pâté.

To build the sandwich: Place the lettuce and a thick layer of the warm pâté onto the toasted baguette,  and top with the sliced roasted red peppers and shaved parmesan cheese.

ENJOY!!

Standard
100 Days Project, Baking, Mains, pastry, Recipes

Day 40 – Puff Pastry Pockets

Day40

The right music always adds to the cooking experience . . .

I received in the mail today the new  Fleur Jack CD, who is a Kiwi singer/song writer and friend currently living in The States.  I stuck the CD in my computer, put it on repeat, and danced my way (wine glass in hand) through this recipe for Puff Pastry Pockets, originally from the Baking Makes Things Better blog.

This was the perfect simple recipe for the end of a work day, that used up many of the ingredients I had around the house. The recipe called for filling the puff pastry with feta, pesto, and sundried tomato, but I added spinach and spring onion/green onion into the mix. There are countless other variation you could do on this as well, to help clean out your refrigerator. I can imagine roast pumpkin, potato, kumara, red peppers, capers, carrot, mushrooms, onion, lentils or other beans, chickpeas, and other kinds of cheese all being great alternatives to the filling I chose.

Puff pastry is not something I have ever tried making myself, although it is on the bucket list. Making puff pastry from scratch is a time consuming delicate process that can very easily go wrong, and it is an ingredient readily available in the freezer section of most super markets. As a vegetarian you have to be careful though, as most pre-made versions use lard or other animal fats. In New Zealand, New Way brand puff pastry is the only one that is vegetarian friendly, and even has the New Zealand Vegetarian Society stamp of approval.

Puff Pastry Pockets

adapted from: Baking Makes Things Better

MAKES: 4 pockets

INGREDIENTS

  • 2 square sheets of pre-made puff pastry
  • 200g or 7 ounces feta cheese, crumbled
  • 2 tablespoons pesto
  • 4 large sundried tomatoes, chopped
  • 1 packed cup of baby spinach
  • 1 green onion/spring onion
  • 1 egg, lightly beaten
  • Black pepper for seasoning

Preheat the oven to 200 C of 400 F, use the fan bake setting if you have one.

Brush a baking sheet with olive oil.

Cut each of the pastry squares in half.

In a medium bowl mix together the feta, pesto, sun-dried tomato, spinach, green onion, plus a sprinkling of black pepper.

Divide the feta mixture between the four pieces of pastry, and hen fold over the pastry to encase the filling. Press down on the edges with a fork to seal the
filing in. They should look like giant ravioli.

Brush the tops with the egg then bake for 20 minutes until golden.

Serve, while warm, with a simple side salad, or these will also make a great lunch for the next day.

ENJOY!!

Standard
100 Days Project, Baking, Breads, Cakes, Desert, Recipes, Uncategorized

Day 39 – Peanut Butter Banana Bread

Day39

There is a Facebook group called Baking Our Blues Away, that has declared Monday July 15th , 2013 as an international day of baking goodwill.

The idea is simple . . .  “everyone is encouraged to take a moment and give someone they know or don’t know, be it a loved one, a work colleague or perhaps a stranger on the street, a bit of baked or handmade love.”  I have browning bananas in my fruit bowl just asking to be made into banana bread, and so in honor of this, today I am baking this Peanut Butter Banana Bread recipe, which I found on the Sweet Pea’s Kitchen blog but originally comes from Cooking Light magazine.

PicsI can not imagine a better combination than peanut butter and banana. Being an American, I grew up on peanut butter, but I know most Kiwis are brought up on and are more partial to Vegemite or Marmite (for the uninitiated they are very different things and you must have a preference for one or the other).  Sadly, When I moved to New Zealand could not find anything on the grocery store shelves that tasted remotely like I expected peanut butter to taste like. They were all too sweet and sugary with chemical artificial sweeteners, and you could not taste any real peanut in them. Thank goodness for Pics Peanut Butter!!! I only discovered this peanut butter, made in the Nelson region, after being here for over 2 years. It used to only be sold at the Nelson weekend markets, and I was visiting a friend who had moved down the line. Honestly for the last 4 years, Pics has been the only peanut butter I will buy, and until someone can convince me there is another acceptable alternative, I will continue to be forever grateful to Mr. Pic.

So even though it is no longer July 15th, try baking something to share with others. In my experience from this 100 Days Project, where I have been sharing most of what I have been making, it makes you feel good and brings a smile to someone else’s face.

Peanut Butter Banana Bread

adapted from: Sweet Pea’s Kitchen and Cooking Light

INGREDIENTS

For the Bread:

  • 1 1/2 cups mashed ripe banana
  • 1/3 cup plain yogurt
  • 1/3 cup peanut butter, creamy or crunchy depending on your preference
  • 3 tablespoons unsalted butter, melted
  • 2 large eggs
  • 1/2 cup granulated sugar
  • 1/2 cup packed brown sugar
  • 1 1/2 cups all-purpose flour
  • 1/4 cup ground flaxseed or ground almonds
  • 3/4 teaspoon baking soda
  • 1/2 teaspoon salt
  • 1/2 teaspoon ground cinnamon
  • 1/8 teaspoon ground allspice
  • 2 tablespoons chopped dry-roasted peanuts

For the Peanut Butter Glaze:

  • 1/3 cup powdered sugar
  • 1 tablespoon milk
  • 1 tablespoon creamy peanut butter

Preheat oven to 180 C or 350 F.
Grease bottom and sides of a loaf pan and dust with flour.

In a large bowl , beat together the bananas, yogurt, peanut butter, butter and eggs at medium speed until combined. Add sugars and beat until blended.

In a small bowl, whisk together flour, flaxseed/ground almond, baking soda, salt, cinnamon and allspice. Add the dry ingredients to banana mixture; beat just until blended. Stir in nuts, and then scrape batter into prepared loaf pan and smooth surface with a rubber spatula.

Bake until top is golden and toothpick inserted into center comes out clean, about 1 hour 15 minutes. Cool in pan 10 minutes, then transfer to wire rack and cool completely.

To make the peanut butter glaze: In a small bowl whisk together powdered sugar, milk and peanut butter until smooth. Drizzle glaze over bread. Make sure it is completely cool when you do this, or you will wind up with a runny mess, like I did on my first attempt.

ENJOY!!

Standard
100 Days Project, Gluten Free (with Substitutions), Party Food, Snacks

Day 38 – Crispy Potato & Parmesan Puffs

Day38

Continuing this weekend’s theme of finger-food, tapas, small plate type recipes . . . I present the Crispy Potato & Parmesan Puff.

This recipe, originally from the How Sweet It Is blog, caught my attention because they idea of potato and parmesan cheese combined together into a crispy bite sized treat was just too good to ignore. It was the perfect thing to make on a rainy sunday afternoon, and combined with the Feta & Pesto Stuffed Peppadew Peppers , the Dolmades, a glass of wine, and some bread, these little puffs make a great lunch or dinner to graze your way through while chatting with a friend or two.

The recipe makes about 70 puffs, but it is easy to halve. Honestly though, I do not think 70 of these puffs would be all that hard to get through.

This recipe would be easy to make gluten free by substituting the panko bread crumbs with a gluten free bread crumb alternative.

Crispy Potato & Parmesan Puffs

MAKES: 70 puffs

INGREDIENTS

  • 1 kg or 2 lbs of russet potatoes, peeled and cut into chunks
  • 2 tablespoons milk
  • 3 tablespoons unsalted butter
  • 1 teaspoon salt
  • 1/2 teaspoon pepper
  • 1 cup freshly grated parmesan cheese
  • 2 tablespoons minced green onions/spring onions
  • 2 eggs, lightly beaten
  • 1-2 cups seasoned panko bread crumbs

Add potatoes to a large pot of boiling water and cook until fork tender, about 20 minutes. Drain the potatoes and then mash them with salt, pepper, butter and milk. Then stir in parmesan and onions, then place the mixture in the fridge to cool for 15-20 minutes.

Preheat the oven to 200 C or 400 F. I would recommend using the fan bake setting, if you have one on your oven.

Remove potatoe mixture from the fridge and roll into golf ball sized balls. Dip each potato ball into the beaten egg, then cover in bread crumbs. Place them on a baking sheet about 20mm or 1-2 inches apart, and hit each with a quick spritz of olive oil or cooking spray.

Bake for 12-15 minutes, or until outside is crispy.

Serve them while still warm with a lemon garlic aioli, pesto or other dipping sauce.

ENJOY!!

Standard