100 Days Project, Dairy Free, Food, Gluten Free, Mains, Vegan

Day 11 – Roasted Garlic & Caramelized Vegetable Tostada

Day11

I had a friend staying with me from Wellington last night so I decided to make something a bit fancy . . .

Especially when that friend is following my Herbivore posts and after reading my Day 9 – World Gin Day French 75  post, he shows up on my doorstep with a bottle of very good gin. Houseguests that arrive with a bottle of good gin definitely deserve a special meal.

Being from the United States and growing up in South Florida, which has a large Latino population, Mexican food is one of my favorite types of food to make.  Although, this recipe I would consider more Modern Mexican, which brings up the question of what is actually the difference between Tex-Mex, traditional Mexican, and Modern Mexican food.

Tex-Mex originated with Tejanos, Texans of Mexican descent, as a mix of native Mexican and Spanish foods when Texas was part of New Spain and later Mexico. It became Americanized in the 20th century, when modern American processed foods (like yellow cheese), became cheap and readily available.  In the 1960s, Americanized Tex-Mex food became a popular cuisine, characterized by heavy use of shredded cheese, meat (particularly beef and pork), beans, shredded lettuce, fresh chopped tomatoes, big dallops of sour cream, the heavy handed use of chili, and wheat based tortillas. Dishes such as Texas-style chili con carne, chimichangas, burritos, nachos, and fajitas are all Tex-Mex inventions.

Alternatively, Mexican food is complex and uses subtle flavor combinations from native ingredients including tomatoes, squashes, beans, avocados, plantains, cocoa, cinnamon, vanilla, tropical fruits, and corn tortillas, as well as other forms of lime treated corn like atole, pozol, tamales, and sopes. Despite the introduction of wheat and rice to Mexico, the basic starch remains corn in almost all areas of the country.  Mexican food has a reputation for being spicy, but its seasoning can be better described as strong and flavorful; chili peppers being used for their flavors and not just their heat. Traditional Mexican food has a base of corn, beans, and chili using meat and dairy sparingly concentrating on the dishes other ingredients and flavors.

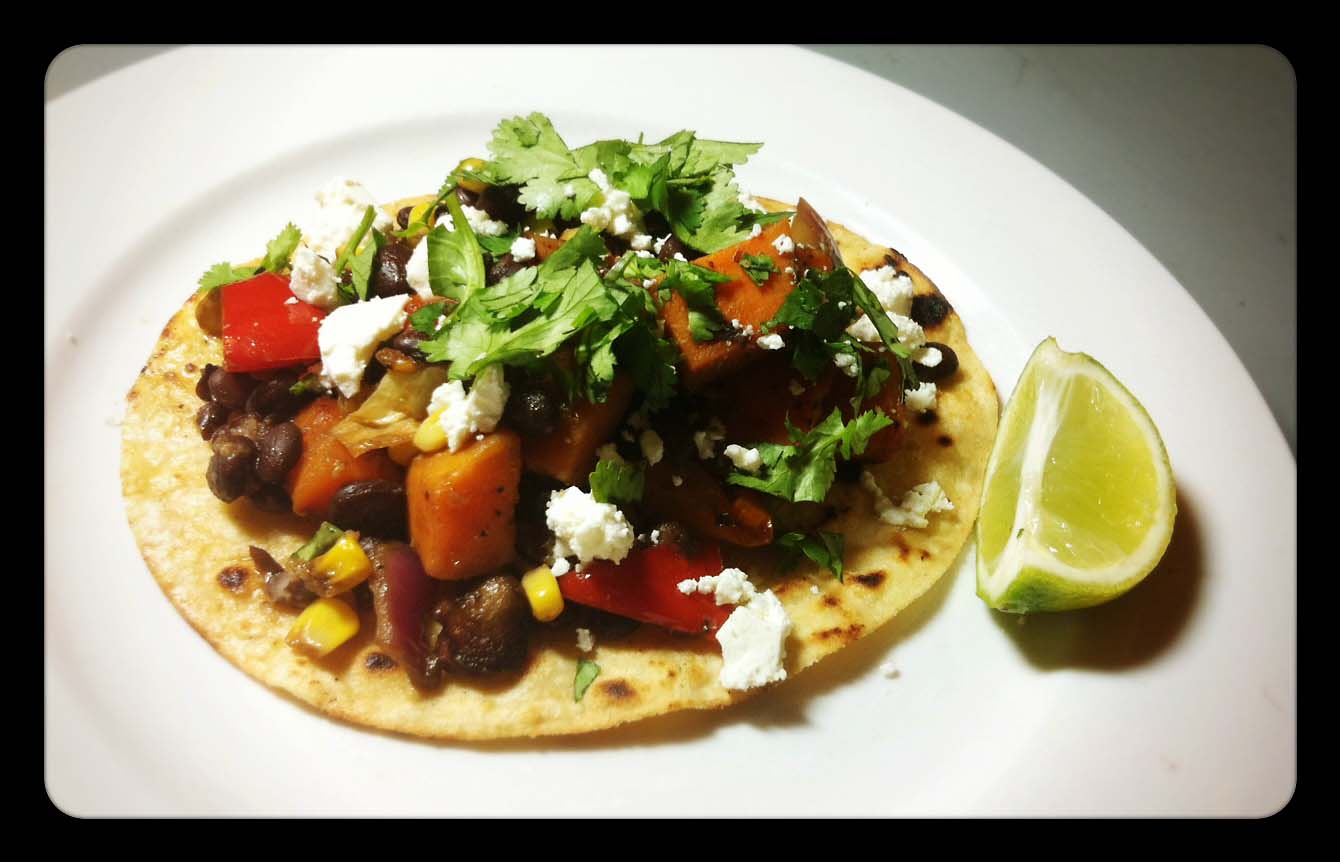
I consider this recipe for Roasted Garlic and Caramelized Vegetable Tostada to be Modern Mexican, as it combines ingredients and a type of dish that is traditional with popular contemporary western flavors like balsamic vinegar and roasted garlic. The original recipe from the How Sweet It Is blog, which typically focuses more on deserts and sweet treats than savory mains, calls for using shredded cheddar cheese and Greek yogurt or sour cream, but I chose to substitute the shredded cheese with cow’s milk feta (which is closer to traditional queso fresco) and leave off the Greek yogurt/sour cream, which I thought would drown out the more subtle flavors.

This recipe can easily be made dairy free and Vegan by leaving off the cheese.

Roasted Garlic & Caramelized Vegetable Tostada

adapted from: How Sweet It Is

MAKES: 4 tostadas

INGREDIENTS

  • 1 bulb of roasted garlic
  • 3 teaspoons olive oil
  • 1 small sweet potato, cubed
  • 1/2 red onion, chopped
  • 1/2 red pepper, chopped
  • 1/2 green pepper, chopped
  • 1 cup sliced mushrooms
  • 2/3 cup corn (if frozen, thaw and pat dry)
  • 1/4 teaspoon salt
  • 1/4 teaspoon pepper
  • 2 tablespoons balsamic vinegar
  • 2/3 cup black beans

for topping:

  • 1 avocado, chopped
  • 1/2 cup cow’s milk feta, crumbled
  • fresh cilantro/coriander
  • lime wedges

for base:

  • 4 corn tortillas
  • olive oil, for brushing

Preheat oven to 400 degrees F or 200 degrees C.

Line a baking sheet or grease the try with olive oil.

In a large bowl, combine sweet potatoes, peppers, onions, corn and mushrooms. Drizzle with 3 tablespoons of olive oil, then sprinkle with salt and pepper and toss to coat. Spread on a baking sheet and roast for 20 minutes. Toss vegetables with the balsamic vinegar, and roast for 15-20 minutes more until caramelized and sweet.

While veggies are roasting, heat a skillet over medium-high heat. Brush each tortilla (front and back) with olive oil, then place one at a time in the skillet until crisp and bubbly, being careful they don’t burn. Each tortilla should take about 5 minutes or so. Remove tortillas and place on a wire rack or plate to cool.

Return the balsamic roasted veggies back into the bowl, add in the black beans, and mix. Squeeze out the roasted garlic cloves and mix thoroughly into the vegetables.

Layer each tortilla with a big helping of the vegetables and garlic, then top with avocado,
cilantro/corriander, cheese and lime juice.

ENJOY!!

Standard
100 Days Project, Dips, Condiments and Dressings, Gluten Free, Party Food, Recipes, Vegan (with substitutions)

Day 10 – White Bean & Pea Shoot Crostini

Day10

Mmmmm . . . Crostini . . .

There is nothing quite like a piece of toasted chrunchy bread topped with an assortment of tasty ingredients. These little nibbles are perfect for a party, an appetiser/entree,  along side of a salad or bowl of soup, or even on their own with a beautiful glass Sauvignon Blanc or other tipple of your choice.

That being said, flavor wise, this probably has not been one of my favorite dishes I have made so far during the 100 Days Project. It tastes nice and full of spring flavors (like lemon and mint), but the inclusion of the raw pea shoots, which I enjoy in salads and sandwiches on their own, did not quite seem to work with the other ingredients.

Th original recipe called for Fava beans, which I could not find in New Zealand this time of year, so maybe the Cannellini Beans I used instead were lacking something to bring the flavors together.

But everyone is different, so if you like the sound of the recipe, give it a try . . . you never know, it could be your new favorite.

You can easily make it gluten free by using a different base for the toppings, and  make it dairy free by leaving off the cheese.

White Bean & Pea Shoot Crostini

adapted from: The Cozy Herbivore

PREP TIME: about 10 minutes
COOKING TIME: about 20 minutes
MAKES: about 24 crostini
INGREDIENTS:

for the bean spread:

  • 1 1/2 pounds or 1 1/4 cups cannellini beans
  • 2 tablespoons extra virgin olive oil
  • 2 ounces pea shoots, roughly chopped
  • 1 bunch or 1/2 cup loosely packed fresh mint, roughly chopped
  • 1 small bunch or 1/4 cup loosely packed fresh flat-leafed parsley, roughly chopped
  • the juice of 2 lemons (about 2 tablespoons)
  • sea salt and freshly cracked pepper, to taste
  • parmesan or manchego cheese, for garnish

for crostini:

  • 1  baguette, cut diagonally into 1/4″ slices
  • 1 clove garlic, roughly smashed
  • 1/4 cup extra virgin olive oil
  • a sprinkle of sea salt and a few cracks of the pepper mill

DIRECTIONS

Prepare the crostini:

Preheat oven to 350 degrees F or 180 degrees C. Lay baguette slices on a couple of baking sheets and rub smashed garlic clove on top of the bread. Lightly brush slices with olive oil and from, and sprinkle with sea salt and freshly cracked pepper.

Place in oven and bake until bread is uniformly a dark golden brown, checking often so the slices don’t burn.  This will take anywhere from 10-20 minutes. Remove slices as they brown and set aside. Crostini can be made up to two days ahead and stored at room temperature in an airtight container.

Prepare the bean spread:

Bring a large pot of salted water to a rolling boil. Add cannellini beans and boil till soft.  Drain and rinse
under cold water. Alternatively you can use a slow cooker to cook the beans, or you can use canned beans if you do not have dried beans around.

Place cooked beans, olive oil, pea shoots, 4. mint, parsley and lemon juice in the bowl of a food processor and pulse until a thick paste is created. (If mixture is super-chunky, drizzle a little more olive oil through the top of the food processor while it’s running until a
smooth consistency is reached.) Season to taste with sea salt & pepper.

The fava paste can be made up to a day ahead and stored in an airtight container in the fridge.

To assemble:

Spread 1 teaspoon of bean paste onto each crostini. Using a vegetable peeler, shave off long, thin slices of manchego or parmesan cheese to garnish.

ENJOY!!

Standard
100 Days Project, Drinks & Cocktails, Recipes

Day 9 – French 75

Day 9

Happy World Gin Day!!

So . . . for those of you who do not know June 15th is World Gin Day, which I figured was the perfect opportunity to use one of my cocktail recipes.

Originally used in the Middle Ages as a herbal medicine, Gin, which happens to be my favorite alcoholic spirit, is now a popular component of many classic and contemporary cocktails.  The main flavor of gin is derived from juniper berries, but the products will vary in origins, styles, and flavor profiles. You will find varieties that are more fruity like Tanqueray No. 10 ,which is distilled with grapefruit and other citrus, or more herbaceous, like Hendricks, which goes perfectly with tonic and cucumber garnish.

The French 75 is a simple classic gin cocktail made from gin, champagne, lemon, and sugar. The cocktail was created in 1915 at the New York Bar in Paris by barman Harry MacElhone, and was named French 75 after the French 75mm Field Gun, because it had such a kick that it felt like being shelled with the powerful gun.

This drink was first made for me by mixologist Tim Etherington-Judge of The Dash of Ginger Bitters cocktail blog. It quickly became a favorite, but one I had never gotten around to trying to make myself. Well . . . there has to be a first time for everything, and that is what my 100 Days Project is all about, so World Gin Day seemed the perfect opportunity to give this one a try.

French 75

INGREDIENTS

  • 2 ounces (1/4 cup) dry gin
  • 1 tablespoon fresh lemon juice
  • 2 teaspoons superfine sugar
  • Chilled champagne or other dry sparkling wine
  • Cracked ice
  • Garnish: lemon slice
  • Equipment: a cocktail shaker and strainer; a 16-ounce highball glass o champagne flute

Half fill the cocktail shaker with cracked ice, then add gin, lemon juice, and sugar. Shake the mixture vigorously, then strain it into a highball glass packed with cracked ice. Fill the glass slowly with champagne and give it a stir.

ENJOY!!

Standard
100 Days Project, Baking, Muffins, Recipes

Day 8 – Wholewheat & Millet Muffins

Day8

Today I realized with shock that I had not done any baking for you yet . . . so to celebrate making it through Week 1 of the 100 Days Project, I made these lovely Wholewheat and Millet Muffins.

The recipe comes from Heidi Swanson’s amazing cookbook Super Natural Everyday, that specializes in teaching people how to use veggies, grains, and pulses in ways that will get the most out of the ingredient’s nutritional value. Plus, all the recipes tend to be quite yummy.

Wholewheat flour is a robust, full-flavored flour containing vitamins, minerals and protein. Whole-grain whole wheat flour is more nutritious than refined white flour, and it is a good source of calcium, iron, fiber, and other minerals like selenium.

Millets are a group of small-seeded grasses, which are a major food source in arid and semiarid regions of the world and feature in the traditional cuisine of many others.  This grain is starchy, high in fiber, has a protein content comparable to wheat or maize (corn), is relatively rich in iron and phosphorus, and the bran layers of millets are a good source of B-complex vitamins, calcium, iron, potassium, magnesium, and zinc. Millets contain no gluten, so they can be eaten by those people who have celiac disease, and make an excellent substitute for oats in porridge.

These muffins came out full of rich hearty wholewheat flavor and make a great breakfast treat slathered in butter, or with the Mediterranean Carrot Relish from my Day 7 post.

Wholewheat & Millet Muffins

by: Heidi Swanson, Super Natural Everyday

MAKES: 12 Muffins

INGREDIENTS

  • 2 1/2 cups whole wheat pastry flour
  • 1/3 cup raw, hulled millet
  • 1 teaspoon baking powder
  • 1 teaspoon baking soda
  • 1/2 teaspoon fine grained sea salt
  • 1 cup plain yogurt (I used Greek style yogurt)
  • 2 large eggs, lightly beaten
  • 1/2 cup bare melted, unsalted butter
  • 1/2 cup honey
  • Grate zest and 2 tablespoons juice from 1 lemon

Preheat oven to 400 F /205 C, with a rack int he top third of the oven. Butter a standard 12-cup muffin pan or line with paper liners.

Whisk together flour, millet, baking powder, baking soda, and salt in a large bowl. In another bowl whisk together the yogurt, eggs, butter, honey, lemon zest, and lemon juice until smooth. Add the wet ingredients to the dry ingredients and stir until flour is just incorporated.  Divide the batter into the muffin cups filling each cup until just below the rim.

Bake for about 15 min, until muffin tops are brown and just beginning to crack. Let cool for 5 minutes in the pan, then turn the muffins out of the pan to cool completely on a wire rack.

ENJOY!!

Standard
100 Days Project, Dairy Free, Dips, Condiments and Dressings, Gluten Free, Recipes, Vegan

Day 7 – Mediterranean Spiced Carrot Relish

Day7

What do you all think about the new pop-up dining craze?

For those of you who may not know, pop-up dining is when a small restaurant appears in random and/or previously vacant space for a limited time, sometimes only one night.  Personally, I think it’s a great idea!! Serving a specialized menu or sometimes themed, pop-up restaurants offer patrons something different from what is normally locally available and helps turn going out to dinner into a social community event. Unfortunately, one of the draw backs of pop-up dining is that it is typically a set menu with limited vegetarian and vegan options.

I found this recipe on online from Pop-Up Dining Auckland. I have only recently found out about this group, but I am very excited to see that they not only are very creative with their events (the last one being Viking themed), but that often these events are Vegan. The next Vegan pop-up dining event, Vegan Latino, is on July 3rd, and tickets are on-sale now. Being American, I love Latino/Mexican food, and I am thinking I need to check out this yummy Vegan goodness myself. Here’s  hoping tickets will still be available when my next paycheck comes in. Anyone want to go with me?

Further endearing this group to me, they seem to openly post some their recipes on-line inviting and encouraging people to try to make the food they have tasted for themselves.  This recipe was one of the items they served during their recent Mediterranean Vegan pop-up dining event, held at Kokako. They called it Carrot Jam, but when I made the recipe, the consistency and texture is much more similar to what I would call a relish; hence the name change.

The flavors found in Mediterranean food are usually fresh and vibrant playing on the contrast between sweet and savory. This recipe for Mediterranean Spiced Carrot Relish certainly fits that description. Much of this recipe is based on your own personal tastes, and you have to work it it a bit to get the sweet savory balance right, but the results are well worth the effort. I am looking forward to eating this carrot relish with some feta and avocado on a cracker, or maybe as a topping for a falafel burger.

Mediterranean Spiced Carrot Relish

by: Pop-Up Dining Auckland

INGREDIENTS

  • 1 tablespoon mustard seeds
  • 1 tablespoon cumin seeds
  • 1 tablespoon olive oil
  • 5 carrots, grated
  • 1 onion, grated
  • orange juice, preferably fresh squeezed
  • orange zest
  • apple cider vinegar
  • brown sugar
  • salt

Take a tablespoon of mustard seeds and one of cumin seeds and fry in hot oil until it smells nice and the mustard seeds pop.

Add about 5 grated carrots and a grated onion and let it sweat over a med heat. Then add orange juice and zest, apple cider vinegar and brown sugar. Here you will need to judge and taste. A rough guide is about 1 part juice to 2 parts vinegar and then a cup of sugar. You need some liquid to show in the bottom of the pan and you may need to add more as it cooks.

Cover pan with a lid and cook for ages; it is jam after all. If it starts to dry out, add more juice and vinegar and suagr to counter the acidity. Add salt as well. Keep cooking and tasting. If its too vinegary for you, add more sugar, to sweet add more vinegar. You get the idea. It should end up rich and sticky. Leave it to cool, refrigerate and eat tomorrow.

ENJOY!!

Standard
100 Days Project, Dairy Free, Gluten Free, Recipes, Salads, Uncategorized, Vegan

Day 6 – Sweet Potato & Pistachio Quinoa Salad

Day6

I have a question for you Herbivores  . . . Do you have the problem of always making just way too much food?

This is certainly a problem in my kitchen; you would think a small army was coming to dinner. I am single, live with one flatmate who I rarely see, every once and awhile I will have a friend or two over for dinner, but typically there is more food made than can possibly be eaten.  Realistically, there are only so many days you can stand to eat the same left overs, and while freezing food is an option, my freezer is small and can only hold so much. Plus, not everything freezes well. One of the lovely things about this recipe is that it makes small portions. It serves two, so you have enough for dinner and lunch for the next day. That being said, it is also easibly scalable just in case that small army turns up unexpectedly, or you want to make a healthy meal for your family or friends.

Quinoa (pronounced keen-wah) is becoming a very popular grain in our modern society, but it has ancient origins dating back to Ican civilization. It was considered the “mother or all grains”, and today we call it a “super grain” as it is wheat-free, gluten-free, easy to digest, high in protein, and among the least allergenic foods available. It has been a staple of the indigenous diet in areas like Peru for centuries cultivated more for domestic use than international export. The only problem with Quinoa’s blossoming popularity in the western world is that it is putting pressure on the available crops causing the price to increase, making this staple food economically out of reach for some communities who have depended on it. This imbalance will hopefully be solved as more crops are currently being planted to keep up with both the domestic and international demand.

I can create amazingly complicated recipes, but the simplest of foods can sometimes be a challenge. Qunioa, like rice, can be difficult to cook properly, coming out gluggy when it should be soft and fluffy, or burning to the bottom of your pan if left too long. Just like rice, I have found you can cheat by making it in a rice cooker for perfect results every time. Shhh . . . this can be our little kitchen secret.

Sweet Potato & Pistachio Quinoa Salad

adapted from: Will Cook For Friends

SERVES: 2

INGREDIENTS

  • 1 sweet potato, peeled and cut into 20mm cubes (in New Zealand you can substitute a golden kumara for sweet potato)
  • 2-3 tabkespoons olive oil
  • 1 clove garlic, minced
  • 1/2 cup quinoa, rinsed (I used a mixture of red and white quinoa)
  • 1 cup vegetable stock or water
  • 1/2 teaspoon coriander seads
  • 1/2 teaspoon cumin powder
  • 1/4 cup fresh cilantro, chopped
  • 1/2 cup pistachios, roasted/salted/shelled, roughly chopped (plus more for garnish)
  • 500g of spinach, roughly chopped or baby spinach
  • Salt, pepper, and cayenne to taste

Preheat oven to 375f.

Toss cubed sweet potato or kumara with 1-2 tablespoons olive oil, and a large pinch of salt. Spread in an single layer on a foil covered baking sheet, and roast for 15-20 minutes, or until fork tender and brown. Shake or stir the pan once during cooking to stop tops from burning.
In a small pan over medium-high heat dry roast the coriander seeds until they start making a popping sound and release their fragrant aroma. Keep an eye on them, because they can very quickly got from brown to burnt. Grind the coriander seeds into coarse powder in an electric coffee mill, mortar and pestle, or with the bottom of a heavy glass.

In the same small pan, over medium heat, saute garlic in 1 tablespoon olive oil until golden and fragrant.

Rinse the quinoa under cold water, drain, then add to the pan. Add the vegetable broth, coriander, and cumin, and bring to a boil. Cover, reduce the heat to low, and let cook 12-15 minutes without lifting the lid. Remove from heat, and let stand for another 5 minutes. Alternatively, you can add all of these ingredients to a insert of a rice cooker and let it simmer away till done. Remove the lid or your pan or rice cooker, and fluff quinoa with a fork.

Gently stir in chopped cilantro, pistachios, and the sweet potato. Season to taste with salt, pepper, and cayenne.

Place a good size handful of the chopped spinach on a plate and top with the quinoa mixture.

ENJOY!!

Standard
100 Days Project, Dairy Free, Gluten Free, Mains, Recipes, Vegan

Day 5 – Indian Curried Chickpeas with Fresh Ginger and Coriander

Day5

WOW . . . this dish packs quite a lot of flavor and spice. I like spicy food, and I had to keep my yogurt nearby.

book3Although the best part about this recipe is that it is made in a slow cooker. Slow cookers are one of my favorite pieces of kitchen equipment (that and my immersion/stick blender; both of which are used in this recipe). There is nothing better than coming home after a long day of work to a warm meal  that has been slowly bubbling away for hours cooking down and gaining flavor. Usually, most recipe books for slow cookers are very meat-centric, so usually I just make up my own concoctions, but it is always nice to get inspiration from somewhere. A couple years ago a friend gave me The Gourmet Vegetarian Slow Cooker  cook book as a birthday present. This is literally one of the best birthday presents I have ever received!! The book is organized by country and it has so many amazing recipes for ways to use a slow cooker that I have never imagined.

Chickpeas or Chana are commonly found in Indian cooking, especially vegetarian Indian cooking. With this recipe there is still a bit of work to be done at the end; the spices and fresh ingredients are added last after the chickpeas have been simmering all day to preserve the flavor and the freshness of these elements. As I mentioned earlier this recipe is SPICY!! You can adjust it for your own spice tolerance by varying the amount of cayenne pepper used.

Indian Curried Chickpeas with Fresh Ginger and Coriander

INGREDIENTS

  • 2 cups dried chickpeas
  • 6 cups water
  • 1 red onion, finely chopped
  • 1/4 cup sesame or vegetable oil
  • 1 tablespoon cumin seeds
  • 1/4 teaspoon black peppercorns
  • 4 whole cloves
  • 4 green cardamon pods
  • 1 1/2 teaspoons pure chili powder
  • 30 mm  piece fresh ginger, peeled and minced
  • 1/2 teaspoon ground tumeric
  • 1 teaspoon garam masala
  • 1/2 teaspoon cayenne pepper (optional, or vary for your spice tolerance)
  • Salt to taste
  • Juice of 1 lemon
  • Yogurt for serving
  • 3 fresh serrano (or NZ green) chiles, seeded, deveined, and cut into julienne, for garnish
  • rough chopped coriander, for garnish

Thoroughly rinse the chickpeas and place them in the slow cooker insert along with the water. Cover and cook on low for 6 to 8 hrs (pretty much while you are at work), until the chickpeas are tender.

In a large saute pan, brown the onion in the sesame oil until dark brown in colour, about 10 -15 min.

spicesNow the fun part . . . combine the cumin seeds, peppercorns, cloves, cardamom, chile powder, ginger, turmeric, garam masala, and cayenne in an electric coffee mill or mortar and pestle and grind to a coarse powder/paste. If you do not have either an electric coffee mill or mortar and pestle then put spices into a heavy bowl and use the bottom of a glass  or jar to grind the spices down. I love the look and smell of all these beautiful spices combining together.

Add the coarsely ground spices to the onion and continue to cook for another 5 minutes, then add the onion and spices to the cooked chickpeas. Recover and continue cooking for another 30 – 60 minutes.

Using an immersion/stick blender, puree some of the chickpeas in the insert, and mix through to thicken the mixture.

Add salt to taste, then stir in the lemon juice. Ladle into bowls, add a dallop of yogurt, and garnish with chile slices and fresh coriander.

ENJOY!!

Standard
Dairy Free, Gluten Free, Raw, Recipes, Salads, Side Dish, Vegan

Simple Raw Veggie Salad with Dill Dressing

dill dressing

This side salad is perfect for when you need something fresh and lite to go with you main meal.  I made it to go with the Creamy Leek and Brussels Sprout Soup in my Day 4 post, and the the crisp sweetness of the raw vegetables and fragrant dill nicely balance the creaminess and subtle spice of the soup.

I used cucumber, red capsicum, yellow capsicum, and avocado, but realistically that was just because those were the vegetables in my fridge. You can use any combination of vegetables you feel will go well together. Besides anything topped with this Dill Dressing will taste brilliant.

This does not take long at all to throw together, and can vary infinitely. You can also substitute other fresh herbs for the dill to make different types of dressing.

Simple Raw Salad with Dill Dressing

INGREDIENTS

for the salad

  • any assortment of raw vegetables (I used cucumber, red capsicum, yellow capsicum, and avocado)

for the dressing

  • 1 tablespoon white wine vinegar (if you do not have white wine vinegar, you can use 1 tablespoon white vinegar with 1/2 teaspoon sugar)
  • 1/4 teaspoon salt
  • 2 tablespoons minced fresh dill, or other fresh herb (you can also use dried herbs but it does not taste quite as nice)
  • 1/2 tablespoon Dijon mustard
  • 1/2 teaspoon minced shallot (you can substitute minced garlic if you do not happen to have a shallot around)
  • 1/4 cup extra-virgin olive oil

Place all the salad ingredients in a large bowl and set aside.

In a small bowl, whisk together the vinegar and salt until the salt dissolves. Add dill, mustard and shallot and whisk to combine. Slowly drizzle in olive oil, whisking constantly, until dressing is smooth and emulsified.  You can also use an immersion/stick blender to emulsify the dressing, which will take less time. Place all ingredients into the tall plastic cup that comes with most immersion/stick blenders, and whizz until dressing takes on a creamy white look. Pour dressing over salad and toss until all ingredients are evenly coated.

Additional Notes

Salad will keep, dressed and refrigerated, for up to 6 hours. For longer storage, keep chopped and assembled salad ingredients covered in the refrigerator up to 1 day ahead and toss with dressing just before serving.

ENJOY!!


Standard
100 Days Project, Gluten Free, Recipes, Soups

Day 4 – Creamy Leek & Brussels Sprout Soup

Day4

WINTER IS COMING . . .

Yes, I am a Game of Thrones fan, and I am so gutted that after last night’s season finale that I have to wait to next April for another episode of this amazing show.  Besides that, it is getting colder here in New Zealand, and for me that means SOUP!!

I love soup . . . in all flavors and forms. Realistically I think I could eat soup every day and be happy. Some of you might be wondering “Why Brussels Sprouts?” . . . and to that, my answer is “Why Not Brussels Sprouts?”. These little veggies have gotten such a bad reputation from generations of housewives cooking all the flavor and texture out of them, and then serving them up to their poor families for dinner.

Brussels sprouts are a cultivar of the same species that includes cabbage, collard greens, broccoli, kale, and kohlrabi. They contain good amounts of vitamin A, vitamin C, folic acid and dietary fiber. Plus, they are believed to protect against colon cancer. These little mini cabbages have a lovely slightly spicey flavor that when cooked correctly can be a beautiful addition to any dish.

book2This recipe is adapted from the Great Tastes Vegetarian cook book, which was originally given to me as a present and it is filled with simple yet flavorful dishes that realistically are easy and quick to make. It took less than an hour (including prep time) to cook this soup, bake Lemon Pepper Bread, and make a quick Simple Raw Vegetable Salad with Dill Dressing as my dinner.

Creamy Leek and Brussels Sprout Soup

INGREDIENTS

  • 1 T olive oil
  • 2 garlic cloves, chopped
  • 2 large leeks, white part only, sliced
  • 300g brussel sprouts, roughly chopped
  • 750 mil (3 cups) vegetable stock
  • 185ml (3/4 cup) heavy cream or milk

Heat the oil in a large sauce pan  over a medium high heat. Add the garlic and leek, cover and fry, stirring often, for 5 minutes.

Add brussels  sprouts, stir to combine, cover and cook, stirring often, for 5 minutes.

Add the stock and season with salt and freshly ground black pepper. Bring back to the boil, then reduce the heat, couver the pot and simmer for 10 minutes, or until vegetables are very tender. Set aside to cool for 10 minutes.

Using an immersion blender/stick blender fitted with the chopping blade, blend soup for 25-30 seconds, or until nicely pureed into a thick consistency. Stir through the cream or milk, and gently reheat soup if necessary.

Sprinkle chopped chives, green onion on top for a pop of bright colour and fresh flavor.

ENJOY!!

Standard
100 Days Project, Desert, Gluten Free, Recipes, Vegan (with substitutions)

Day 3 – When All Else Fails . . . Make Snickers Truffles

Photo1(17)

So . . . do you remember from my Day 2 post that I had a lot trouble getting the Snickers Bars out of my glass baking dish?

This left me with a rather large amount of broken bits, pieces, chunks that were falling part, and gooey caramel.  Probably close to half the dish wound up being unusable. I hate wasting food; I REALLY hate wasting food . . . especially something that I had put so much time and effort into making. Now those of you that know me, know I am a bit of an insomniac especially when I have something on my mind. I lay awake last night thinking about what, if anything, I could do with this rather yummy mess, and then it came to me  . . . TRUFFLES!!

Day3_3I am not talking about the mushroom kind; I am talking about the yummy, soft, chocolatey little round balls of goodness. I have never made any sort of truffle before, but figured it was worth trying to turn this chocolate, caramel, peanut, nougat mess into some sort of Snickers Truffles. Using my food processor attachment of my stick blender I pulsed the mixture until the larger bits looked broken down but still chunky (I did not want to completely blend it all together as I hoped the different textures of the original Snickers bar layers would still come through). I wet my hands slightly with cold water and rolled a small ping pong ball sized portion of the mixture into as round a shape as I could make it. The caramel was sticky enough that it held everything together, but in the current state they did not look too appetising. There will still some roasted, salted peanuts left from making the Snickers bars the day before. So I quickly pulsed those in the blender into a coarse grind, and then rolled the caramel ball in the peanuts to give it a textured, more appealing finish. VIOLA!!! . . . the Snickers Truffle was born!!

This just goes to show, that when things do not go quite according to plan in the kitchen, do not get upset or feel like you have failed . . . GET CREATIVE!!

I realize this is not officially a new recipe, because the recipe for these truffles would be the same as the for the Snickers Bars, but it is making something I have never made before, so I think it still counts.

Now all that is left to do is to see which people like more . . . the Snickers Bar or the Snickers Truffle.

ENJOY!!

Standard